еңЁUnix-LikeеҢ…жӢ¬LinuxзӯүдҪңдёҡеә•дёӢзҡ„еӣҫеҪўз•ҢйқўйҖҡеёёиў«жҲ‘们з®Җз§°дёәX-Windowе•°пјҢиҝҷдёӘX-WindowжҖҺд№ҲжқҘзҡ„пјҹд»–зӣ®еүҚзҡ„зүҲжң¬жҳҜжҖҺж ·пјҹиҝҳжңүпјҢX-Windowдё»иҰҒжҳҜдё»д»Һжһ¶жһ„зҡ„(Server, Client)пјҢйӮЈд№Ҳиҝҷдәӣдё»д»Һжһ¶жһ„жҳҜжҖҺд№ҲеӣһдәӢе‘ўпјҹжҲ‘们еә•дёӢе°ұжқҘи°ҲдёҖи°ҲиҝҷдәӣдёңиҘҝеҗ§пјҒ
- XFree86 зҡ„еҺҶеҸІжј”иҝӣдёҺзүҲжң¬
еҹәжң¬дёҠпјҢX-Windowзҡ„ж ёеҝғе°ұжҳҜ XFree86 иҝҷдёӘзҺ©ж„Ҹе„ҝе•°пјҢд»–жҖҺд№ҲжқҘзҡ„е‘ўпјҹеңЁж—©жңҹзҡ„Unixдё–з•ҢдёӯпјҢ并没жңүжүҖи°“зҡ„еӣҫеҪўз•ҢйқўпјҢжүҖд»ҘеңЁдёҖдәӣеӣҫеҪўеұ•зӨәдёҠйқўжңүзӮ№еӣ°жү°е°ұжҳҜдәҶпјҢеҗҺжқҘз»ҸиҝҮйә»зңҒзҗҶе·ҘеӯҰйҷў(MIT)зҡ„еҸ‘еұ•пјҢз»ҲдәҺеңЁ 1986 е№ҙејҖеҸ‘еҮәеңЁ Unix зі»з»ҹдёҠйқўзҡ„ X Window SystemпјҒ并且组з»ҮдәҶ XFree86 иҝҷдёӘи®ЎеҲ’з»„з»ҮжқҘеҸ‘еұ•иҝҷдёӘеӣҫеҪўжҺҘеҸЈпјҒд»ҺжӯӨд№ӢеҗҺпјҢдәә们жүҚеҸҜд»ҘеңЁ Unix ж“ҚдҪңзі»з»ҹдёӯзңӢеҲ°иҝҷдёӘзҫҺзҫҺзҡ„еӣҫеҪўеҢ–жҺҘеҸЈ(Graphical User Interface, з®Җз§°GUI)е‘ўпјҒйӮЈд№ҲиҝҷдёӘ XFree86 з»„з»Ү继з»ӯеҸ‘еұ•иҝҷдёӘжҺҘеҸЈпјҢеҲ°дәҶ 1987 е№ҙйҮҠеҮә第дёҖзүҲзҡ„X11зүҲжң¬пјҢиҖҢеҗҺйҷҶз»ӯеҸ‘еұ•еҮәжӣҙж–°зҡ„зүҲжң¬пјҢеңЁз¬¬дәҢзүҲйҮҠеҮәиў«з§°дёәX11R2пјҢзӣ®еүҚзҡ„зүҲжң¬еҲҷжҳҜ第е…ӯж¬ЎйҮҠеҮәпјҢз§°дёәX11R6е•°пјҒиҖҢзӣ®еүҚзҡ„X11R6зүҲжң¬дёӯпјҢдё»иҰҒдҫқз…§ж–°ж—§еҸҲиў«еҲҶдёәиҫғж—§зҡ„第дёүзүҲ(version 3)пјҢд»ҘеҸҠиҫғж–°зҡ„第еӣӣзүҲ(version 4)гҖӮ(жіЁпјҡ XFree86 зҡ„е‘ҪеҗҚеҹәжң¬дёҠдёә X зі»з»ҹ + Free иҪҜ件 + x86 зі»з»ҹжһ¶жһ„ зҡ„з®ҖеҶҷе•°пјҒ)
гҖҖ
йӮЈд№ҲеңЁ Linux й’ҲеҜ№ XFree86 зҡ„дҪҝз”ЁдёҠйқўжғ…еҶөжҳҜжҖҺж ·е‘ўпјҢе‘өе‘өпјҢеңЁ 1994 е№ҙ第дёҖдёӘ Linux kernel 1.0 зҡ„зүҲжң¬еҪ“дёӯпјҢе°ұе·Із»Ҹж”ҜжҢҒ XFree86 е•°пјҒиҮідәҺзӣ®еүҚеңЁ 2002 е№ҙд№ӢеҗҺеҮәзүҲзҡ„ Linux distribution йҖҡеёёйғҪе·Із»ҸжҚўдёәдәҶversion 4дәҶпјҢдҫӢеҰӮ Mandrake 9.0 еҸҠRed Hat 7.2д»ҘеҗҺзүҲжң¬пјҢиҝҷдёҖзүҲж”ҜжҢҒзҡ„жҳҫзӨәеҚЎй©ұеҠЁзЁӢеәҸиҫғеӨҡпјҢиҖҢдё”д№ҹиҫғж–°е•ҰпјҒдёҚиҝҮпјҢеңЁ 2001 е№ҙд»ҘеүҚзҡ„LinuxзүҲжң¬еҲҷдё»иҰҒиҝҳжҳҜд»Ҙ version 3 дёәдё»е‘ўпјҒ
гҖҖ
- X server, X client дёҺ Window manager
еӨ§жҰӮдәҶи§ЈдёҖдёӢX-Windowзҡ„еҺҶеҸІдёҺзүҲжң¬д№ӢеҗҺпјҢжҺҘзқҖдёӢжқҘжҲ‘们иҰҒжқҘи°ҲдёҖи°ҲпјҢйӮЈд№Ҳд»Җд№ҲжҳҜX server, X clientиҝҷдәӣдёӘдёңиҘҝпјҢжҖҺд№ҲдёҖдёӘX-Windowжңүиҝҷд№ҲеӨҡзҡ„еҘҮжҖӘзҡ„жҺҘеҸЈпјҢд»Җд№ҲKDEе•ҰиҝҳжңүGNOMEе•Ұзӯүзӯүзҡ„пјҒ
гҖҖгҖҖ
- X serverпјҡ
еҹәжң¬дёҠпјҢXFree86зҡ„дё»иҰҒеҠҹиғҪжҳҜд»Җд№Ҳе‘ўпјҹе—ҜпјҒйӮЈе°ұжҳҜз®ЎзҗҶж•ҙдёӘLinuxдё»жңәдёҠйқўзҡ„е…ідәҺжҳҫзӨәзҡ„硬件й…ҚеӨҮе•ҰпјҒдҫӢеҰӮжҳҫзӨәеҚЎгҖҒеұҸ幕еҲҶиҫЁзҺҮгҖҒй”®зӣҳеҪўејҸгҖҒ йј ж ҮеҪўејҸзӯүзӯүпјҢе’ҰпјҒйӮЈжҲ‘们еңЁе®үиЈ…Linuxзҡ„ж—¶еҖҷпјҢдёҚжҳҜйғҪе·Із»ҸеҸҜд»Ҙе°ҶиҝҷдәӣдҝЎжҒҜи®ҫе®ҡеҘҪдәҶеҗ—пјҹиҝҷйҮҢеҝ…йЎ»иҜҙжҳҺзҡ„жҳҜпјҢX-WindowеңЁLinuxйҮҢйқўеҸӘжҳҜгҖҺдёҖдёӘ иҪҜ件гҖҸиҖҢе·ІпјҢжүҖд»ҘпјҢдҪ еңЁе®үиЈ…Linuxзҡ„ж—¶еҖҷпјҢйҖүжӢ©зҡ„й”®зӣҳд№ҹеҘҪпјҢйј ж ҮеҪўејҸд№ҹеҘҪпјҢйғҪжҳҜз»ҷLinuxиҝҷдёӘзі»з»ҹз”Ёзҡ„пјҢи·ҹX-WindowеҸҜжІЎжңүз»қеҜ№зҡ„е…ізі»е‘ўпјҒжүҖ д»Ҙиҝҷд№ҹе°ұиҜҙжҳҺе•ҰпјҢдҪ зҡ„X-WindowиҰҒеңЁLinuxдёҠйқўеҗҜеҠЁж—¶пјҢиҝҳйңҖиҰҒеҠ иҪҪX-WindowйңҖиҰҒзҡ„й©ұеҠЁзЁӢеәҸжүҚиЎҢпјҒжүҖд»Ҙе‘ўпјҢеҪ“дҪ д»Ҙrun-level 3иҝӣе…ҘLinuxд№ӢеҗҺпјҢеҹәжң¬дёҠпјҢX-WindowжҳҜе®Ңе…ЁдёҚеӯҳеңЁдҪ зҡ„зі»з»ҹзҡ„еҶ…еӯҳдёӯпјҢиҖҢеҪ“дҪ иҫ“е…Ҙstartxд»ҘеҗҜеҠЁX-Windowзі»з»ҹж—¶пјҢиҝҷдёӘж—¶еҖҷ LinuxжүҚдјҡејҖе§ӢиҜ»е…ҘX-Windowзҡ„й©ұеҠЁзЁӢеәҸ(еӨ§жҰӮе°ұжҳҜжҳҫзӨәеҚЎй©ұеҠЁзЁӢеәҸгҖҒеұҸ幕еҲҶиҫЁзҺҮи°ғж•ҙзӯүзӯүзҡ„и®ҫе®ҡеҖј)гҖӮжүҖд»ҘпјҢиҜ·жіЁж„Ҹе•ҰпјҢиҝҷдёӘX serverе°ұжҳҜз”ЁжқҘз®ЎзҗҶLinuxдё»иҰҒе…ідәҺжҳҫзӨәзҡ„дёҖдәӣ硬件дёҺй©ұеҠЁзЁӢеәҸе•°пјҒгҖҖ
- X clientпјҡ
еӨ§з•ҘзҹҘйҒ“дәҶX serverд№ӢеҗҺпјҢеҶҚжқҘжҲ‘们иҰҒзңӢдёҖзңӢпјҢйӮЈд№Ҳд»Җд№ҲжҳҜX clientе‘ўпјҹеҸҲжІЎжңүзҪ‘з»ңиҒ”жңәпјҢжҖҺд№ҲдјҡжңүclientиҝҷдёӘеҗҚиҜҚпјҹе…¶е®һпјҢX serverдё»иҰҒзҡ„еҠҹиғҪеҸӘжҳҜеңЁз®ЎзҗҶжҳҫзӨәзҡ„й©ұеҠЁзЁӢеәҸдёҺ硬件пјҢдҪҶжҳҜеңЁж•ҙдёӘеұҸ幕еүҚйқўжҳҫзӨәз»ҷдҪҝз”ЁиҖ…пјҢ并且з»Ҹз”ұдҪҝз”ЁиҖ…移еҠЁйј ж Үд№ҹеҘҪгҖҒй”®зӣҳд№ҹеҘҪпјҢжқҘеҗҜеҠЁдёҖдәӣгҖҺдәӢ件гҖҸзҡ„еҠЁдҪңпјҢд»Ҙе“Қеә”з»ҷX serverпјҢ并иҝӣдёҖжӯҘеӨ„зҗҶдёҖдәӣдҝЎжҒҜпјҢеҲҷжҳҜйңҖиҰҒдёҖдәӣXзҡ„иҪҜ件жқҘиҝӣиЎҢпјҢиҝҷдәӣе…ідәҺXзҡ„иҪҜ件пјҢжҲ‘们е°ұеҸҜд»Ҙз§°дёәжҳҜX clientе•°пјҒеҸҚжӯЈпјҢеҸӘиҰҒжҳҜе…ідәҺдёҖдәӣзӘ—еҸЈзҡ„иЎҢдёәгҖҒжҳҫзӨәеңЁеұҸ幕зҡ„иЎҢдёәзӯүзӯүпјҢдҪҝз”ЁиҖ…йғҪжҳҜйҖҸиҝҮX clientжқҘе‘ҠиҜүX serverзҡ„е•ҰпјҒйӮЈд№ҹе°ұжҳҜиҜҙпјҢгҖҺеҪ“X serverжӯ»жҺүзҡ„ж—¶еҖҷпјҢX clientж №жң¬е°ұж— жі•еҠЁдҪңпјҒгҖҸжҖҺд№ҲиҜҙе‘ўпјҹеӣ дёәз®ЎзҗҶ硬件зҡ„X serverйғҪдёҚеҠЁдәҶпјҢеҲ©з”ЁиҝҷдёӘserverжқҘиҝӣиЎҢжҳҫзӨәдёҺдәӢ件и§ҰеҸ‘зҡ„X clientиҰҒжҖҺд№Ҳжҙ»дёӢеҺ»пјҹдәҶи§ЈдәҶеҗ—пјҹгҖҖ
- Window managerпјҡ
йӮЈд№Ҳд»Җд№ҲеҸҲжҳҜгҖҺзӘ—еҸЈз®ЎзҗҶе‘ҳпјҹгҖҸиҜҙз©ҝдәҶпјҢе…¶е®һзӘ—еҸЈз®ЎзҗҶе‘ҳдҪ д№ҹеҸҜд»Ҙз®ҖеҚ•зҡ„е°Ҷд»–зңӢеҒҡжҳҜдёҖдёӘX clientе•ҰпјҒиҝҷдёӘWindow managerдё»иҰҒжҳҜеҒҡдёәдҪ и·ҹж•ҙдёӘX Windowзі»з»ҹзҡ„жҺҘеҸЈпјҢжүҖд»ҘпјҢжүҖжңүзҡ„XиҪҜ件(е°ұжҳҜдёҠйқўи®ІеҲ°зҡ„X client)йғҪжҳҜд»–з®Ўзҡ„пјҒзӣ®еүҚжңҖзғӯй—Ёзҡ„дёӨдёӘзӘ—еҸЈз®ЎзҗҶе‘ҳе°ұжҳҜKDEдёҺGNOMEе•°пјҒ
еҰӮжһңжҲ‘们д»ҘKDEжқҘдҪңиҜҙжҳҺпјҢйӮЈд№ҲжӮЁеә”иҜҘдёҚйҡҫдәҶи§ЈпјҢдё»иҰҒзҡ„硬件й©ұеҠЁиҝҳжҳҜеҫ—иҰҒX Windowзҡ„ж ёеҝғпјҢд№ҹе°ұжҳҜXFree86иҝҷдёӘе’ҡе’ҡжІЎжңүй—®йўҳзҡ„й©ұеҠЁд№ӢеҗҺпјҢ然еҗҺжҲ‘们жүҚиғҪиҝӣе…ҘKDEиҝҷдёӘзӘ—еҸЈз®ЎзҗҶе‘ҳзҡ„жҺҘеҸЈд№ӢдёӢиҝӣиЎҢзҫҺзҫҺзҡ„еӣҫеҪўжҺҘеҸЈзҺҜеўғе·ҘдҪңпјҒдёҮдёҖе“ӘдёҖеӨ©жӮЁзҡ„X-Windowжӯ»жҺүдәҶпјҢдҪ еҝ…йЎ»иҰҒзҹҘйҒ“зҡ„жҳҜпјҢдҪ жҳҜжҖҺд№Ҳи®©д»–жӯ»жҺүзҡ„пјҹ
гҖҖгҖҖ
- еҰӮжһңд№ӢеүҚиҝҳеҸҜд»Ҙиҝӣе…ҘX-WindowпјҢд№ҹе°ұжҳҜKDEпјҢдёҚиҝҮз»ҸиҝҮеҪ“жңәд№ӢеҗҺ(иҝҷйҮҢжҢҮзҡ„жҳҜ并没жңүйҮҚж–°и®ҫе®ҡ XFree86е–”пјҒ)пјҢеҜјиҮҙX-Windowж— жі•иҝӣе…ҘпјҢйӮЈд№Ҳеә”иҜҘеҸҜиғҪе°ұжқҘиҮӘдәҺKDEзҡ„й—®йўҳдәҶпјҢиҝҷдёӘжғ…еҶөд№ӢдёӢпјҢйҖҡеёёеҲ йҷӨиҮӘе·ұ家зӣ®еҪ•д№ӢдёӢзҡ„.kdeиҝҷдёӘйҡҗи—Ҹзӣ® еҪ•еҗҺпјҢе°ұеҸҜд»ҘжҒўеӨҚеҲ°жңҖеҺҹе§Ӣзҡ„зҠ¶жҖҒгҖӮ
гҖҖ
- дҪҶжҳҜеҰӮжһңдёҖе®үиЈ…е®ҢLinuxе°ұдёҖзӣҙж— жі•иҝӣе…ҘX-Windowзҡ„иҜқпјҢйӮЈд№ҲеӨ§жҰӮе°ұжҳҜXFree86иҝҷдёӘж ёеҝғжІЎжңүи®ҫе®ҡеҘҪзҡ„й—®йўҳе•ҰпјҒжүҖд»ҘжҲ‘们е°ұеҝ…йЎ»иҰҒи®ҫе®ҡXFree86е‘ўпјҒ
- XFree86 зҡ„дё»иҰҒи®ҫе®ҡжЎЈжЎҲ
еҘҪе•ҰпјҢ既然еҰӮжһңжӣҫз»Ҹиҝӣе…ҘиҝҮX-WindowпјҢеҲҷеҸҜиғҪзҡ„й—®йўҳе°ұдјҡеҸҳжҲҗжҳҜwindow managerзҡ„й—®йўҳпјҢиҖҢдёҚжҳҜXFree86зҡ„й—®йўҳпјҢйӮЈд№Ҳжғ…еҶөеә”иҜҘиҝҳе®№жҳ“и§ЈеҶіпјҢжүҖд»ҘжҲ‘们дёҚи°ҲиҝҷдёӘгҖӮжҲ‘们еә•дёӢиҰҒи°Ҳзҡ„жҳҜеҪ“дҪ зҡ„X-WindowдёҖзӣҙж— жі•жӯЈзЎ®дё” жҲҗеҠҹзҡ„еҗҜеҠЁж—¶пјҢйӮЈд№Ҳеә”иҜҘе°ұжҳҜ硬件и®ҫе®ҡзҡ„й—®йўҳе•ҰпјҒдҫӢеҰӮеҲҶиҫЁзҺҮи°ғй”ҷе•ҰгҖҒйј ж Үж јејҸдёҚеҜ№е•ҰгҖҒжҳҫзӨәеҚЎзҡ„й©ұеҠЁзЁӢеәҸдёҚеҜ№зӯүзӯүзҡ„й—®йўҳпјҒжһңзңҹжҳҜиҝҷдәӣй—®йўҳзҡ„ж—¶еҖҷпјҢжҲ‘иҰҒеҰӮдҪ•жқҘйҮҚ ж–°и®ҫе®ҡжҲ‘зҡ„XFree86иҝҷдёӘж ёеҝғе‘ўпјҹ
гҖҖ
еҲҡеҲҡеүҚйқўжҸҗиҝҮпјҢжҲ‘们зҡ„XFree86зӣ®еүҚжңүдёӨдёӘзүҲжң¬пјҢеҲҶеҲ«жҳҜversion 3дёҺversion 4пјҢйӮЈд№ҲжҖҺд№ҲзҹҘйҒ“жҲ‘зҡ„LinuxдҪҝз”Ёзҡ„жҳҜе“ӘдёҖдёӘXFree86зҡ„зүҲжң¬е‘ўпјҹе—ҜпјҒе°ұдҪҝз”Ёпјҡ
гҖҖX вҖ“version
гҖҖ
жқҘжЈҖжҹҘеҗ§пјҒеҘҪдәҶпјҢйӮЈд№ҲдёҚеҗҢзүҲжң¬зҡ„и®ҫе®ҡжЎЈеңЁе“ӘйҮҢпјҹиҝҷдёӨдёӘзүҲжң¬зҡ„и®ҫе®ҡжЎЈеҲҶеҲ«жҳҜпјҡ
гҖҖгҖҖ
- version 3: /etc/X11/XF86Config
- version 4: /etc/X11/XF86Config-4
иҜ·зү№еҲ«з•ҷж„Ҹд»–зҡ„еӨ§е°ҸеҶҷе‘ўпјҒдёҠйқўзҡ„еҸҜжҳҜи®ҫе®ҡжЎЈе–”пјҒжүҖд»Ҙе‘ўпјҢеҪ“жҲ‘们иҜҙгҖҺжҲ‘зҡ„X-WindowдёҖзӣҙж— жі•й©ұеҠЁпјҢжҲ‘иҰҒеҺ»дҝ®ж”№жҲ‘зҡ„и®ҫе®ҡжЎЈпјҒгҖҸйҖҡеёёжҢҮзҡ„е°ұжҳҜиҝҷдёӘ жЎЈжЎҲе•ҰпјҒзӣ®еүҚжҲ‘们еңЁLinuxйҮҢйқўеӨ§еӨҡжҳҜдҪҝз”Ёversion 4дәҶпјҢеӣ жӯӨеә•дёӢжҲ‘们е°Ҷд»Ҙ/etc/X11/XF86Config-4иҝҷдёӘжЎЈжЎҲжқҘиҜҙжҳҺе‘ўпјҒиҜ·жіЁж„ҸпјҢеҰӮжһңжӮЁзҡ„X-Windowжң¬жқҘеҸҜд»ҘжӯЈзЎ®ж— иҜҜзҡ„еҗҜеҠЁж—¶пјҢиЎЁзӨә иҝҷдёӘжЎЈжЎҲеҶ…е®№жҳҜеҜ№зҡ„пјҢиҝҷдёӘж—¶еҖҷпјҢгҖҺиҜ·еҠЎеҝ…е°ҶжӮЁзҡ„иҝҷдёӘи®ҫе®ҡжЎЈжЎҲеӨҮд»ҪдёҖдёӘпјҒгҖҸеӣ дёәжңӘжқҘеҰӮжһңи®ҫе®ҡй”ҷиҜҜеҜјиҮҙж— жі•иҝӣе…ҘX-Windowж—¶пјҢеҸӘиҰҒе°ҶеҺҹжң¬жӯЈзЎ®зҡ„еӨҮд»Ҫж–Ү件 иҰҶзӣ–еӣһжқҘпјҢдҪ зҡ„X-Windowе°ұж•‘еӣһжқҘдәҶпјҒжүҖд»ҘиҝҷдёӘжЎЈжЎҲзңҹзҡ„еҫҲйҮҚиҰҒпјҢиҜ·и®°еҫ—дёҖе®ҡиҰҒеӨҮд»Ҫе–”пјҒ
гҖҖcp /etc/X11/XF86Config-4 /etc/X11/XF86Config-4.bak
гҖҖ
еә•дёӢжҲ‘们е°ұжқҘи°ҲдёҖи°ҲпјҢжҖҺд№Ҳж ·и®ҫе®ҡжҲ‘们зҡ„XFree86е‘ўпјҹдёҖиҲ¬иҖҢиЁҖпјҢеҰӮжһңдҪ иҰҒйҮҚж–°и®ҫе®ҡXFree86зҡ„дёҖдәӣз»ҶйЎ№и®ҫе®ҡж—¶пјҢжңҖеҘҪзҡ„жӯҘйӘӨжҳҜпјҡ
гҖҖ
- еҰӮжһңе·Із»ҸиғҪеӨҹиҝӣе…ҘX-WindowдәҶпјҢйӮЈд№Ҳе°ұзӣҙжҺҘд»ҘWindow managerжҸҗдҫӣзҡ„е°Ҹе·Ҙе…·жқҘи®ҫе®ҡдҪ зҡ„XFree86пјҢдҫӢеҰӮKDEжҸҗдҫӣзҡ„control centerе°ұеҸҜд»ҘиҝӣиЎҢиҝҷдёӘе·ҘдҪңпјӣ
- еҰӮжһңжІЎжңүеҠһжі•иҝӣе…ҘX-WindowдәҶпјҢйӮЈд№Ҳе°ұдҪҝз”Ёеҗ„家distributionжҸҗдҫӣзҡ„е°Ҹе·Ҙе…·жқҘи®ҫе®ҡжҲ‘们зҡ„XFree86и®ҫе®ҡжЎЈпјӣ
- еҰӮжһңеҗ„家жҸҗдҫӣзҡ„е·Ҙе…·иҝҳжІЎжңүеҠһжі•и®ҫе®ҡеҘҪXFree86зҡ„иҜқпјҢйӮЈд№Ҳе°ұеҝ…йЎ»иҰҒдҪҝз”ЁеҲ°XFree86жҸҗдҫӣзҡ„е°ҸиҪҜ件е·Ҙе…·пјҢеңЁжҢҮд»ӨеҲ—жЁЎејҸдёӢйқўжү§иЎҢзҡ„xf86cfgжҲ–xf86configе•°пјҒ
- еҰӮжһңи°ғж•ҙзҡ„з»“жһңжӮЁиҝҳжҳҜдёҚеӨӘж»Ўж„ҸпјҢйӮЈд№Ҳе°ұзӣҙжҺҘжүӢеҠЁзҡ„жқҘеҫ®и°ғ/etc/X11/XF86Config-4иҝҷдёӘжЎЈжЎҲеҗ§пјҒ
еҘҪдәҶпјҢеҰӮжһңдҪ зҡ„X-Windowжң¬жқҘе°ұжІЎжңүй—®йўҳпјҢйӮЈд№Ҳеә•дёӢзҡ„ж•°жҚ®е°ұеҸҜд»ҘдёҚиҰҒзңӢе•ҰпјҒдҪҶжҳҜпјҢеҰӮжһңдҪ зҡ„X-WindowдёҖзӣҙжҖӘжҖӘзҡ„пјҢйӮЈ д№Ҳеә•дёӢзҡ„и®ҫе®ҡж–№ејҸе°ұеҫ—з»ҷд»–зһ§дёҖзһ§пјҒзӣ®еүҚдҪҝз”ЁдёҠйқўиҫғдёәж–№дҫҝзҡ„пјҢиҝҳжҳҜд»Ҙеҗ„家distributionжҸҗдҫӣзҡ„е°Ҹе·Ҙе…·жқҘи®ҫе®ҡжҲ‘们зҡ„ /etc/X11/XF86Config-4иҝҷдёӘжЎЈжЎҲиҫғдёәж–№дҫҝпјҢиҖҢи®ҫе®ҡзҡ„еҶ…е®№дёҚеӨ–д№ҺпјҡдёҠйқўйӮЈдёӘжҳҫзӨәзҡ„еҲҶиҫЁзҺҮиҝҳеҫ—иҰҒдәҶи§ЈдёҖдёӢпјҢжҲ‘们еңЁи®ҫе®ҡеұҸ幕зҡ„еҲҶиҫЁзҺҮж—¶пјҢжҢҮзҡ„жҳҜгҖҺжҲ‘зҡ„еұҸ幕иғҪеӨҹиҙҹиҚ·зҡ„жңҖй«ҳеҲҶиҫЁзҺҮгҖҸпјҢиҖҢеңЁз¬¬дә”йЎ№зҡ„жҳҫзӨәзҡ„еҲҶиҫЁзҺҮпјҢжҳҜжҲ‘们иҝӣе…ҘX-Window并且дҪҝз”ЁWindow managerжқҘж“ҚдҪңдё»жңәд№ӢеҗҺпјҢйӮЈдёӘжЎҢйқўзҡ„ж”ҜжҢҒзҡ„еҲҶиҫЁзҺҮе•ҰпјҒеӣ жӯӨпјҢ第дёүйЎ№еұҸ幕зҡ„еҲҶиҫЁзҺҮеҪ“然е°ұеҸҜд»Ҙи®ҫе®ҡзҡ„жҜ”иҫғй«ҳе•°пјҒ
- й”®зӣҳзҡ„ж јејҸпјӣ
- йј ж Үзҡ„ж јејҸпјӣ
- еұҸ幕зҡ„ж јејҸпјҢеҢ…еҗ«еҲҶиҫЁзҺҮгҖҒж°ҙе№ігҖҒеһӮзӣҙжӣҙж–°йў‘зҺҮзӯүзӯүпјӣ
- жҳҫзӨәеҚЎзҡ„дё»иҰҒй©ұеҠЁзЁӢеәҸпјҢд№ҹе°ұжҳҜжүҖи°“зҡ„X serverжңҖдё»иҰҒзҡ„еҶ…е®№е•ҰпјҒ
- жҳҫзӨәзҡ„еҲҶиҫЁзҺҮпјҡ
гҖҖ
зӣ®еүҚжңҖжөҒиЎҢзҡ„дёӨеҘ—LinuxпјҡMandrakeдёҺRed HatеқҮжҸҗдҫӣдёҚй”ҷзҡ„иҪҜ件жқҘи®ҫе®ҡXF86Config-4пјҢйӮЈе°ұжҳҜпјҡиҝҷдёӨдёӘеҘ—件и®ҫе®ҡзҡ„йЎ№зӣ®еҮ д№ҺйғҪжҳҜдёҖжЁЎдёҖж ·е•ҰгҖӮеҘҪдәҶпјҢиҜ·и®°еҫ—еӨҮд»ҪдҪ зҡ„XF86Config-4иҝҷдёӘжЎЈжЎҲеҗ§гҖӮ
- Mandrake XFdake
- Red Hat Xconfigurator
еҫҲз®ҖеҚ•еҗ§пјҢиҝҷе°ұжҳҜдҪҝз”Ёе·Ҙе…·иҪҜ件жқҘи®ҫе®ҡзҡ„ж–№жі•гҖӮеә•дёӢжҲ‘们жқҘжҸҗдёҖжҸҗпјҢйӮЈд№ҲжӯЈз»ҹзҡ„и®ҫе®ҡXFree86иҜҘжҖҺд№ҲзҺ©пјҹ
- Mandrake пјҡ XFdrake
зӣҙжҺҘеңЁжҢҮд»ӨеҲ—жЁЎејҸдёӯиҫ“е…ҘXFdrakeејҖе§ӢдҪҝз”Ё XFdrake зҡ„ X и®ҫе®ҡе•°пјҒ
гҖҖгҖҖ
- дҫҰжөӢзі»з»ҹзҡ„硬件и®ҫе®ҡпјҡ
гҖҖгҖҖ
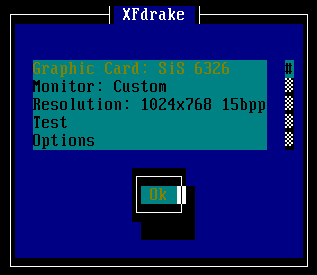
иҝӣе…ҘXFdrakeд№ӢеҗҺзҡ„第дёҖдёӘеҠЁдҪңеҚіжҳҜеңЁдҫҰжөӢдҪ зҡ„дё»жңәдёҠйқўзҡ„硬件е•ҰпјҒеҰӮжһңжҚүеҲ°зЎ¬д»¶д№ӢеҗҺпјҢдјҡе°ҶдҪ зҡ„Linuxдё»жңәдёҠйқўзҡ„硬件з»ҷд»–жҳҫзӨәеңЁз”»йқўдёҠпјҢеҰӮеҗҢдёҠеӣҫжүҖзӨәпјҢиҖҢдё”жңүеҮ дёӘи®ҫе®ҡеҖјпјҡ
гҖҖгҖҖ
- Graphic Card: иҝҷдёӘжҳҫзӨәзӣ®еүҚдҪ зҡ„жҳҫзӨәеҚЎиҠҜзүҮпјӣ
- Monitor: жҳҫзӨәзӣ®еүҚдҪ зҡ„еұҸ幕еҺӮзүҢжҲ–иҖ…йҖүжӢ©иҮӘи®ў(Custom)
- Resolution: йҖүжӢ©дҪ зҡ„X-WindowжҳҫзӨәзҡ„еҲҶиҫЁзҺҮ
- Test: з«ӢеҚіжөӢиҜ•дҪ зҡ„硬件и®ҫе®ҡ
- Options: и®©дҪ йҖүжӢ©жҳҜеҗҰејҖжңәзҡ„ж—¶еҖҷиҝӣе…ҘX-Window
- Quit: зҰ»ејҖXFdrakeиҝҷдёӘзЁӢеәҸпјҒ
иҜ·жіЁж„ҸпјҢеңЁйҖүжӢ©зҡ„ж—¶еҖҷпјҢеҝ…йЎ»иҰҒдҪҝз”Ё<tab>жҢүй”®пјҢдҪҝе…үж Ү移еҠЁеҲ°OKд№ӢеҗҺпјҢжүҚеҸҜд»Ҙиҝӣе…Ҙеҗ„з»ҶйЎ№еҺ»йҖүжӢ©е‘ўпјҒ
гҖҖ
- жҳҫзӨәеҚЎиҠҜзүҮз»„зҡ„йҖүжӢ©пјҡGraphic Card
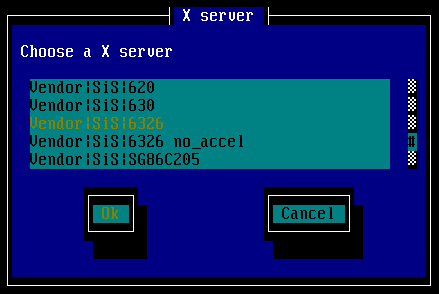
еңЁжҢүдёӢдәҶGraphic Cardд№ӢеҗҺпјҢдјҡеҮәзҺ°еҸҜд»ҘйҖүжӢ©иҠҜзүҮз»„зҡ„з”»йқўжқҘпјҢеҰӮдёӢеӣҫжүҖзӨәпјҢеңЁдёӢеӣҫдёӯпјҢеҹәжң¬дёҠдјҡжңүдёүдёӘеӯ—ж®өпјҢ第дёҖдёӘVendorжҳҜиҜҙеҺӮе•ҶпјҢ第дәҢдёӘSISеҲҷжҳҜеҸ‘еұ•зҡ„еҺӮе•ҶеҗҚ з§°пјҢдҫӢеҰӮдҪ зҡ„жҳҫзӨәеҚЎжҳҜNvidiaзҡ„пјҢйӮЈд№Ҳе°ұйҖүжӢ©Nvidiaеҗ§пјҒ第дёүдёӘеҲҷжҳҜиҝҷдёӘеҺӮе•Ҷзҡ„ж”ҜжҢҒиҠҜзүҮз»„пјҒе—ҜпјҒйҖүжӢ©дҪ зҡ„жҳҫзӨәеҚЎеҗ§пјҒжҲ‘иҝҷйҮҢжҳҜдҪҝз”ЁSISзҡ„6326 е•ҰпјҒ
гҖҖгҖҖ
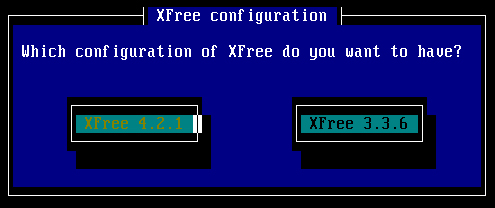
еҘҪдәҶпјҢзЎ®е®ҡдәҶиҠҜзүҮз»„д№ӢеҗҺпјҢз”ұдәҺжҲ‘们зҡ„X11зӣ®еүҚжңүдёӨзүҲпјҢжүҖд»Ҙеҝ…йЎ»иҰҒе…ҲзЎ®и®ӨдёҖдёӢдҪ зҡ„X11зүҲжң¬дёәдҪ•пјҹеӣ дёәиҝҷдёӨдёӘзүҲжң¬дҪҝз”Ёзҡ„иҠҜзүҮз»„й©ұеҠЁзЁӢеәҸ并дёҚзӣёеҗҢе‘ҖпјҒеӣ жӯӨпјҢжҢүдёӢOKд№ӢеҗҺдјҡеҮәзҺ°дёӢйқўеӣҫзӨәпјҡ
гҖҖгҖҖ
з”ұдәҺжҲ‘жҳҜдҪҝз”Ёversion 4пјҢжүҖд»ҘиҝҷйҮҢе°ұйҖүжӢ©XFree 4.2.1е•°пјҒйҖүжӢ©дәҶXFree 4.2.1д№ӢеҗҺпјҢзі»з»ҹдјҡеӣһеӨҚеҲ°жңҖе…ҲеүҚзҡ„з”»йқўе–”пјҒ
гҖҖ
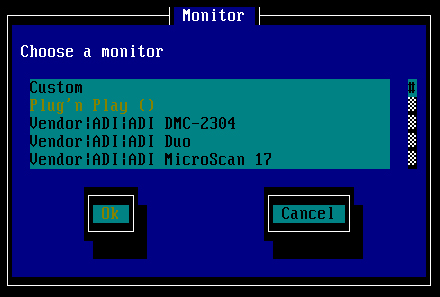
- и®ҫе®ҡеұҸ幕пјҡMonitor
и®ҫе®ҡе®ҢдәҶжҳҫзӨәеҚЎд№ӢеҗҺпјҢеҶҚжқҘеҲҷжҳҜи®ҫе®ҡеҸҰеӨ–дёҖдёӘеҫҲйҮҚиҰҒзҡ„е’ҡе’ҡпјҢе°ұжҳҜжҳҫзӨәеҷЁпјҢд№ҹе°ұжҳҜеұҸ幕и®ҫе®ҡе•ҰпјҒеңЁеұҸ幕зҡ„и®ҫе®ҡеҪ“дёӯпјҢйҰ–е…ҲпјҢдҪ еҸҜд»ҘйҖүжӢ©зЁӢеәҸжҸҗдҫӣзҡ„жҳҫзӨәеҷЁзҡ„еҺӮзүҢпјҢеҰӮдёӢеӣҫжүҖзӨәпјҢеҰӮжһңдҪ еҸҜд»ҘжүҫеҲ°дҪ зҡ„еұҸ幕еҺӮзүҢзҡ„иҜқпјҢйӮЈд№ҲзӣҙжҺҘзӮ№йҖүе°ұеҸҜд»Ҙе•ҰпјҒеҰӮжһңжүҫдёҚеҲ°зҡ„иҜқпјҢйӮЈд№Ҳе°ұзӣҙжҺҘйҖүжӢ©Customеҗ§пјҒ
гҖҖгҖҖ гҖҖ
еҰӮжһңеҲҡеҲҡдёҠйқўйҖүжӢ©дәҶеҺӮзүҢзҡ„иҜқпјҢйӮЈд№ҲзЁӢеәҸе°ҶдјҡиҮӘеҠЁи®ҫе®ҡж°ҙе№ігҖҒеһӮзӣҙжӣҙж–°йў‘зҺҮпјӣдҪҶжҳҜпјҢеҰӮжһңжҳҜйҖүжӢ©дәҶCustomзҡ„иҜқпјҢйӮЈд№Ҳе°ұдјҡеҮәзҺ°еҰӮдёҠзҡ„еӣҫзӨәжқҘиҰҒжұӮдҪ иҫ“ е…Ҙж°ҙе№ігҖҒеһӮзӣҙзҡ„жӣҙж–°йў‘зҺҮгҖӮиҝҷйҮҢиҜ·зү№еҲ«з•ҷж„Ҹе‘ўпјҢеӣ дёәиҝҷдёӨдёӘйў‘зҺҮи®ҫе®ҡй”ҷиҜҜзҡ„иҜқ(еҰӮжһңи®ҫе®ҡеҫ—еӨӘй«ҳдәҶзҡ„иҜқ)еҫҲжңүеҸҜиғҪдјҡйҖ жҲҗгҖҺеұҸ幕зҡ„зғ§жҜҒгҖҸпјҢйҖҡеёёи®ҫе®ҡж°ҙе№і31-57 еҸҠеһӮзӣҙ50-90еә”иҜҘйғҪдёҚдјҡжңүй—®йўҳе•ҰпјҒиҝҷйҮҢи®ҫе®ҡе®Ңд№ӢеҗҺпјҢеҸҲдјҡеӣһеҲ°жңҖе…ҲеүҚзҡ„з”»йқўгҖӮ
гҖҖ
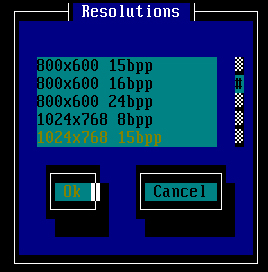
- и®ҫе®ҡX-WindowеҲҶиҫЁзҺҮпјҡResolution
еңЁжҢүдёӢдәҶResolutionд№ӢеҗҺпјҢдјҡеҮәзҺ°дёӢеӣҫпјҡ
гҖҖгҖҖ
еңЁеұҸ幕зҡ„еҲҶиҫЁзҺҮдёҠйқўпјҢиҝҷдёӘе°ұйҡҸдёӘдәәзҡ„е–ңеҘҪиҖҢе®ҡдәҶпјҢйёҹе“Ҙзү№еҲ«е–ңж¬ўеӯ—е°Ҹе°Ҹзҡ„пјҢжЎҢйқўеӨ§еӨ§зҡ„пјҢжүҖд»ҘжҜ”иҫғеҒҸеҘҪ1024x768иҝҷж ·зҡ„и®ҫе®ҡеҖје•°пјҒ
гҖҖ
- е®һең°жөӢиҜ•пјҡTest
еҶҚжқҘпјҢеҰӮжһңжҢүдёӢTestд№ӢеҗҺпјҢXFdrakeе°ұдјҡеё®жҲ‘们иҝӣиЎҢжөӢиҜ•е·ҘдҪңдәҶпјҒеҘҮжҖӘзҡ„жҳҜпјҢжҲ‘еҒҡдәҶеҘҪеҮ ж¬ЎпјҢз»“жһңйғҪжІЎжңүеҠһжі•TestжҲҗеҠҹпјҒзңҹжҳҜеҘҮжҖӘпјҹеҰӮжһңеңЁиҝҷдёӘз”»йқўдёӯеҪ“жҺүдәҶпјҢдёҚиҰҒж…Ңеј пјҢжҢүдёӢ[Ctrl]+[Alt]+[F1]е°ұдјҡеӣһеҲ°еҺҹжқҘзҡ„з”»йқўпјҢеҹәжң¬дёҠпјҢдёҚTestд№ҹжІЎжңүе…ізі»е•ҰпјҒ
гҖҖ
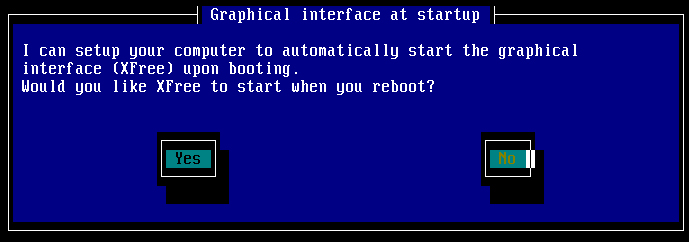
- и®ҫе®ҡrun-levelпјҡOptions
жҺҘзқҖдёӢжқҘеҲҷжҳҜи®ҫе®ҡжҳҜеҗҰејҖжңәеҚіеҗҜеҠЁX-WindowпјҢд№ҹе°ұжҳҜжүҖи°“зҡ„run-level 5е•Ұ
гҖҖгҖҖ
д»ҘжҲ‘дёәдҫӢпјҢеӣ дёәжҲ‘зҡ„LinuxйғҪжҳҜжӢҝжқҘеҪ“жңҚеҠЎеҷЁз”Ёзҡ„пјҢиҖҢдё”еҜ№дәҺX-WindowдёҚжҳҜеҫҲжңүдҪҝз”Ёзҡ„ж—¶жңәпјҢжүҖд»ҘжҲ‘йғҪжҳҜд»Ҙrun-level 3жқҘзҷ»е…ҘLinuxзҡ„пјҢиҮӘ然д№ҹе°ұйҖүжӢ©Noе•°пјҒ
гҖҖ
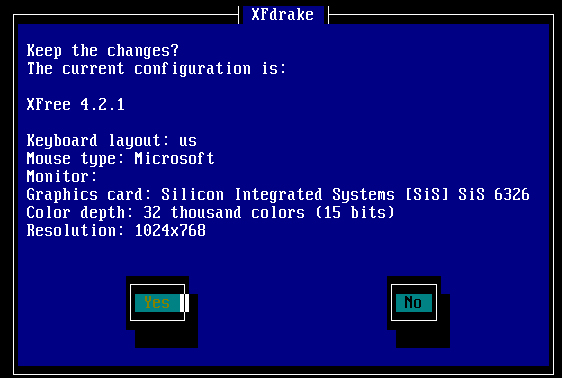
- зҰ»ејҖXFdrakeпјҡQuit
иҝҷж ·е°ұи®ҫе®ҡе®ҢжҜ•дәҶпјҒжүҖд»ҘйҖүжӢ©зҰ»ејҖпјҢиҝҷдёӘж—¶еҖҷдјҡеҮәзҺ°еҰӮдёӢзҡ„еӣҫзӨәпјҡ
гҖҖгҖҖ
еҰӮжһңзЎ®е®ҡдёҖеҲҮйғҪжІЎжңүй—®йўҳпјҢе°ұз»ҷд»–жҢүдёӢгҖҺYesгҖҸеҗ§пјҒиҝҷж ·е°ұе®ҢжҲҗи®ҫе®ҡдәҶпјҒеҪ“然е•ҰпјҢдҪ зҡ„/etc/X11/XF86Config-4е°ұиў«жӣҙж”№е•°пјҒ
- Red Hat : Xconfiguration
еңЁ Red Hat йҮҢйқўд№ҹжңүдёӘ Xconfiguration жқҘз®ҖеҚ•зҡ„и®ҫе®ҡжҲ‘们зҡ„ X Window зҡ„еҗ„йЎ№и®ҫе®ҡе–”пјҒ
гҖҖ
- жү§иЎҢ Xconfigurator пјҡ
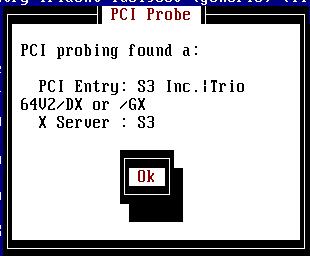
иҝҷдёӘж—¶еҖҷдјҡеҮәзҺ°дёҖдёӘж¬ўиҝҺз”»йқўпјҢжҢүдёӢ OK д№ӢеҗҺпјҢзі»з»ҹдјҡиҮӘеҠЁеҺ»жҚүжҳҫзӨәеҚЎзҡ„иҠҜзүҮз»„гҖӮ еҰӮжһңжҳҫзӨәеҚЎжҳҜиҝҷдёҖзүҲзҡ„ XFree86 жңүж”ҜжҢҒзҡ„иҜқпјҢйӮЈзі»з»ҹе°ұдјҡжҳҫзӨәеҮәдҪ зҡ„жҳҫзӨәеҚЎеһӢеҸ·пјҢеҰӮдёӢеӣҫжүҖзӨәдёә S3 зҡ„ Trio64v2 иҠҜзүҮпјҡ
гҖҖгҖҖ
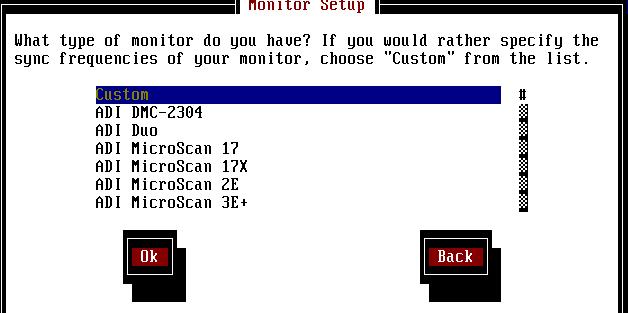
- и®ҫе®ҡеұҸ幕дёҺеұҸ幕еҲҶиҫЁзҺҮпјҡ
дёҠеӣҫжҢүдёӢ OK д№ӢеҗҺдјҡејҖе§ӢеҺ»и®ҫе®ҡжҳҫзӨәеҷЁпјҲеұҸ幕пјүпјҢдёҖиҲ¬жҲ‘们йғҪз”ЁиҮӘи®ўзҡ„ж–№жі•еҺ»жҚүеұҸ幕пјҢжүҖд»ҘйҖүжӢ© Custom жүӢеҠЁи®ҫе®ҡпјҲ第дёҖйЎ№пјүпјҢеҰӮдёӢеӣҫжүҖзӨәпјҡ
гҖҖгҖҖ
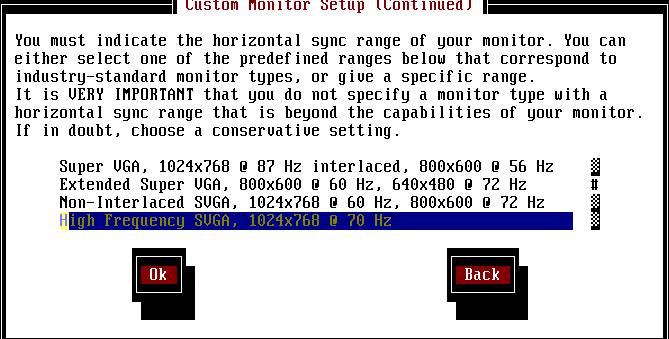
жҢүдёӢ OK д№ӢеҗҺпјҢзі»з»ҹдјҡе‘ҠиҜүдҪ дёҖдәӣи®ҜжҒҜпјҢеҶҚжҢүдёӢ OK еҗҺпјҢе°ұдјҡеҮәзҺ°еҰӮдёӢзҡ„з”»йқўпјҢе‘ҠиҜүдҪ еә”иҜҘиҰҒйҖүжӢ©е“ӘдёҖдёӘеұҸ幕зҡ„еҲҶиҫЁзҺҮпјҢйҖҡеёёжҲ‘们йғҪдјҡйҖүжӢ©гҖҺHigh Frequency SVGA, 1024x768 @ 70Hz гҖҸйӮЈдёҖдёӘйҖүйЎ№гҖӮ
гҖҖгҖҖ
дёҠеӣҫжҢүдёӢ OK д№ӢеҗҺпјҢе°ұдјҡиҰҒжұӮдҪ йҖүжӢ©еһӮзӣҙеҲҶиҫЁзҺҮпјҢйҖҡеёёжҲ‘们йғҪжҳҜйҖүжӢ©з¬¬дәҢйЎ№пјҢд№ҹе°ұжҳҜ 50-90 йӮЈдёҖйЎ№еҚіеҸҜпјӣ
гҖҖ
- жҳҫзӨәеҚЎзӣёе…іи®ҫе®ҡпјҡгҖҖ
еҶҚжқҘзі»з»ҹдјҡй—®дҪ жҳҜеҗҰиҰҒи®© XFree86 иҮӘе·ұжҚүжҳҫзӨәеҚЎзӣёе…ізҡ„дҝЎжҒҜпјҹиҝҷйҮҢеҸҜд»ҘжҢү Probe д№ҹеҸҜд»ҘжҢү Don't Probe пјҢеҸӘжҳҜпјҢеҰӮжһңдҪ зЎ®еҲҮзҡ„зҹҘйҒ“дҪ зҡ„жҳҫзӨәеҚЎеҶ…еӯҳзҡ„еӨ§е°Ҹзҡ„иҜқпјҢиҝҷйҮҢе»әи®®йҖүжӢ© Don't Probeпјӣ дёҠдёҖжӯҘйӘӨйҖүжӢ© Don't Probe д№ӢеҗҺпјҢзі»з»ҹдјҡиҰҒдҪ йҖүжӢ©дҪ зҡ„еҶ…еӯҳпјҢиҜ·дҫқдҪ зҡ„жҳҫзӨәеҚЎеҶ…еӯҳе®һйҷ…еӨ§е°Ҹиҫ“е…ҘпјҢеҰӮжһңжҳҜ S3 Vrige зҡ„иҜқпјҢйҖҡеёёжҳҜ 1M жҲ–иҖ…жҳҜ 2M е·ҰеҸіеҗ§пјҒ
гҖҖ
йҖүе®ҢдәҶеҶ…еӯҳеӨ§е°Ҹд№ӢеҗҺпјҢиҝҮжқҘжҳҜйҖүжӢ©дҪ зҡ„и®°еҝҶйў‘зҺҮиҠҜзүҮпјҢз”ұдәҺжҲ‘们йҖҡеёёдёҚжҳҜеҫҲжё…жҘҡжҲ‘们зҡ„иҠҜзүҮжҳҜе“ӘдёҖдёӘпјҢжүҖд»ҘиҝҷйҮҢеҸӘеҘҪи®©зі»з»ҹиҮӘе·ұжҚүпјҢеҰӮдёӢеӣҫпјҢзӣҙжҺҘйҖүжӢ© No Clockchip Setting еҚіеҸҜпјҒ
гҖҖ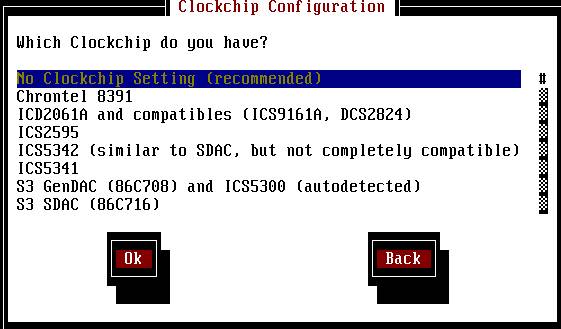
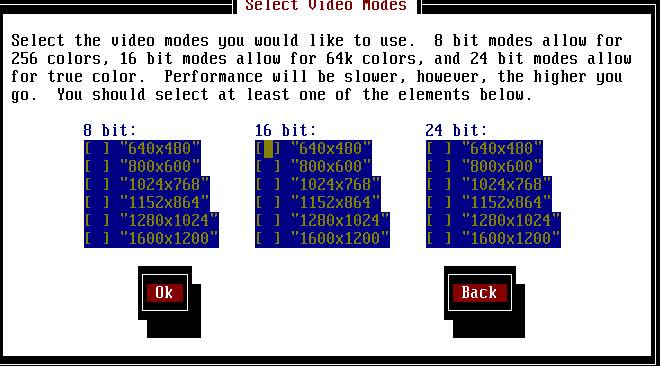
- иүІеҪ©еәҰзҡ„и®ҫе®ҡпјҡ
еҶҚжқҘеҲҷжҳҜйҖүжӢ©з”»йқўеҲҶиҫЁзҺҮдёҺиүІеҪ©йҮҸпјҢеҰӮдёӢеӣҫжүҖзӨәпјҢдёҖиҲ¬иҖҢиЁҖпјҢеҰӮжһңдҪ зҡ„ X-Window дёҖзӣҙжңүй—®йўҳпјҢиҝҷйҮҢеҸҜд»ҘйҖүжӢ© 8 bitпјҢеҸҠ 640x480 зҡ„жңҖеҺҹе§Ӣи®ҫе®ҡе°ұеҘҪпјҒеҰӮжһңдҪ зҡ„ X-Window жІЎжңүй—®йўҳпјҢеҸҜд»ҘжӯЈеёёзҡ„дҪҝз”ЁдәҶпјҢиҖҢдҪ и§үеҫ—дҪ жғіиҰҒи®©дҪ зҡ„иүІеҪ©жңҖеӨ§еҢ–пјҢеҲҷеҸҜд»Ҙд»…йҖүжӢ© 24 bit еҸҠ 1024x768 иҝҷдёҖйЎ№еҚіеҸҜпјҒеҰӮжӯӨдёҖжқҘпјҢдҪ е°ұеҸҜд»Ҙд»ҘдҪ жңҖе–ңж¬ўзҡ„еҲҶиҫЁзҺҮдёҺиүІеәҰиҝӣе…Ҙ X-Window е•ҰпјҒпјҲжіЁж„Ҹе–”пјҢеңЁ bit д№Ӣй—ҙд»Ҙ tab 键移еҠЁпјҢиҖҢд»Ҙ з©әж јй”® зЎ®е®ҡпјҒпјү
гҖҖгҖҖ
жҺҘзқҖдёӢжқҘзі»з»ҹе‘ҠиҜүдҪ иҰҒејҖе§ӢжөӢиҜ• X-Windows е•ҰпјҢжҢүдёӢ OK д№ӢеҗҺзі»з»ҹе°ұејҖе§ӢжөӢиҜ• X-WindowпјҒеңЁиҝҷдёӘең°ж–№иҰҒжіЁж„ҸдёҖдёӢпјҢеҰӮжһңдҪ зҡ„и®ҫе®ҡдёҚе®Ңе…ЁпјҢеҲҷзі»з»ҹе°ҶдјҡеӣһеҲ°з¬¬дёүжӯҘйӘӨйҮҚж–°еҶҚи®ҫе®ҡпјҢеҰӮжһңдҪ еңЁиҝҷдёҖдёӘжӯҘйӘӨйҮҚеӨҚдәҶдёүж¬Ўд»ҘдёҠд»Қж— жі•и®ҫе®ҡжҲҗеҠҹпјҢйӮЈе°ұеҝ…йЎ»д»Ҙ xf86config иҝҷж”ҜзЁӢеәҸи®ҫе®ҡдәҶпјҒ
гҖҖ
еҰӮжһңдҪ еҸҜд»ҘжӯЈеёёзҡ„зңӢеҲ°дёҖдёӘе…үж ҮеҸҠдёҖдёӘжЎҶжЎҶе‘ҠиҜүдҪ иҝҳжңү10з§’й’ҹзҡ„ж—¶й—ҙеҸҜд»ҘжҢүзЎ®е®ҡпјҢйӮЈе°ұиЎЁзӨәдҪ зҡ„ X-Window еҸҜд»Ҙз”Ёе•ҰпјҒиҝҷдёӘж—¶еҖҷиҜ·йҖүжӢ© OKпјҢ然еҗҺеҮәзҺ°зҡ„еҸҰдёҖдёӘжЎҶжЎҶе‘ҠиҜүдҪ пјҡгҖҺжҳҜеҗҰиҰҒеңЁдёӢж¬ЎејҖжңәзҡ„ж—¶еҖҷд»ҘеӣҫеҪўжҺҘеҸЈзҷ»е…ҘгҖҸпјҢиҝҷдёҖжӯҘеҚғдёҮйҖүжӢ©гҖҺNOгҖҸпјҢеӣ дёәд»Ҙ X-Window дёәйў„и®ҫзҡ„ејҖжңәжҺҘеҸЈпјҢдёӘдәәи§үеҫ—并дёҚеҘҪпјҢеӣ дёәдёҚдҪҶеҚ з”ЁдәҶиҫғеӨҡзҡ„зі»з»ҹиө„жәҗпјҢиҖҢдё”пјҢ并дёҚдјҡжҜ”иҫғеҘҪдҪҝз”ЁпјҒ
гҖҖ
е®ҢжҲҗи®ҫе®ҡдәҶпјҢи·іеҮә Xconfigurator еҗҺпјҢд»Ҙ startx иҝӣе…Ҙ X-Window пјҒ
еҹәжң¬дёҠпјҢXFree86 е·Із»ҸжҸҗдҫӣдәҶдёӨж”ҜзӣёеҪ“еҘҪз”Ёзҡ„зЁӢеәҸжқҘеё®жҲ‘们и®ҫе®ҡ XF86Config-4 дәҶпјҒйӮЈе°ұжҳҜ xf86cfg еҸҠ xf86config иҝҷдёӨдёӘпјҒ
гҖҖ
йӮЈдёӘ xf86cfg дјҡиҮӘеҠЁзҡ„дҫҰжөӢжҲ‘们зҡ„дё»жңәдҝЎжҒҜпјҢ并且зӣҙжҺҘе°Ҷж–°зҡ„ XF86Config.new жЎЈжЎҲж”ҫзҪ®еңЁи®ҫе®ҡиҖ…зҡ„家зӣ®еҪ•д№ӢдёӢпјҢзӣёеҪ“зҡ„ж–№дҫҝпјҒеҸӘиҰҒдҪҝз”ЁиҖ…еңЁеҗҜеҠЁ X-Window д№ӢеүҚпјҢе°ҶиҮӘе·ұ家зӣ®еҪ•зҡ„ XF86Config.new еӨҚеҲ¶еҲ° /etc/X11/XF86Config-4 иҝҷдёӘжЎЈжЎҲпјҢйӮЈд№Ҳе°ұе®ҢжҲҗи®ҫе®ҡе•ҰпјҒдҪҶжҳҜпјҢз”ұдәҺ xf86cfg дё»иҰҒжҳҜиҮӘеҠЁеё®жҲ‘们жҚүеҸ–ж•°жҚ®зҡ„пјҢйҷӨйқһжӮЁдҪҝз”Ё man xf86cfg жқҘжҹҘиҜўд»–зҡ„еҸӮж•°пјҢеҗҰеҲҷеёёеёёж— жі•жҚүеҲ°иҮӘе·ұе–ңж¬ўзҡ„жЁЎејҸпјҒдҪҝз”Ёзҡ„ж–№жі•жҳҜзӣҙжҺҘеңЁжҢҮд»ӨеҲ—жЁЎејҸдёӢпјҢдёӢиҫҫ xf86cfg еҚіеҸҜпјҒ
гҖҖ
зӣёеҜ№дәҺ xf86cfg зҡ„дё»еҠЁдҫҰжөӢж•°жҚ®пјҢиҝҷдёӘ xf86config еҲҷжҳҫзҡ„иҫғдёәиҖҒжҖҒйҫҷй’ҹпјҢеӣ дёәд»–зҡ„жүҖжңүи®ҫе®ҡйғҪйңҖиҰҒдҪҝз”ЁиҖ…з»ҷдәҲе‘ўпјҒеҢ…жӢ¬й”®зӣҳгҖҒйј ж ҮгҖҒеұҸ幕гҖҒеҲҶиҫЁзҺҮзӯүзӯүзҡ„й—®йўҳгҖӮдёҚиҝҮпјҢеӣ дёәд»–йғҪжҳҜз»Ҹз”ұдҪҝз”ЁиҖ…и®ҫе®ҡзҡ„пјҢжүҖд»ҘиҮӘ然д№ҹе°ұжңү еҠһжі•зӣҙжҺҘжҸҗдҫӣдҪҝз”ЁиҖ…дёҖдёӘе–ңеҘҪзҡ„зҺҜеўғи®ҫе®ҡе•°пјҒеә•дёӢжҲ‘们е°ұй’ҲеҜ№ xf86config жқҘи°ҲдёҖи°Ҳеҗ§пјҒ
гҖҖгҖҖ
[root @test root]# xf86config
Step 1: еҮҶеӨҮеӨҮд»ҪдёҺжҳҜеҗҰиҝӣиЎҢпјҹ
This program will create a basic XF86Config file, based on menu selections you make.
Before continuing with this program, make sure you know what video card
you have, and preferably also the chipset it uses and the amount of video
memory on your video card. SuperProbe may be able to help with this.
Press enter to continue, or ctrl-c to abort. <==иҝҷйҮҢжҢүдёӢEnterејҖе§Ӣи®ҫе®ҡStep 2: и®ҫе®ҡйј ж Үпјҡ
First specify a mouse protocol type. Choose one from the following list:
1. Microsoft compatible (2-button protocol)
2. Mouse Systems (3-button protocol)
3. Bus Mouse
4. PS/2 Mouse
5. Logitech Mouse (serial, old type, Logitech protocol)
6. Logitech MouseMan (Microsoft compatible)
7. MM Series
8. MM HitTablet
9. Microsoft IntelliMouse
Enter a protocol number: 4 <==дё»иҰҒжҳҜ2жҲ–4пјҢзӣ®еүҚеӨ§еӨҡдҪҝз”Ёps/2йј ж ҮпјҢжүҖд»ҘйҖү4е°ұеҜ№дәҶпјҒDo you want to enable Emulate3Buttons? n <==жҳҜеҗҰжЁЎжӢҹдёүй”®пјҹжҲ‘们已з»ҸжҳҜдёүй”®пјҢеҪ“然дёҚжЁЎжӢҹпјҒ
Now give the full device name that the mouse is connected to, for example
/dev/tty00. Just pressing enter will use the default, /dev/mouse.
Mouse device: <==иҝҷйҮҢиҰҒи®ҫе®ҡйј ж Үзҡ„иЈ…зҪ®д»ЈеҸ·пјҢйҖҡеёёдҪҝз”Ёй»ҳи®ӨеҖјеҚіеҸҜпјҢжүҖд»ҘжҢүдёӢEnterпјҒStep 3: и®ҫе®ҡй”®зӣҳж јејҸпјҡ
1 Generic 101-key PC
2 Generic 102-key (Intl) PC
3 Generic 104-key PC
4 Generic 105-key (Intl) PC
5 Dell 101-key PC
6 Everex STEPnote
7 Keytronic FlexPro
8 Microsoft Natural
Enter a number to choose the keyboard.
1 <==йҖүжӢ©й”®зӣҳзҡ„еҪўејҸпјҢеҰӮжһңдёҚзҹҘйҒ“дҪ зҡ„й”®зӣҳж јејҸпјҢйҖүжӢ© 1 жҲ– 3 еҚіеҸҜпјҒ1 U.S. English
2 U.S. English w/ ISO9995-3
3 U.S. English w/ deadkeys
4 Albanian
Enter a number to choose the country.
Press enter for the next page
1 <==йҖүжӢ©й”®зӣҳжҢүй”®пјҢжҲ‘们键зӣҳдёҠйқўжңүзҡ„жҳҜиӢұж–Үе‘ҖпјҒжүҖд»ҘеҪ“然йҖүжӢ© 1 иӢұж–ҮжҢүй”®пјҒPlease enter a variant name for 'us' layout. Or just press enter
for default variant
<==йҖүжӢ©иҝҷдёӘй”®зӣҳзҡ„еҗҚз§°пјҢйў„и®ҫз§°дёә us пјҢдёҚз”Ёжҗһзү№ж®ҠпјҢEnterеҚіеҸҜпјҒPlease answer the following question with either 'y' or 'n'.
Do you want to select additional XKB options (group switcher,
group indicator, etc.)? n <==жҳҜеҗҰйңҖиҰҒйўқеӨ–зҡ„XKBйҖүйЎ№пјҢдёҚйңҖиҰҒе•ҰпјҒжҢү n пјҒStep 4:и®ҫе®ҡеұҸ幕
Now we want to set the specifications of the monitor.
The valid range for horizontal sync and vertical sync should be documented
in the manual of your monitor. If in doubt, check the monitor database
/usr/X11R6/lib/X11/doc/Monitors to see if your monitor is there.
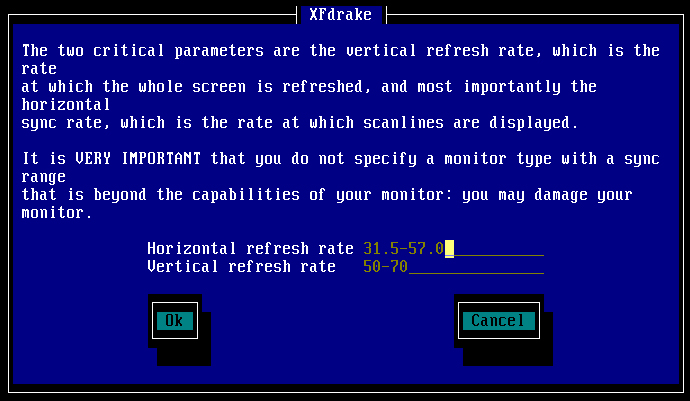
Press enter to continue, or ctrl-c to abort. <==еҮҶеӨҮи®ҫе®ҡеұҸ幕пјҢжҢүEnterејҖе§Ӣhsync in kHz; monitor type with characteristic modes
1 31.5; Standard VGA, 640x480 @ 60 Hz
2 31.5 - 35.1; Super VGA, 800x600 @ 56 Hz
3 31.5, 35.5; 8514 Compatible, 1024x768 @ 87 Hz interlaced (no 800x600)
4 31.5, 35.15, 35.5; Super VGA, 1024x768 @ 87 Hz interlaced, 800x600 @ 56 Hz
5 31.5 - 37.9; Extended Super VGA, 800x600 @ 60 Hz, 640x480 @ 72 Hz
6 31.5 - 48.5; Non-Interlaced SVGA, 1024x768 @ 60 Hz, 800x600 @ 72 Hz
7 31.5 - 57.0; High Frequency SVGA, 1024x768 @ 70 Hz
8 31.5 - 64.3; Monitor that can do 1280x1024 @ 60 Hz
9 31.5 - 79.0; Monitor that can do 1280x1024 @ 74 Hz
10 31.5 - 82.0; Monitor that can do 1280x1024 @ 76 Hz
11 Enter your own horizontal sync range
Enter your choice (1-11): 7 <==зӣ®еүҚзҡ„еұҸ幕йҖүжӢ© 7 еә”иҜҘйғҪеҗғзҡ„дёӢе•ҰпјҒ
еҪ“然пјҢеҰӮжһңдҪ зҡ„еұҸ幕жҜ”иҫғеҘҪпјҢеҸҜд»ҘиҖғиҷ‘йҖүжӢ© 8~10 зҡ„йҖүжӢ©пјҒthe number that counts is the high one (e.g. 87 Hz rather than 43 Hz).
1 50-70
2 50-90
3 50-100
4 40-150
5 Enter your own vertical sync range
Enter your choice: 2 <==зӣ®еүҚеұҸ幕йҖүжӢ© 2 д№ҹеә”иҜҘйғҪжІЎжңүй—®йўҳе•ҰпјҒYou must now enter a few identification/description strings, namely an
identifier, a vendor name, and a model name. Just pressing enter will fill
in default names.
The strings are free-form, spaces are allowed.
Enter an identifier for your monitor definition: MyMonitor<==иҝҷйҮҢиҰҒеҶҷдёҖдёӢдҪ зҡ„еұҸ幕зҡ„д»ЈеҸ·пјҢ
йҡҸдҫҝеҶҷжІЎжңүе…ізі»е•ҰпјҒеӣ дёәиҝҷдёӘжҳҜеңЁXF86ConfigйҮҢйқўзҡ„д»ЈеҸ·иҖҢе·ІпјҒStep 5: и®ҫе®ҡжҳҫзӨәеҚЎ
Do you want to look at the card database? y <==жҳҜеҗҰиҰҒйҖүжӢ©жҳҫзӨәеҚЎпјҹеҪ“然жҳҜиҰҒе•°пјҒ468 SiS 5597 SiS5597
469 SiS 5598 SIS5598
470 SiS 620 SIS620
471 SiS 6326 SiS6326
472 SiS SG86C201 SIS86C201
Enter a number to choose the corresponding card definition.
Press enter for the next page, q to continue configuration.
471<==иҝҷйҮҢжҺҘзқҖдёӢжқҘдјҡи®©дҪ йҖүжӢ©дҪ зҡ„жҳҫзӨәеҚЎж•°жҚ®пјҢз”ұдәҺжҲ‘们зҡ„ж•°жҚ®еә“зӣёеҪ“еәһеӨ§пјҢжүҖд»Ҙ
еҰӮжһңиҜҘйЎөжІЎжңүдҪ иҰҒзҡ„ж•°жҚ®ж—¶пјҢеҸҜд»ҘжҢүдёӢEnterеҲ°дёӢдёҖйЎөеҺ»йҖүжӢ©пјҒйӮЈд№ҲеҰӮжһңдҪ зҡ„еҺӮе•Ҷ
жҳҜжҜ”иҫғе°ҸзүҢзҡ„жҖҺд№ҲеҠһпјҹжІЎе…ізі»пјҢжһңзңҹеҰӮжӯӨпјҢйӮЈд№ҲйҖүжӢ©дёҚеҗҢеҺӮе•ҶдҪҶжҳҜеҗҢж ·иҠҜзүҮзҡ„
ж•°жҚ®е°ұеҸҜд»ҘдәҶпјҒз”ұдәҺжҲ‘жҳҜдҪҝз”ЁSis 6326пјҢжүҖд»Ҙе°ұйҖүжӢ©471иҝҷдёӘеҸ·з Ғе•°пјҒYour selected card definition:
Identifier: SiS 6326
Chipset: SiS6326
Driver: sis
Do NOT probe clocks or use any Clocks line.
Press enter to continue, or ctrl-c to abort. <==иҝҷйҮҢеҶҚжҢүEnterеҚіеҸҜпјҒHow much video memory do you have on your video card:
1 256K
2 512K
3 1024K
4 2048K
5 4096K
6 Other
Enter your choice: 6 <==и®ҫе®ҡдҪ зҡ„жҳҫзӨәеҚЎеҶ…еӯҳпјҢзӣ®еүҚзҡ„дё»жөҒе·Із»ҸжҸҗеҚҮеҲ° 64MBдәҶпјҢ
жүҖд»ҘиҮӘ然иҰҒйҖүжӢ© 6 жқҘиҮӘе®ҡдәҶпјҒи®°еҫ— RAM зҡ„з®—жі•пјҡ
32M = 32*1024= 32768K жүҚеҜ№е–”пјҒAmount of video memory in Kbytes: 1024 <==жҲ‘зҡ„еҚЎеҸӘжңү 1M иҖҢе·ІвҖҰ.
The strings are free-form, spaces are allowed.
Enter an identifier for your video card definition: <==иҝҷйҮҢжҢүдёӢ Enter дҪҝз”Ёй»ҳи®ӨеҖјеҚіеҸҜпјҒStep 6:и®ҫе®ҡеұҸ幕еҲҶиҫЁзҺҮпјҡ
"640x480" "800x600" "1024x768" for 8-bit
"640x480" "800x600" for 16-bit
"640x480" for 24-bitModes that cannot be supported due to monitor or clock constraints will
be automatically skipped by the server.1 Change the modes for 8-bit (256 colors)
2 Change the modes for 16-bit (32K/64K colors)
3 Change the modes for 24-bit (24-bit color)
4 The modes are OK, continue.Enter your choice: 3 <==йў„и®ҫзҡ„жғ…еҶөдёӢдјҡжңүдёҠйқўзҡ„йӮЈдәӣжЁЎејҸпјҢйӮЈд№ҲжҲ‘йҖҡеёёе–ңж¬ўдёҖз§ҚжЁЎејҸиҖҢе·ІпјҢ
жүҖд»Ҙе°ұжҢүдёӢ 3 жқҘдҝ®ж”№иҜҘжЁЎејҸпјҢи®ҫе®ҡдёәжҲ‘е–ңж¬ўзҡ„ 1024x768 йӮЈдёӘжЁЎејҸгҖӮSelect modes from the following list:
1 "640x400"
2 "640x480"
3 "800x600"
4 "1024x768"
5 "1280x1024"
6 "320x200"
7 "320x240"
8 "400x300"
9 "1152x864"
a "1600x1200"
b "1800x1400"
c "512x384"
Please type the digits corresponding to the modes that you want to select.
For example, 432 selects "1024x768" "800x600" "640x480", with a
default mode of 1024x768.Which modes? 4 <==йҖүжӢ©жҲ‘иҰҒзҡ„е‘ҰпјҒ
Please answer the following question with either 'y' or 'n'.
Do you want a virtual screen that is larger than the physical screen? n
дёҠйқўзҡ„и®ҫе®ҡеңЁиҜҙжҳҺпјҢжҳҜеҗҰйңҖиҰҒиҷҡжӢҹжЎҢйқўпјҹжҲ‘жүҚдёҚиҰҒе‘ўпјҒжүҖд»ҘйҖүжӢ© n е•°пјҒ1 Change the modes for 8-bit (256 colors)
2 Change the modes for 16-bit (32K/64K colors)
3 Change the modes for 24-bit (24-bit color)
4 The modes are OK, continue.Enter your choice: 4 <==иҝҷж ·е°ұ OK дәҶпјҒ
Please specify which color depth you want to use by default:
1 1 bit (monochrome)
2 4 bits (16 colors)
3 8 bits (256 colors)
4 16 bits (65536 colors)
5 24 bits (16 million colors)
Enter a number to choose the default depth.
5 <==йў„и®ҫжҳҜе“ӘдёҖдёӘиүІеҪ©еәҰзҷ»е…Ҙе‘ўпјҹйҖүжӢ©дҪ иҰҒзҡ„е–”пјҒжҲ‘иҰҒзҡ„жҳҜ 5 йӮЈдёӘиүІеҪ©еәҰпјҒStep 7: еҶҷе…Ҙи®ҫе®ҡжЎЈ
Shall I write it to /etc/X11/XF86Config? y <==еӢҮж•ўдёҖзӮ№пјҒз»ҷд»– y еҶҷе…Ҙеҗ§пјҒеҸҚжӯЈе·Із»ҸеӨҮд»ҪдәҶпјҒ
иҝҷж ·е°ұи®ҫе®ҡе®ҢжҲҗдәҶпјҢдҪҶжҳҜжҜ”иҫғйә»зғҰзҡ„жҳҜпјҢиҝҷдёӘжҢҮд»ӨеңЁи®ҫе®ҡXF86ConfigпјҢжүҖд»ҘдҪ еҝ…йңҖе°Ҷд»–еӨҚеҲ¶жҲҗдёәXF86Config-4жүҚеҸҜд»Ҙе‘ўпјҒ然еҗҺе°ұеҸҜд»ҘжөӢиҜ•дёҖдёӢX-WindowжҳҜеҗҰжҲҗеҠҹе•°пјҒ
еҘҪдәҶпјҢ既然зҹҘйҒ“еүҚйқўеҮ дёӘе’ҡе’ҡйғҪжҳҜеңЁи®ҫе®ҡXF86Config-4иҝҷдёӘжЎЈжЎҲпјҢйӮЈд№ҲжҲ‘们еІӮдёҚжҳҜд№ҹеҸҜд»ҘиҮӘиЎҢеҺ»дҝ®ж”№иҝҷдёӘжЎЈжЎҲе‘ўпјҹиҜҙзҡ„еҘҪпјҒжІЎй”ҷпјҒжүҖд»ҘжҲ‘们е°ұжқҘдҝ®дҝ®ж”№ж”№иҝҷдёӘжЎЈжЎҲеҗ§пјҒйҰ–е…ҲпјҢиҝҷдёӘжЎЈжЎҲйҮҢйқўе°ҶеҫҲеӨҡзҡ„ж®өиҗҪеҲҶжҲҗиҝҷз§ҚжЁЎж ·пјҡ
гҖҖгҖҖ
Section вҖңsection nameвҖқ
вҖҰвҖҰ..
вҖҰвҖҰ..
EndSection
ејҖеӨҙз”ұ Section жҺҘзқҖиҜҘж®өиҗҪзҡ„еҶ…е®№йЎ№зӣ®пјҢ然еҗҺз»“жқҹд»Ҙ EndSection жқҘз»“жқҹпјҢжҲ‘们зӣҙжҺҘеңЁжЎЈжЎҲеҶ…е®№иҝӣиЎҢиҜҙжҳҺеҗ§пјҒиҜ·еҸӮиҖғдёҖдёӢеә•дёӢзҡ„еҶ…е®№е•°пјҡ
гҖҖгҖҖ
[root @test X11]# vi /etc/X11/XF86Config-4
Section "Module"
Load "dbe"
Load "dri"
Load "extmod"
Load "glx"
Load "record"
Load "xie"
Load "freetype"
Load "type1"
Load "v4l"
EndSection
дёҠйқўзҡ„ж•°жҚ®еңЁеҠ иҪҪй©ұеҠЁX-Windowзҡ„ж—¶еҖҷпјҢйңҖиҰҒзҡ„жЁЎеқ—йЎ№зӣ®пјҒйҖҡеёёиҝҷдәӣйЎ№зӣ®йғҪз»ҷд»–еҠ иҪҪиҝӣеҺ»еҗ§пјҒеҸҰеӨ–пјҢжЁЎеқ—зҡ„ж•°жҚ®еҸҜд»ҘеңЁ/usr/X11R6/lib/modulesиҝҷдёӘзӣ®еҪ•дёӯжүҫеҲ°пјҒSection "Device"
Identifier "Card0"
Driver "nv"
VendorName "NVidia"
BoardName "GeForce2 MX"
BusID "PCI:1:0:0"
Option "X-KXCONFIG-VideoRam" "32768"
Option "X-KXCONFIG-MaxClock" "350"
EndSection
иҝҷдёӘйЎ№зӣ®еңЁи®ҫе®ҡдҪ зҡ„жҳҫзӨәеҚЎй©ұеҠЁзЁӢеәҸпјҒд»ҘжҲ‘зҡ„еҚЎдёәдҫӢпјҢиҝҷдёӘдҫӢеӯҗдёӯпјҢдҪҝз”Ёзҡ„жҳҜ Geforce 2 MXпјҢ
жүҖд»ҘеҪ“然е°ұжҳҜдҪҝз”Ё nv иҝҷдёӘйў„и®ҫзҡ„ Nvidia й©ұеҠЁзЁӢеәҸе•ҰпјҒиҝҳжңүOptionйҮҢйқўзҡ„VideoRamи®ҫе®ҡзҡ„жҳҜжҳҫзӨәеҚЎеҶ…еӯҳе®№йҮҸпјҢи®°еҫ—еЎ«еҜ№пјҒиҮідәҺе…¶е®ғзҡ„йЎ№зӣ®е°ұжІЎжңүиҝҷд№ҲйҮҚиҰҒпјҒSection "Files"
RgbPath "/usr/X11R6/lib/X11/rgb"
FontPath "/usr/X11R6/lib/X11/fonts/75dpi:unscaled"
FontPath "/usr/X11R6/lib/X11/fonts/misc:unscaled"
FontPath "/usr/X11R6/lib/X11/fonts/TrueType"
FontPath "/usr/X11R6/lib/X11/fonts/Type1"
FontPath "/usr/X11R6/lib/X11/fonts/Speedo"
FontPath "/usr/X11R6/lib/X11/fonts/ghostscript"
EndSection
иҝҷдёӘйЎ№зӣ®еңЁи®ҫе®ҡеӯ—еһӢдёҺйўңиүІпјҢйӮЈдёӘRgbPathжҳҜи®ҫе®ҡиүІеҪ©пјҢиҖҢFontPathеҲҷжҳҜи®ҫе®ҡеӯ—еһӢзҡ„ең°ж–№пјҒ
иҝҷйҮҢе‘ҠиҜүжҲ‘们еҸҰдёҖдёӘдҝЎжҒҜпјҢйӮЈе°ұжҳҜеӯ—еһӢйҖҡеёёжҳҜж‘ҶеңЁ/usr/X11R6/lib/X11/fontsйҮҢйқўе–”пјҒSection "ServerFlags"
Option "AllowMouseOpenFail" вҖңfalseвҖқ
EndSection
иҝҷйҮҢеҸҜд»Ҙи®ҫе®ҡX-Windowзҡ„еҸҰдёҖдёӘж•ҙдҪ“еҢ–еҸӮж•°пјҒдёҠйқўйӮЈдёӘ AllowMouseOpenFail зҡ„и®ҫе®ҡдёӯпјҢ
иӢҘи®ҫе®ҡдёә вҖңfalseвҖқ йӮЈд№ҲжІЎжңүжүҫеҲ°е№¶й©ұеҠЁйј ж ҮпјҢе°ұдёҚиғҪзҷ»е…ҘX-Windowе•°пјҒSection "InputDevice"
Driver "keyboard"
Identifier "keyboard"
Option "XkbRules" "xfree86"
Option "XkbModel" "pc104"
Option "XkbLayout" "us_group3"
EndSection
Section "InputDevice"
Driver "mouse"
Identifier "mouse"
Option "Protocol" "IMPS/2"
Option "Device" "/dev/psaux"
Option "ZAxisMapping" "4 5"
EndSection
иҝҷдёӘжҳҜеңЁи®ҫе®ҡе‘Ёиҫ№иҫ“е…ҘжҺҘеҸЈпјҢжңүй”®зӣҳеҸҠйј ж ҮдёӨз§Қи®ҫе®ҡпјҢжіЁж„ҸдёҠйқўй»‘дҪ“зҡ„ең°ж–№пјҢkeyboardи®ҫе®ҡзҡ„жҳҜй”®зӣҳзҡ„ж јејҸ(XkbModelдёҺ XkbLayout)пјҢиҖҢйј ж ҮеҲҷжҳҜи®ҫе®ҡжҺҘеҸЈ(Protocol)иҫғдёәйҮҚиҰҒпјҒSection "ServerLayout"
Identifier "Default layout"
Screen 0 "Screen0" 0 0
InputDevice "mouse" "CorePointer"
InputDevice "usbmice" "SendCoreEvents"
InputDevice "keyboard" "CoreKeyboard"
EndSection
иҝҷдёӘең°ж–№еңЁи®ҫе®ҡж•ҙдёӘз”»йқўзҡ„иҫ“еҮәе‘ўпјҒйҮҚзӮ№еңЁ Screen йӮЈдёӘйЎ№зӣ®зҡ„и®ҫе®ҡе–”пјҒйӮЈдёӘ 0 0 жҢҮзҡ„жҳҜжЎҢйқўе·ҰдёҠи§’дёә 0 0 зҡ„ж„ҸжҖқпјҒSection "Monitor"
Identifier "Generic Monitor"
VendorName "Typical Monitors"
ModelName "1280x1024, 60Hz"
HorizSync 31-64
VertRefresh 50-90
ModeLine "1024x768/70Hz" 75 1024 1048 1184 1328 768 771 777 806 -HSync -VSync
ModeLine "640x480" 25.175 640 664 760 800 480 491 493 525
EndSection
иҝҷдёӘйЎ№зӣ®еҲҷжҳҜи®ҫе®ҡеұҸ幕зҡ„з»ҶйЎ№пјҢеҢ…жӢ¬еҲҶиҫЁзҺҮгҖҒжӣҙж–°йў‘зҺҮзӯүзӯүзҡ„и®ҫе®ҡеҖје–”пјҒSection "Screen"
Identifier "Screen0"
Device "Card0"
Monitor "Generic Monitor"
DefaultDepth 16
Subsection "Display"
Depth 32
Modes "1024x768/70Hz" "640x480"
Virtual 0 0
EndSubsection
Subsection "Display"
Depth 24
Modes "1024x768/70Hz" "640x480"
Virtual 0 0
EndSubsection
Subsection "Display"
Depth 8
Modes "1024x768/70Hz" "640x480"
Virtual 0 0
EndSubsection
Subsection "Display"
Depth 16
Modes "1024x768/70Hz"
Virtual 0 0
EndSubsection
EndSection
йҮҚзӮ№жқҘдәҶпјҒиҝҷдёӘе°ұжҳҜи®ҫе®ҡдҪ иҝӣ е…ҘX-Windowзҡ„ж—¶еҖҷпјҢжҳҫзӨәзҡ„еҲҶиҫЁзҺҮе•°пјҒйў„и®ҫжңүж”ҜжҢҒзҡ„йЎ№зӣ®йғҪдјҡеҶҷиҝӣжқҘпјҢдҪҶжҳҜпјҢеғҸжҜ”иҫғйҫҹжҜӣзҡ„жҲ‘пјҢе°ұжҳҜдёҚе–ңж¬ўжңүиҝҷд№ҲеӨҡзҡ„йЎ№зӣ®еӯҳеңЁпјҢжүҖд»ҘжҲ‘еҸҜд»Ҙе°ҶдёҠйқўзҡ„иө„ ж–ҷпјҢеҸӘеү©дёӢзІ—дҪ“еӯ—пјҢе…¶е®ғзҡ„йғҪеҲ йҷӨпјҢйӮЈд№Ҳиҝӣе…ҘX-Windowе°ұеҸӘжңүдёҖз§ҚжҳҫзӨәжЁЎејҸпјҒжҜ”иҫғж–№дҫҝе•ҰпјҒеҪ“然啰пјҢдҪ д№ҹеҸҜд»Ҙи—үз”ұдҝ®ж”№DefaultDepthйӮЈдёӘйЎ№зӣ® жқҘжҺ§еҲ¶зҷ»е…ҘX-Windowж—¶зҡ„и®ҫе®ҡеҖје•°пјҒ
иҝҷж ·е°ұи®ҫе®ҡе®ҢжҲҗе•ҰпјҒиҖҢеҰӮжһңдҪ жӣҫз»ҸйҖүй”ҷдәҶгҖҺиҷҡжӢҹжЎҢйқўпјҢVirtual desktopгҖҸж—¶пјҢйӮЈд№Ҳе°ұдҝ®ж”№Section Screen йӮЈдёӘйЎ№зӣ®пјҢе°ҶйҮҢйқўзҡ„ Virtual ж”№жҲҗ 0 0 еҚіеҸҜе•°пјҒдёҖиҲ¬иҖҢиЁҖпјҢжҲ‘们еңЁи®ҫе®ҡX-Windowж—¶пјҢйҖҡеёёдјҡе…Ҳд»Ҙеҗ„家Linux distributionжҸҗдҫӣзҡ„иҪҜ件жқҘи®ҫе®ҡпјҢеҰӮжһңдёҚиғҪжҲҗеҠҹпјҢе°ұж”№д»Ҙxf86cfgжқҘиҮӘеҠЁи®ҫе®ҡпјҢиҝҳдёҚиғҪжҲҗеҠҹпјҢе°ұд»Ҙxf86configжқҘи®ҫе®ҡпјҢеҶҚдёҚжҲҗеҠҹпјҢе”үпҪһеҸӘеҘҪдҪҝз”ЁжүӢеҠЁзҡ„ж–№ејҸдҝ®ж”№и®ҫе®ҡжЎЈе•°пјҒ
еҘҪдәҶпјҢи®ҫе®ҡеҘҪдәҶXF86Config-4д№ӢеҗҺпјҢиҮӘ然е°ұжҳҜиҰҒеҗҜеҠЁX-WindowиҜ•иҜ•зңӢе•°пјҒйӮЈд№ҲиҜҘеҰӮдҪ•еҗҜеҠЁX-Windowе‘ўпјҹеҰӮжһңеңЁејҖжңәжөҒзЁӢз®Җд»ӢйӮЈдёҖзҜҮжңүд»”з»Ҷзҡ„зһ§иҝҮзҡ„иҜқпјҢеә”иҜҘдјҡзҹҘйҒ“пјҢжҲ‘们зҡ„ејҖжңәиҝӣе…ҘжЁЎејҸжңүеӨҡз§ҚпјҢдҪҶжҳҜеҹәжң¬дёҠжӯЈеёёзҷ»е…ҘеҲҷжңүrun-level 3зҡ„ж–Үеӯ—жҺҘеҸЈзҷ»е…ҘеҸҠrun-level 5зҡ„еӣҫеҪўжҺҘеҸЈзҷ»е…ҘпјҒеҰӮжһңжҳҜrun-level 5зҡ„иҜқпјҢйӮЈд№ҲиЎЁзӨәжӮЁзӣ®еүҚеә”иҜҘе·Із»ҸжҳҜеңЁX-Windowзҡ„зҺҜеўғдёӢдәҶпјҢеҰӮжһңжҳҜеңЁrun-level 3иҰҒиҪ¬еҲ°X-Windowзҡ„з”»йқўдёӢпјҢйӮЈд№Ҳе°ұзӣҙжҺҘз»ҷд»–пјҡstartxе°ұеҸҜд»Ҙе•ҰпјҒиҝҷдёӘж—¶еҖҷе°ұдјҡдё»еҠЁзҡ„жқҘе°ҶжҲ‘们еҲҡеҲҡи®ҫе®ҡзҡ„еҶ…е®№з»ҷд»–й©ұеҠЁзңӢзңӢпјҢеҰӮжһңеҸҜд»Ҙзҡ„иҜқпјҢиҮӘ然е°ұдјҡиҝӣе…ҘзӘ—еҸЈжЎҢйқўе•°пјҒеҰӮжһңдёҚиғҪиҝӣе…ҘпјҢеҶҚж¬Ўзҡ„з»ҷд»–и®ҫе®ҡеҗ§пјҒ ^_^
йӮЈд№ҲдёҮдёҖжҲ‘зҡ„жҳҫзӨәеҚЎе№¶дёҚиў«жҲ‘зҡ„XFree86жүҖж”ҜжҢҒе‘ўпјҹдҫӢеҰӮжңҖж–°зҡ„Geforce4иҝҷдәӣиҠҜзүҮз»„зҡ„жҳҫзӨәеҚЎпјҹжІЎжңүе…ізі»пјҢиғҪдёҚиғҪй©ұеҠЁзЎ¬ дҪ“жҳҜи·ҹ硬件еҸ‘еұ•зҡ„еҺӮе•Ҷжңүе…ізі»зҡ„пјҢжүҖд»ҘеҸӘиҰҒ硬件ејҖеҸ‘е•ҶиғҪеӨҹжҸҗдҫӣй©ұеҠЁзЁӢеәҸзҡ„иҜқпјҢйӮЈд№ҲиҮӘ然е°ұеҸҜд»ҘжІЎжңүй—®йўҳзҡ„з»ҷд»–й©ұеҠЁе•°пјҒеә•дёӢжҲ‘们д»Ҙзӣ®еүҚжңҖеёёи§Ғзҡ„Nvidiaзҡ„жҳҫ зӨәеҚЎжқҘиҝӣиЎҢиҜҙжҳҺпјҢи®©еӨ§е®¶дәҶи§ЈдёҖдёӢеҰӮдҪ•жӣҙж–°иҝҷдёӘй©ұеҠЁзЁӢеәҸеҗ§пјҒ
- дёӢиҪҪжңҖж–°зҡ„й©ұеҠЁзЁӢеәҸпјҡ
既然иҰҒжӣҙж–°й©ұеҠЁзЁӢеәҸпјҢиҮӘ然иҰҒеҲ°зЎ¬д»¶ејҖеҸ‘е•Ҷзҡ„зҪ‘з«ҷеҺ»дёӢиҪҪе•°пјҒеә•дёӢеҲ—еҮәNvidaзҡ„зҪ‘еқҖпјҢжӮЁеҸҜд»ҘеүҚеҫҖдёӢиҪҪжңҖж–°зҡ„й©ұеҠЁзЁӢеәҸе•°пјҒжҲ‘жҳҜдҪҝз”ЁSRPMдёӢиҪҪеҲ°жҲ‘зҡ„зі»з»ҹеҪ“дёӯпјҢ然еҗҺи—үз”ұзј–иҜ‘жқҘе®ҢжҲҗе®үиЈ…зҡ„пјҒжүҖд»Ҙе»әи®®жӮЁд№ҹдёӢиҪҪSRPMжқҘзҺ©зҺ©еҗ§пјҒ
гҖҖhttp://www.nvidia.com/view.asp?IO=linux_display_archive
гҖҖ
жіЁпјҡиҮіе°‘иҰҒдёӨдёӘжЎЈжЎҲпјҢжЎЈеҗҚдёәпјҡ
гҖҖNVIDIA_GLX-xxxx.src.rpm
гҖҖ
NVIDIA_kernel-xxxx.src.rpm
йӮЈдёӘxxxxжҳҫзӨәзҡ„жҳҜзүҲжң¬пјҢиҝҷдёӨдёӘжЎЈжЎҲзҡ„зүҲжң¬еҝ…йңҖдёҖиҮҙжүҚиЎҢпјҒ
гҖҖ
- зј–иҜ‘并е®үиЈ…й©ұеҠЁзЁӢеәҸпјҡ
еҘҪдәҶпјҢејҖе§ӢжқҘзј–иҜ‘дёҖдёӢжҲ‘们зҡ„SRPMе•°пјҒ并且е®ү装他们е•ҰпјҒ
гҖҖгҖҖ
[root @test root]# rpm --rebuild NVIDIA_kernel-1.0-3123.src.rpm
[root @test root]# rpm --rebuild NVIDIA_GLX-1.0-3123.src.rpm
иҝҷдёӘж—¶еҖҷдјҡеңЁ/usr/src/RPM/RPMS/i586еӨҡдёӨдёӘжЎЈжЎҲпјҢеҘҪдәҶпјҢе°Ҷд»–иЈ…дёҠ[root @test root]# rpm -ivh /usr/src/RPM/RPMS/i586/NVIDIA_kernel-1.0-3123.i586.rpm
[root @test root]# rpm -ivh /usr/src/RPM/RPMS/i586/NVIDIA_GLX-1.0-3123.i586.rpm
е®үиЈ…зҡ„иҝҮзЁӢеҪ“дёӯдјҡжңүдёҖдәӣй”ҷиҜҜи®ҜжҒҜжҳҫзӨәпјҢдёҚиҝҮдёҚиҰҒд»…пјҢйӮЈдёӘжҳҜжӯЈеёёзҡ„пјҒеңЁе®үиЈ…еҘҪдәҶд№ӢеҗҺпјҢдјҡеңЁ/usr/X11R6/lib/modules/driversеӨҡдёҖдёӘеҗҚдёәnvidia_drv.oзҡ„жЎЈжЎҲпјҢйӮЈдёӘе°ұжҳҜжҲ‘们иҰҒзҡ„й©ұеҠЁзЁӢеәҸе•ҰпјҒ
гҖҖ
- жүӢеҠЁеҠ е…Ҙй©ұеҠЁзЁӢеәҸдәҺи®ҫе®ҡжЎЈдёӯ
еҰӮжһңжӮЁеҺҹе…Ҳе°ұеҸҜд»ҘдҪҝз”ЁX-WindowпјҢйӮЈд№Ҳе°ұзӣҙжҺҘжүӢеҠЁзҡ„дҝ®ж”№/etc/X11/XF86Config-4иҝҷдёӘжЎЈжЎҲпјҢеҰӮжһңеҺҹе…Ҳе°ұж— жі•дҪҝз”ЁX-Windowзҡ„иҜқпјҢйӮЈд№ҲиҜ·йҮҚж–°д»Ҙxf86configи®ҫе®ҡдёҖдёӢдҪ зҡ„XFree86пјҢ然еҗҺеңЁдҝ®ж”№еә•дёӢзҡ„ж•°жҚ®пјҡ
гҖҖгҖҖ
[root @test root]# vi /etc/X11/XF86Config-4
1. иҪҪе…Ҙ GLX жЁЎеқ—пјҡ
еҜ»жүҫ Section вҖңModuleвҖқ зЎ®е®ҡеә•дёӢиҝҷдёҖиЎҢеӯҳеңЁпјҢиӢҘдёҚеӯҳеңЁпјҢиҜ·иҮӘиЎҢеҠ е…Ҙпјҡ
Load "glx"
еҗҢж—¶еҜ»жүҫеә•дёӢдёӨиЎҢпјҡ
Load "dri"
Load "GLcore"
иҝҷдёӨиЎҢиӢҘеӯҳеңЁзҡ„иҜқпјҢиҜ·еҲ йҷӨпјҢиӢҘдёҚеӯҳеңЁпјҢе°ұжІЎжңүе…ізі»пјҒ2. еҠ иҪҪй©ұеҠЁж ёеҝғзЁӢеәҸ
еҜ»жүҫSection "Device" еә”иҜҘдјҡжңүиҝҷдёҖиЎҢпјҡ
Driver "nv" (жҲ–иҖ…е…¶е®ғзҡ„еҗҚз§°пјҒ)
е°Ҷд»–дҝ®ж”№дёәеҰӮдёӢзҡ„ж ·еӯҗпјҡ
Driver вҖңnvidiaвҖқ
иҝҷж ·е°ұдҝ®и®ўе®ҢжҲҗдәҶпјҒиө¶еҝ«йҮҚж–°еҗҜеҠЁX-WindowиҜ•иҜ•зңӢпјҒ