Nagios对象格式的一个特点是可以创建上下继承关系的对象定义。一个如何实现对象继承关系的解释可查阅这篇文档。强烈建议你在阅读过下面内容后要再熟悉一下继承关系,因为它将使对象定义创建和维护变得更为容易,同样,还得阅读对象定义决窍一文以使一些冗长定义任务变得简短。
注意
当创建或编辑配置文件时,要遵守如下要求:- 以符号'#'开头的行将视为注释不做处理;
- 变量名是大小写敏感的;
需要着重指出一点,当修改了配置文件时有几个在主机、服务和联系人定义里的域值不会清除。有这种特性的对象域在下面被标记了星号(*)。这个原因是由于Nagios会将一些对象域值会用保存在状态保持文件里的值来覆盖配置文件,前提是配置了对程序内容全面地状态保持选项使能并且域里的值在运行时被外部命令修改过。
绕过这个问题的一个方法是将非状态信息的保持选项关闭掉,在主机、服务和联系人对象定义里用retain_nonstatus_information选项开关。关掉这个选项后会令Nagios在重启动时使用配置文件里给出的域值而不是从状态保持文件中取值。
描述:
主机被定义为存在于网络中的一个物理服务器、工作站或设备等。
定义格式:
注意
标记了(*)的域是必备的而黑色是可选的。define host{ host_name host_name(*) alias alias(*) display_name display_name address address(*) parents host_names hostgroups hostgroup_names check_command command_name initial_state [o,d,u] max_check_attempts #(*) check_interval # retry_interval # active_checks_enabled [0/1] passive_checks_enabled [0/1] check_period timeperiod_name(*) obsess_over_host [0/1] check_freshness [0/1] freshness_threshold # event_handler command_name event_handler_enabled [0/1] low_flap_threshold # high_flap_threshold # flap_detection_enabled [0/1] flap_detection_options [o,d,u] process_perf_data [0/1] retain_status_information [0/1] retain_nonstatus_information [0/1] contacts contacts(*) contact_groups contact_groups(*) notification_interval #(*) first_notification_delay # notification_period timeperiod_name(*) notification_options [d,u,r,f,s] notifications_enabled [0/1] stalking_options [o,d,u] notes note_string notes_url url action_url url icon_image image_file icon_image_alt alt_string vrml_image image_file statusmap_image image_file 2d_coords x_coord,y_coord 3d_coords x_coord,y_coord,z_coord ... }
定义样例:
define host{
		host_name			bogus-router
		alias				Bogus Router #1
		address				192.168.1.254
		parents				server-backbone
		check_command			check-host-alive
		check_interval			5
		retry_interval			1
		max_check_attempts		5
		check_period			24x7
		process_perf_data		0
		retain_nonstatus_information	0
		contact_groups			router-admins
		notification_interval		30
		notification_period		24x7
		notification_options		d,u,r
		}
域描述:
host_name: This directive is used to define a short name used to identify the host. It is used in host group and service definitions to reference this particular host. Hosts can have multiple services (which are monitored) associated with them. When used properly, the $HOSTNAME$ macro will contain this short name.
alias: This directive is used to define a longer name or description used to identify the host. It is provided in order to allow you to more easily identify a particular host. When used properly, the $HOSTALIAS$ macro will contain this alias/description.
address: This directive is used to define the address of the host. Normally, this is an IP address, although it could really be anything you want (so long as it can be used to check the status of the host). You can use a FQDN to identify the host instead of an IP address, but if DNS services are not availble this could cause problems. When used properly, the $HOSTADDRESS$ macro will contain this address. Note: If you do not specify an address directive in a host definition, the name of the host will be used as its address. A word of caution about doing this, however - if DNS fails, most of your service checks will fail because the plugins will be unable to resolve the host name.
display_name: This directive is used to define an alternate name that should be displayed in the web interface for this host. If not specified, this defaults to the value you specify for the host_name directive. Note: The current CGIs do not use this option, although future versions of the web interface will.
parents: This directive is used to define a comma-delimited list of short names of the "parent" hosts for this particular host. Parent hosts are typically routers, switches, firewalls, etc. that lie between the monitoring host and a remote hosts. A router, switch, etc. which is closest to the remote host is considered to be that host's "parent". Read the "Determining Status and Reachability of Network Hosts" document located here for more information. If this host is on the same network segment as the host doing the monitoring (without any intermediate routers, etc.) the host is considered to be on the local network and will not have a parent host. Leave this value blank if the host does not have a parent host (i.e. it is on the same segment as the Nagios host). The order in which you specify parent hosts has no effect on how things are monitored.
hostgroups: This directive is used to identify the short name(s) of the hostgroup(s) that the host belongs to. Multiple hostgroups should be separated by commas. This directive may be used as an alternative to (or in addition to) using the members directive in hostgroup definitions.
check_command: This directive is used to specify the short name of the command that should be used to check if the host is up or down. Typically, this command would try and ping the host to see if it is "alive". The command must return a status of OK (0) or Nagios will assume the host is down. If you leave this argument blank, the host will not be actively checked. Thus, Nagios will likely always assume the host is up (it may show up as being in a "PENDING" state in the web interface). This is useful if you are monitoring printers or other devices that are frequently turned off. The maximum amount of time that the notification command can run is controlled by the host_check_timeout option.
initial_state: By default Nagios will assume that all hosts are in UP states when in starts. You can override the initial state for a host by using this directive. Valid options are: o = UP, d = DOWN, and u = UNREACHABLE.
max_check_attempts: This directive is used to define the number of times that Nagios will retry the host check command if it returns any state other than an OK state. Setting this value to 1 will cause Nagios to generate an alert without retrying the host check again. Note: If you do not want to check the status of the host, you must still set this to a minimum value of 1. To bypass the host check, just leave the check_command option blank.
check_interval: This directive is used to define the number of "time units" between regularly scheduled checks of the host. Unless you've changed the interval_length directive from the default value of 60, this number will mean minutes. More information on this value can be found in the check scheduling documentation.
retry_interval: This directive is used to define the number of "time units" to wait before scheduling a re-check of the hosts. Hosts are rescheduled at the retry interval when the have changed to a non-UP state. Once the host has been retried max_attempts times without a change in its status, it will revert to being scheduled at its "normal" rate as defined by the check_interval value. Unless you've changed the interval_length directive from the default value of 60, this number will mean minutes. More information on this value can be found in the check scheduling documentation.
active_checks_enabled **: This directive is used to determine whether or not active checks (either regularly scheduled or on-demand) of this host are enabled. Values: 0 = disable active host checks, 1 = enable active host checks.
passive_checks_enabled **: This directive is used to determine whether or not passive checks are enabled for this host. Values: 0 = disable passive host checks, 1 = enable passive host checks.
check_period: This directive is used to specify the short name of the time period during which active checks of this host can be made.
obsess_over_host **: This directive determines whether or not checks for the host will be "obsessed" over using the ochp_command.
check_freshness **: This directive is used to determine whether or not freshness checks are enabled for this host. Values: 0 = disable freshness checks, 1 = enable freshness checks.
freshness_threshold: This directive is used to specify the freshness threshold (in seconds) for this host. If you set this directive to a value of 0, Nagios will determine a freshness threshold to use automatically.
event_handler: This directive is used to specify the short name of the command that should be run whenever a change in the state of the host is detected (i.e. whenever it goes down or recovers). Read the documentation on event handlers for a more detailed explanation of how to write scripts for handling events. The maximum amount of time that the event handler command can run is controlled by the event_handler_timeout option.
event_handler_enabled **: This directive is used to determine whether or not the event handler for this host is enabled. Values: 0 = disable host event handler, 1 = enable host event handler.
low_flap_threshold: This directive is used to specify the low state change threshold used in flap detection for this host. More information on flap detection can be found here. If you set this directive to a value of 0, the program-wide value specified by the low_host_flap_threshold directive will be used.
high_flap_threshold: This directive is used to specify the high state change threshold used in flap detection for this host. More information on flap detection can be found here. If you set this directive to a value of 0, the program-wide value specified by the high_host_flap_threshold directive will be used.
flap_detection_enabled **: This directive is used to determine whether or not flap detection is enabled for this host. More information on flap detection can be found here. Values: 0 = disable host flap detection, 1 = enable host flap detection.
flap_detection_options: This directive is used to determine what host states the flap detection logic will use for this host. Valid options are a combination of one or more of the following: o = UP states, d = DOWN states, u = UNREACHABLE states.
process_perf_data **: This directive is used to determine whether or not the processing of performance data is enabled for this host. Values: 0 = disable performance data processing, 1 = enable performance data processing.
retain_status_information: This directive is used to determine whether or not status-related information about the host is retained across program restarts. This is only useful if you have enabled state retention using the retain_state_information directive. Value: 0 = disable status information retention, 1 = enable status information retention.
retain_nonstatus_information: This directive is used to determine whether or not non-status information about the host is retained across program restarts. This is only useful if you have enabled state retention using the retain_state_information directive. Value: 0 = disable non-status information retention, 1 = enable non-status information retention.
contacts: This is a list of the short names of the contacts that should be notified whenever there are problems (or recoveries) with this host. Multiple contacts should be separated by commas. Useful if you want notifications to go to just a few people and don't want to configure contact groups. You must specify at least one contact or contact group in each host definition.
contact_groups: This is a list of the short names of the contact groups that should be notified whenever there are problems (or recoveries) with this host. Multiple contact groups should be separated by commas. You must specify at least one contact or contact group in each host definition.
notification_interval: This directive is used to define the number of "time units" to wait before re-notifying a contact that this server is still down or unreachable. Unless you've changed the interval_length directive from the default value of 60, this number will mean minutes. If you set this value to 0, Nagios will not re-notify contacts about problems for this host - only one problem notification will be sent out.
first_notification_delay: This directive is used to define the number of "time units" to wait before sending out the first problem notification when this host enters a non-UP state. Unless you've changed the interval_length directive from the default value of 60, this number will mean minutes. If you set this value to 0, Nagios will start sending out notifications immediately.
notification_period: This directive is used to specify the short name of the time period during which notifications of events for this host can be sent out to contacts. If a host goes down, becomes unreachable, or recoveries during a time which is not covered by the time period, no notifications will be sent out.
notification_options: This directive is used to determine when notifications for the host should be sent out. Valid options are a combination of one or more of the following: d = send notifications on a DOWN state, u = send notifications on an UNREACHABLE state, r = send notifications on recoveries (OK state), f = send notifications when the host starts and stops flapping, and s = send notifications when scheduled downtime starts and ends. If you specify n (none) as an option, no host notifications will be sent out. If you do not specify any notification options, Nagios will assume that you want notifications to be sent out for all possible states. Example: If you specify d,r in this field, notifications will only be sent out when the host goes DOWN and when it recovers from a DOWN state.
notifications_enabled **: This directive is used to determine whether or not notifications for this host are enabled. Values: 0 = disable host notifications, 1 = enable host notifications.
stalking_options: This directive determines which host states "stalking" is enabled for. Valid options are a combination of one or more of the following: o = stalk on UP states, d = stalk on DOWN states, and u = stalk on UNREACHABLE states. More information on state stalking can be found here.
notes: This directive is used to define an optional string of notes pertaining to the host. If you specify a note here, you will see the it in the extended information CGI (when you are viewing information about the specified host).
notes_url: This variable is used to define an optional URL that can be used to provide more information about the host. If you specify an URL, you will see a red folder icon in the CGIs (when you are viewing host information) that links to the URL you specify here. Any valid URL can be used. If you plan on using relative paths, the base path will the the same as what is used to access the CGIs (i.e. /cgi-bin/nagios/). This can be very useful if you want to make detailed information on the host, emergency contact methods, etc. available to other support staff.
action_url: This directive is used to define an optional URL that can be used to provide more actions to be performed on the host. If you specify an URL, you will see a red "splat" icon in the CGIs (when you are viewing host information) that links to the URL you specify here. Any valid URL can be used. If you plan on using relative paths, the base path will the the same as what is used to access the CGIs (i.e. /cgi-bin/nagios/).
icon_image: This variable is used to define the name of a GIF, PNG, or JPG image that should be associated with this host. This image will be displayed in the various places in the CGIs. The image will look best if it is 40x40 pixels in size. Images for hosts are assumed to be in the logos/ subdirectory in your HTML images directory (i.e. /usr/local/nagios/share/images/logos).
icon_image_alt: This variable is used to define an optional string that is used in the ALT tag of the image specified by the <icon_image> argument.
vrml_image: This variable is used to define the name of a GIF, PNG, or JPG image that should be associated with this host. This image will be used as the texture map for the specified host in the statuswrl CGI. Unlike the image you use for the <icon_image> variable, this one should probably not have any transparency. If it does, the host object will look a bit wierd. Images for hosts are assumed to be in the logos/ subdirectory in your HTML images directory (i.e. /usr/local/nagios/share/images/logos).
statusmap_image: This variable is used to define the name of an image that should be associated with this host in the statusmap CGI. You can specify a JPEG, PNG, and GIF image if you want, although I would strongly suggest using a GD2 format image, as other image formats will result in a lot of wasted CPU time when the statusmap image is generated. GD2 images can be created from PNG images by using the pngtogd2 utility supplied with Thomas Boutell's gd library. The GD2 images should be created in uncompressed format in order to minimize CPU load when the statusmap CGI is generating the network map image. The image will look best if it is 40x40 pixels in size. You can leave these option blank if you are not using the statusmap CGI. Images for hosts are assumed to be in the logos/ subdirectory in your HTML images directory (i.e. /usr/local/nagios/share/images/logos).
2d_coords: This variable is used to define coordinates to use when drawing the host in the statusmap CGI. Coordinates should be given in positive integers, as the correspond to physical pixels in the generated image. The origin for drawing (0,0) is in the upper left hand corner of the image and extends in the positive x direction (to the right) along the top of the image and in the positive y direction (down) along the left hand side of the image. For reference, the size of the icons drawn is usually about 40x40 pixels (text takes a little extra space). The coordinates you specify here are for the upper left hand corner of the host icon that is drawn. Note: Don't worry about what the maximum x and y coordinates that you can use are. The CGI will automatically calculate the maximum dimensions of the image it creates based on the largest x and y coordinates you specify.
3d_coords: This variable is used to define coordinates to use when drawing the host in the statuswrl CGI. Coordinates can be positive or negative real numbers. The origin for drawing is (0.0,0.0,0.0). For reference, the size of the host cubes drawn is 0.5 units on each side (text takes a little more space). The coordinates you specify here are used as the center of the host cube.
描述:
主机组是指一台或多台主机构成的组,可使配置更简单或是为完成特定目的而在CGI里显示使用。
定义格式:
注意
标记了(*)的域是必备的而黑色是可选的。define hostgroup{ hostgroup_name hostgroup_name(*) alias alias(*) members hosts hostgroup_members hostgroups notes note_string notes_url url action_url url ... }
定义样例:
define hostgroup{
		hostgroup_name		novell-servers
		alias			Novell Servers
		members			netware1,netware2,netware3,netware4
		}
域描述:
hostgroup_name: This directive is used to define a short name used to identify the host group.
alias: This directive is used to define is a longer name or description used to identify the host group. It is provided in order to allow you to more easily identify a particular host group.
members: This is a list of the short names of hosts that should be included in this group. Multiple host names should be separated by commas. This directive may be used as an alternative to (or in addition to) the hostgroups directive in host definitions.
hostgroup_members: This optional directive can be used to include hosts from other "sub" host groups in this host group. Specify a comma-delimited list of short names of other host groups whose members should be included in this group.
notes: This directive is used to define an optional string of notes pertaining to the host. If you specify a note here, you will see the it in the extended information CGI (when you are viewing information about the specified host).
notes_url: This variable is used to define an optional URL that can be used to provide more information about the host group. If you specify an URL, you will see a red folder icon in the CGIs (when you are viewing hostgroup information) that links to the URL you specify here. Any valid URL can be used. If you plan on using relative paths, the base path will the the same as what is used to access the CGIs (i.e. /cgi-bin/nagios/). This can be very useful if you want to make detailed information on the host group, emergency contact methods, etc. available to other support staff.
action_url: This directive is used to define an optional URL that can be used to provide more actions to be performed on the host group. If you specify an URL, you will see a red "splat" icon in the CGIs (when you are viewing hostgroup information) that links to the URL you specify here. Any valid URL can be used. If you plan on using relative paths, the base path will the the same as what is used to access the CGIs (i.e. /cgi-bin/nagios/).
描述:
服务定义为在主机上运行的某种“应用服务”。这种服务定义得非常宽泛,可以是在主机上实际的服务进程(POP3、SMTP、HTTP等)或是与主机有关的某种计量值(PING响应值、在线用户数、磁盘空闲空间等),其中的差异见下面的说明。
定义格式:
注意
标记了(*)的域是必备的而黑色是可选的。define service{ host_name host_name(*) hostgroup_name hostgroup_name service_description service_description(*) display_name display_name servicegroups servicegroup_names is_volatile [0/1] check_command command_name(*) initial_state [o,w,u,c] max_check_attempts #(*) check_interval #(*) retry_interval #(*) active_checks_enabled [0/1] passive_checks_enabled [0/1] check_period timeperiod_name(*) obsess_over_service [0/1] check_freshness [0/1] freshness_threshold # event_handler command_name event_handler_enabled [0/1] low_flap_threshold # high_flap_threshold # flap_detection_enabled [0/1] flap_detection_options [o,w,c,u] process_perf_data [0/1] retain_status_information [0/1] retain_nonstatus_information [0/1] notification_interval #(*) first_notification_delay # notification_period timeperiod_name(*) notification_options [w,u,c,r,f,s] notifications_enabled [0/1] contacts contacts(*) contact_groups contact_groups(*) stalking_options [o,w,u,c] notes note_string notes_url url action_url url icon_image image_file icon_image_alt alt_string ... }
定义样例:
define service{
		host_name		linux-server
		service_description	check-disk-sda1
		check_command		check-disk!/dev/sda1
		max_check_attempts	5
		check_interval	5
		retry_interval	3
		check_period		24x7
		notification_interval	30
		notification_period	24x7
		notification_options	w,c,r
		contact_groups		linux-admins
		}
域描述:
host_name: This directive is used to specify the short name(s) of the host(s) that the service "runs" on or is associated with. Multiple hosts should be separated by commas.
hostgroup_name: This directive is used to specify the short name(s) of the hostgroup(s) that the service "runs" on or is associated with. Multiple hostgroups should be separated by commas. The hostgroup_name may be used instead of, or in addition to, the host_name directive.
service_description;: This directive is used to define the description of the service, which may contain spaces, dashes, and colons (semicolons, apostrophes, and quotation marks should be avoided). No two services associated with the same host can have the same description. Services are uniquely identified with their host_name and service_description directives.
display_name: This directive is used to define an alternate name that should be displayed in the web interface for this service. If not specified, this defaults to the value you specify for the service_description directive. Note: The current CGIs do not use this option, although future versions of the web interface will.
servicegroups: This directive is used to identify the short name(s) of the servicegroup(s) that the service belongs to. Multiple servicegroups should be separated by commas. This directive may be used as an alternative to using the members directive in servicegroup definitions.
is_volatile: This directive is used to denote whether the service is "volatile". Services are normally not volatile. More information on volatile service and how they differ from normal services can be found here. Value: 0 = service is not volatile, 1 = service is volatile.
check_command: This directive is used to specify the short name of the command that Nagios will run in order to check the status of the service. The maximum amount of time that the service check command can run is controlled by the service_check_timeout option.
initial_state: By default Nagios will assume that all services are in OK states when in starts. You can override the initial state for a service by using this directive. Valid options are: o = 正常(OK), w = 告警(WARNING), u = 未知(UNKNOWN), and c = 紧急(CRITICAL).
max_check_attempts: This directive is used to define the number of times that Nagios will retry the service check command if it returns any state other than an OK state. Setting this value to 1 will cause Nagios to generate an alert without retrying the service check again.
check_interval: This directive is used to define the number of "time units" to wait before scheduling the next "regular" check of the service. "Regular" checks are those that occur when the service is in an OK state or when the service is in a non-OK state, but has already been rechecked max_attempts number of times. Unless you've changed the interval_length directive from the default value of 60, this number will mean minutes. More information on this value can be found in the check scheduling documentation.
retry_interval: This directive is used to define the number of "time units" to wait before scheduling a re-check of the service. Services are rescheduled at the retry interval when the have changed to a non-OK state. Once the service has been retried max_attempts times without a change in its status, it will revert to being scheduled at its "normal" rate as defined by the check_interval value. Unless you've changed the interval_length directive from the default value of 60, this number will mean minutes. More information on this value can be found in the check scheduling documentation.
active_checks_enabled **: This directive is used to determine whether or not active checks of this service are enabled. Values: 0 = disable active service checks, 1 = enable active service checks.
passive_checks_enabled **: This directive is used to determine whether or not passive checks of this service are enabled. Values: 0 = disable passive service checks, 1 = enable passive service checks.
check_period: This directive is used to specify the short name of the time period during which active checks of this service can be made.
obsess_over_service **: This directive determines whether or not checks for the service will be "obsessed" over using the ocsp_command.
check_freshness **: This directive is used to determine whether or not freshness checks are enabled for this service. Values: 0 = disable freshness checks, 1 = enable freshness checks.
freshness_threshold: This directive is used to specify the freshness threshold (in seconds) for this service. If you set this directive to a value of 0, Nagios will determine a freshness threshold to use automatically.
event_handler_enabled **: This directive is used to determine whether or not the event handler for this service is enabled. Values: 0 = disable service event handler, 1 = enable service event handler.
low_flap_threshold: This directive is used to specify the low state change threshold used in flap detection for this service. More information on flap detection can be found here. If you set this directive to a value of 0, the program-wide value specified by the low_service_flap_threshold directive will be used.
high_flap_threshold: This directive is used to specify the high state change threshold used in flap detection for this service. More information on flap detection can be found here. If you set this directive to a value of 0, the program-wide value specified by the high_service_flap_threshold directive will be used.
flap_detection_enabled **: This directive is used to determine whether or not flap detection is enabled for this service. More information on flap detection can be found here. Values: 0 = disable service flap detection, 1 = enable service flap detection.
flap_detection_options: This directive is used to determine what service states the flap detection logic will use for this service. Valid options are a combination of one or more of the following: o = OK states, w = WARNING states, c = CRITICAL states, u = UNKNOWN states.
process_perf_data **: This directive is used to determine whether or not the processing of performance data is enabled for this service. Values: 0 = disable performance data processing, 1 = enable performance data processing.
retain_status_information: This directive is used to determine whether or not status-related information about the service is retained across program restarts. This is only useful if you have enabled state retention using the retain_state_information directive. Value: 0 = disable status information retention, 1 = enable status information retention.
retain_nonstatus_information: This directive is used to determine whether or not non-status information about the service is retained across program restarts. This is only useful if you have enabled state retention using the retain_state_information directive. Value: 0 = disable non-status information retention, 1 = enable non-status information retention.
notification_interval: This directive is used to define the number of "time units" to wait before re-notifying a contact that this service is still in a non-OK state. Unless you've changed the interval_length directive from the default value of 60, this number will mean minutes. If you set this value to 0, Nagios will not re-notify contacts about problems for this service - only one problem notification will be sent out.
first_notification_delay: This directive is used to define the number of "time units" to wait before sending out the first problem notification when this service enters a non-OK state. Unless you've changed the interval_length directive from the default value of 60, this number will mean minutes. If you set this value to 0, Nagios will start sending out notifications immediately.
notification_period: This directive is used to specify the short name of the time period during which notifications of events for this service can be sent out to contacts. No service notifications will be sent out during times which is not covered by the time period.
notification_options: This directive is used to determine when notifications for the service should be sent out. Valid options are a combination of one or more of the following: w = send notifications on a WARNING state, u = send notifications on an UNKNOWN state, c = send notifications on a CRITICAL state, r = send notifications on recoveries (OK state), f = send notifications when the service starts and stops flapping, and s = send notifications when scheduled downtime starts and ends. If you specify n (none) as an option, no service notifications will be sent out. If you do not specify any notification options, Nagios will assume that you want notifications to be sent out for all possible states. Example: If you specify w,r in this field, notifications will only be sent out when the service goes into a WARNING state and when it recovers from a WARNING state.
notifications_enabled **: This directive is used to determine whether or not notifications for this service are enabled. Values: 0 = disable service notifications, 1 = enable service notifications.
contacts: This is a list of the short names of the contacts that should be notified whenever there are problems (or recoveries) with this service. Multiple contacts should be separated by commas. Useful if you want notifications to go to just a few people and don't want to configure contact groups. You must specify at least one contact or contact group in each service definition.
contact_groups: This is a list of the short names of the contact groups that should be notified whenever there are problems (or recoveries) with this service. Multiple contact groups should be separated by commas. You must specify at least one contact or contact group in each service definition.
stalking_options: This directive determines which service states "stalking" is enabled for. Valid options are a combination of one or more of the following: o = stalk on OK states, w = stalk on WARNING states, u = stalk on UNKNOWN states, and c = stalk on CRITICAL states. More information on state stalking can be found here.
notes: This directive is used to define an optional string of notes pertaining to the service. If you specify a note here, you will see the it in the extended information CGI (when you are viewing information about the specified service).
notes_url: This directive is used to define an optional URL that can be used to provide more information about the service. If you specify an URL, you will see a red folder icon in the CGIs (when you are viewing service information) that links to the URL you specify here. Any valid URL can be used. If you plan on using relative paths, the base path will the the same as what is used to access the CGIs (i.e. /cgi-bin/nagios/). This can be very useful if you want to make detailed information on the service, emergency contact methods, etc. available to other support staff.
action_url: This directive is used to define an optional URL that can be used to provide more actions to be performed on the service. If you specify an URL, you will see a red "splat" icon in the CGIs (when you are viewing service information) that links to the URL you specify here. Any valid URL can be used. If you plan on using relative paths, the base path will the the same as what is used to access the CGIs (i.e. /cgi-bin/nagios/).
icon_image: This variable is used to define the name of a GIF, PNG, or JPG image that should be associated with this host. This image will be displayed in the status and extended information CGIs. The image will look best if it is 40x40 pixels in size. Images for hosts are assumed to be in the logos/ subdirectory in your HTML images directory (i.e. /usr/local/nagios/share/images/logos).
icon_image_alt: This variable is used to define an optional string that is used in the ALT tag of the image specified by the <icon_image> argument. The ALT tag is used in the status, extended information and statusmap CGIs.
描述:
A service group definition is used to group one or more services together for simplifying configuration with object tricks or display purposes in the CGIs.
定义格式:
注意
标记了(*)的域是必备的而黑色是可选的。define servicegroup{ servicegroup_name servicegroup_name(*) alias alias(*) members services servicegroup_members servicegroups notes note_string notes_url url action_url url ... }
定义样例:
define servicegroup{
		servicegroup_name	dbservices
		alias			Database Services
		members			ms1,SQL Server,ms1,SQL Server Agent,ms1,SQL DTC
		}
域描述:
servicegroup_name: This directive is used to define a short name used to identify the service group.
alias: This directive is used to define is a longer name or description used to identify the service group. It is provided in order to allow you to more easily identify a particular service group.
members: This is a list of the descriptions of service (and the names of their corresponding hosts) that should be included in this group. Host and service names should be separated by commas. This directive may be used as an alternative to the servicegroups directive in service definitions. The format of the member directive is as follows (note that a host name must precede a service name/description): members=<host1>,<service1>,<host2>,<service2>,...,<hostn>,<servicen>
servicegroup_members: This optional directive can be used to include services from other "sub" service groups in this service group. Specify a comma-delimited list of short names of other service groups whose members should be included in this group.
notes: This directive is used to define an optional string of notes pertaining to the service group. If you specify a note here, you will see the it in the extended information CGI (when you are viewing information about the specified service group).
notes_url: This directive is used to define an optional URL that can be used to provide more information about the service group. If you specify an URL, you will see a red folder icon in the CGIs (when you are viewing service group information) that links to the URL you specify here. Any valid URL can be used. If you plan on using relative paths, the base path will the the same as what is used to access the CGIs (i.e. /cgi-bin/nagios/). This can be very useful if you want to make detailed information on the service group, emergency contact methods, etc. available to other support staff.
action_url: This directive is used to define an optional URL that can be used to provide more actions to be performed on the service group. If you specify an URL, you will see a red "splat" icon in the CGIs (when you are viewing service group information) that links to the URL you specify here. Any valid URL can be used. If you plan on using relative paths, the base path will the the same as what is used to access the CGIs (i.e. /cgi-bin/nagios/).
描述:
A contact definition is used to identify someone who should be contacted in the event of a problem on your network. The different arguments to a contact definition are described below.
定义格式:
注意
标记了(*)的域是必备的而黑色是可选的。define contact{ contact_name contact_name(*) alias alias(*) contactgroups contactgroup_names host_notifications_enabled [0/1](*) service_notifications_enabled [0/1](*) host_notification_period timeperiod_name(*) service_notification_period timeperiod_name(*) host_notification_options [d,u,r,f,s,n](*) service_notification_options [w,u,c,r,f,s,n](*) host_notification_commands command_name(*) service_notification_commands command_name(*) email email_address pager pager_number or pager_email_gateway addressx additional_contact_address can_submit_commands [0/1] retain_status_information [0/1] retain_nonstatus_information [0/1] ... }
定义样例:
define contact{
		contact_name                    jdoe
		alias                           John Doe
		host_notifications_enabled		1
		service_notifications_enabled	1
		service_notification_period     24x7
		host_notification_period        24x7
		service_notification_options    w,u,c,r
		host_notification_options       d,u,r
		service_notification_commands   notify-by-email
		host_notification_commands      host-notify-by-email
		email			jdoe@localhost.localdomain
		pager			555-5555@pagergateway.localhost.localdomain
		address1			xxxxx.xyyy@icq.com
		address2			555-555-5555
		can_submit_commands	1
		}
域描述:
contact_name: This directive is used to define a short name used to identify the contact. It is referenced in contact group definitions. Under the right circumstances, the $CONTACTNAME$ macro will contain this value.
alias: This directive is used to define a longer name or description for the contact. Under the rights circumstances, the $CONTACTALIAS$ macro will contain this value.
contactgroups: This directive is used to identify the short name(s) of the contactgroup(s) that the contact belongs to. Multiple contactgroups should be separated by commas. This directive may be used as an alternative to (or in addition to) using the members directive in contactgroup definitions.
host_notifications_enabled: This directive is used to determine whether or not the contact will receive notifications about host problems and recoveries. Values: 0 = don't send notifications, 1 = send notifications.
service_notifications_enabled: This directive is used to determine whether or not the contact will receive notifications about service problems and recoveries. Values: 0 = don't send notifications, 1 = send notifications.
host_notification_period: This directive is used to specify the short name of the time period during which the contact can be notified about host problems or recoveries. You can think of this as an "on call" time for host notifications for the contact. Read the documentation on time periods for more information on how this works and potential problems that may result from improper use.
service_notification_period: This directive is used to specify the short name of the time period during which the contact can be notified about service problems or recoveries. You can think of this as an "on call" time for service notifications for the contact. Read the documentation on time periods for more information on how this works and potential problems that may result from improper use.
host_notification_commands: This directive is used to define a list of the short names of the commands used to notify the contact of a host problem or recovery. Multiple notification commands should be separated by commas. All notification commands are executed when the contact needs to be notified. The maximum amount of time that a notification command can run is controlled by the notification_timeout option.
host_notification_options: This directive is used to define the host states for which notifications can be sent out to this contact. Valid options are a combination of one or more of the following: d = notify on DOWN host states, u = notify on UNREACHABLE host states, r = notify on host recoveries (UP states), f = notify when the host starts and stops flapping, and s = send notifications when host or service scheduled downtime starts and ends. If you specify n (none) as an option, the contact will not receive any type of host notifications.
service_notification_options: This directive is used to define the service states for which notifications can be sent out to this contact. Valid options are a combination of one or more of the following: w = notify on WARNING service states, u = notify on UNKNOWN service states, c = notify on CRITICAL service states, r = notify on service recoveries (OK states), and f = notify when the service starts and stops flapping. If you specify n (none) as an option, the contact will not receive any type of service notifications.
service_notification_commands: This directive is used to define a list of the short names of the commands used to notify the contact of a service problem or recovery. Multiple notification commands should be separated by commas. All notification commands are executed when the contact needs to be notified. The maximum amount of time that a notification command can run is controlled by the notification_timeout option.
email: This directive is used to define an email address for the contact. Depending on how you configure your notification commands, it can be used to send out an alert email to the contact. Under the right circumstances, the $CONTACTEMAIL$ macro will contain this value.
pager: This directive is used to define a pager number for the contact. It can also be an email address to a pager gateway (i.e. pagejoe@pagenet.com). Depending on how you configure your notification commands, it can be used to send out an alert page to the contact. Under the right circumstances, the $CONTACTPAGER$ macro will contain this value.
addressx: Address directives are used to define additional "addresses" for the contact. These addresses can be anything - cell phone numbers, instant messaging addresses, etc. Depending on how you configure your notification commands, they can be used to send out an alert o the contact. Up to six addresses can be defined using these directives (address1 through address6). The $CONTACTADDRESSx$ macro will contain this value.
can_submit_commands: This directive is used to determine whether or not the contact can submit external commands to Nagios from the CGIs. Values: 0 = don't allow contact to submit commands, 1 = allow contact to submit commands.
retain_status_information: This directive is used to determine whether or not status-related information about the contact is retained across program restarts. This is only useful if you have enabled state retention using the retain_state_information directive. Value: 0 = disable status information retention, 1 = enable status information retention.
retain_nonstatus_information: This directive is used to determine whether or not non-status information about the contact is retained across program restarts. This is only useful if you have enabled state retention using the retain_state_information directive. Value: 0 = disable non-status information retention, 1 = enable non-status information retention.
描述:
A contact group definition is used to group one or more contacts together for the purpose of sending out alert/recovery notifications.
定义格式:
注意
标记了(*)的域是必备的而黑色是可选的。define contactgroup{ contactgroup_name contactgroup_name(*) alias alias(*) members contacts(*) contactgroup_members contactgroups ... }
定义样例:
define contactgroup{
		contactgroup_name		novell-admins
		alias			Novell Administrators
		members			jdoe,rtobert,tzach
		}
域描述:
contactgroup_name: This directive is a short name used to identify the contact group.
alias: This directive is used to define a longer name or description used to identify the contact group.
members: This directive is used to define a list of the short names of contacts that should be included in this group. Multiple contact names should be separated by commas. This directive may be used as an alternative to (or in addition to) using the contactgroups directive in contact definitions.
contactgroup_members: This optional directive can be used to include contacts from other "sub" contact groups in this contact group. Specify a comma-delimited list of short names of other contact groups whose members should be included in this group.
描述:
A time period is a list of times during various days that are considered to be "valid" times for notifications and service checks. It consists of time ranges for each day of the week that "rotate" once the week has come to an end. Different types of exceptions to the normal weekly time are supported, including: specific weekdays, days of generic months, days of specific months, and calendar dates.
定义格式:
注意
标记了(*)的域是必备的而黑色是可选的。define timeperiod{ timeperiod_name timeperiod_name(*) alias alias(*) [weekday] timeranges [exception] timeranges exclude [timeperiod1,timeperiod2,...,timeperiodn] ... }
定义样例:
define timeperiod{
		timeperiod_name		nonworkhours
		alias			Non-Work Hours
		sunday			00:00-24:00			; Every Sunday of every week
		monday			00:00-09:00,17:00-24:00		; Every Monday of every week
		tuesday			00:00-09:00,17:00-24:00		; Every Tuesday of every week
		wednesday			00:00-09:00,17:00-24:00		; Every Wednesday of every week
		thursday			00:00-09:00,17:00-24:00		; Every Thursday of every week
		friday			00:00-09:00,17:00-24:00		; Every Friday of every week
		saturday			00:00-24:00			; Every Saturday of every week
		}

define timeperiod{
		timeperiod_name		misc-single-days
		alias			Misc Single Days
		1999-01-28		00:00-24:00 		; January 28th, 1999
		monday 3			00:00-24:00		; 3rd Monday of every month
		day 2			00:00-24:00		; 2nd day of every month
		february 10		00:00-24:00		; February 10th of every year
		february -1		00:00-24:00		; Last day in February of every year
		friday -2			00:00-24:00		; 2nd to last Friday of every month
		thursday -1 november	00:00-24:00		; Last Thursday in November of every year
		}

define timeperiod{
		timeperiod_name		misc-date-ranges
		alias			Misc Date Ranges
		2007-01-01 - 2008-02-01	00:00-24:00		; January 1st, 2007 to February 1st, 2008
		monday 3 - thursday 4	00:00-24:00		; 3rd Monday to 4th Thursday of every month
		day 1 - 15		00:00-24:00		; 1st to 15th day of every month
		day 20 - -1		00:00-24:00		; 20th to the last day of every month
		july 10 - 15		00:00-24:00		; July 10th to July 15th of every year
		april 10 - may 15		00:00-24:00		; April 10th to May 15th of every year
		tuesday 1 april - friday 2 may	00:00-24:00	; 1st Tuesday in April to 2nd Friday in May of every year
		}

define timeperiod{
		timeperiod_name		misc-skip-ranges
		alias			Misc Skip Ranges
		2007-01-01 - 2008-02-01 / 3		00:00-24:00	; Every 3 days from January 1st, 2007 to February 1st, 2008
		2008-04-01 / 7			00:00-24:00	; Every 7 days from April 1st, 2008 (continuing forever)
		monday 3 - thursday 4 / 2		00:00-24:00	; Every other day from 3rd Monday to 4th Thursday of every month
		day 1 - 15 / 5			00:00-24:00	; Every 5 days from the 1st to the 15th day of every month
		july 10 - 15 / 2			00:00-24:00	; Every other day from July 10th to July 15th of every year
		tuesday 1 april - friday 2 may / 6	00:00-24:00	; Every 6 days from the 1st Tuesday in April to the 2nd Friday in May of every year
		}
域描述:
timeperiod_name: This directives is the short name used to identify the time period.
alias: This directive is a longer name or description used to identify the time period.
[weekday]: The weekday directives ("sunday" through "saturday")are comma-delimited lists of time ranges that are "valid" times for a particular day of the week. Notice that there are seven different days for which you can define time ranges (Sunday through Saturday). Each time range is in the form of HH:MM-HH:MM, where hours are specified on a 24 hour clock. For programlisting, 00:15-24:00 means 12:15am in the morning for this day until 12:20am midnight (a 23 hour, 45 minute total time range). If you wish to exclude an entire day from the timeperiod, simply do not include it in the timeperiod definition.
[exception]: You can specify several different types of exceptions to the standard rotating weekday schedule. Exceptions can take a number of different forms including single days of a specific or generic month, single weekdays in a month, or single calendar dates. You can also specify a range of days/dates and even specify skip intervals to obtain functionality described by "every 3 days between these dates". Rather than list all the possible formats for exception strings, I'll let you look at the programlisting timeperiod definitions above to see what's possible. :-) Weekdays and different types of exceptions all have different levels of precedence, so its important to understand how they can affect each other. More information on this can be found in the documentation on timeperiods.
exclude: This directive is used to specify the short names of other timeperiod definitions whose time ranges should be excluded from this timeperiod. Multiple timeperiod names should be separated with a comma.
描述:
A command definition is just that. It defines a command. Commands that can be defined include service checks, service notifications, service event handlers, host checks, host notifications, and host event handlers. Command definitions can contain macros, but you must make sure that you include only those macros that are "valid" for the circumstances when the command will be used. More information on what macros are available and when they are "valid" can be found here. The different arguments to a command definition are outlined below.
定义格式:
注意
标记了(*)的域是必备的而黑色是可选的。define command{ command_name command_name(*) command_line command_line(*) ... }
定义样例:
define command{
		command_name	check_pop
		command_line	/usr/local/nagios/libexec/check_pop -H $HOSTADDRESS$
		}
域描述:
command_name: This directive is the short name used to identify the command. It is referenced in contact, host, and service definitions (in notification, check, and event handler directives), among other places.
command_line: This directive is used to define what is actually executed by Nagios when the command is used for service or host checks, notifications, or event handlers. Before the command line is executed, all valid macros are replaced with their respective values. See the documentation on macros for determining when you can use different macros. Note that the command line is not surrounded in quotes. Also, if you want to pass a dollar sign ($) on the command line, you have to escape it with another dollar sign. NOTE: You may not include a semicolon (;) in the command_line directive, because everything after it will be ignored as a config file comment. You can work around this limitation by setting one of the $USER$ macros in your resource file to a semicolon and then referencing the appropriate $USER$ macro in the command_line directive in place of the semicolon. you want to pass arguments to commands during runtime, you can use $ARGn$ macros in the command_line directive of the command definition and then separate individual arguments from the command name (and from each other) using bang (!) characters in the object definition directive (host check command, service event handler command, etc) that references the command. More information on how arguments in command definitions are processed during runtime can be found in the documentation on macros.
描述:
Service dependencies are an advanced feature of Nagios that allow you to suppress notifications and active checks of services based on the status of one or more other services. Service dependencies are optional and are mainly targeted at advanced users who have complicated monitoring setups. More information on how service dependencies work (read this!) can be found here.
定义格式:
注意
标记了(*)的域是必备的而黑色是可选的。然而你最少要在定义中给定出一种使用类型标准。define servicedependency{ dependent_host_name host_name(*) dependent_hostgroup_name hostgroup_name dependent_service_description service_description(*) host_name host_name(*) hostgroup_name hostgroup_name service_description service_description(*) inherits_parent [0/1] execution_failure_criteria [o,w,u,c,p,n] notification_failure_criteria [o,w,u,c,p,n] dependency_period timeperiod_name ... }
定义样例:
define servicedependency{
			host_name			WWW1
			service_description		Apache Web Server
			dependent_host_name		WWW1
			dependent_service_description	Main Web Site
			execution_failure_criteria	n
			notification_failure_criteria	w,u,c
			}
域描述:
dependent_host: This directive is used to identify the short name(s) of the host(s) that the dependent service "runs" on or is associated with. Multiple hosts should be separated by commas. Leaving is directive blank can be used to create "same host" dependencies.
dependent_hostgroup: This directive is used to specify the short name(s) of the hostgroup(s) that the dependent service "runs" on or is associated with. Multiple hostgroups should be separated by commas. The dependent_hostgroup may be used instead of, or in addition to, the dependent_host directive.
dependent_service_description: This directive is used to identify the description of the dependentservice.
host_name: This directive is used to identify the short name(s) of the host(s) that the service that is being depended upon (also referred to as the master service) "runs" on or is associated with. Multiple hosts should be separated by commas.
hostgroup_name: This directive is used to identify the short name(s) of the hostgroup(s) that the service that is being depended upon (also referred to as the master service) "runs" on or is associated with. Multiple hostgroups should be separated by commas. The hostgroup_name may be used instead of, or in addition to, the host_name directive.
service_description: This directive is used to identify the description of the servicethat is being depended upon (also referred to as the master service).
inherits_parent: This directive indicates whether or not the dependency inherits dependencies of the service that is being depended upon (also referred to as the master service). In other words, if the master service is dependent upon other services and any one of those dependencies fail, this dependency will also fail.
execution_failure_criteria: This directive is used to specify the criteria that determine when the dependent service should not be actively checked. If the master service is in one of the failure states we specify, the dependent service will not be actively checked. Valid options are a combination of one or more of the following (multiple options are separated with commas): o = fail on an OK state, w = fail on a WARNING state, u = fail on an UNKNOWN state, c = fail on a CRITICAL state, and p = fail on a pending state (e.g. the service has not yet been checked). If you specify n (none) as an option, the execution dependency will never fail and checks of the dependent service will always be actively checked (if other conditions allow for it to be). Example: If you specify o,c,u in this field, the dependent service will not be actively checked if the master service is in either an OK, a CRITICAL, or an UNKNOWN state.
notification_failure_criteria: This directive is used to define the criteria that determine when notifications for the dependent service should not be sent out. If the master service is in one of the failure states we specify, notifications for the dependent service will not be sent to contacts. Valid options are a combination of one or more of the following: o = fail on an OK state, w = fail on a WARNING state, u = fail on an UNKNOWN state, c = fail on a CRITICAL state, and p = fail on a pending state (e.g. the service has not yet been checked). If you specify n (none) as an option, the notification dependency will never fail and notifications for the dependent service will always be sent out. Example: If you specify w in this field, the notifications for the dependent service will not be sent out if the master service is in a WARNING state.
dependency_period: This directive is used to specify the short name of the time period during which this dependency is valid. If this directive is not specified, the dependency is considered to be valid during all times.
描述:
Service escalations are completely optional and are used to escalate notifications for a particular service. More information on how notification escalations work can be found here.
定义格式:
注意
标记了(*)的域是必备的而黑色是可选的。define serviceescalation{ host_name host_name(*) hostgroup_name hostgroup_name service_description service_description(*) contacts contacts(*) contact_groups contactgroup_name(*) first_notification #(*) last_notification #(*) notification_interval #(*) escalation_period timeperiod_name escalation_options [w,u,c,r] ... }
定义样例:
define serviceescalation{
		host_name		nt-3
		service_description	Processor Load
		first_notification	4
		last_notification	0
		notification_interval	30
		contact_groups		all-nt-admins,themanagers
		}
域描述:
host_name: This directive is used to identify the short name(s) of the host(s) that the service escalation should apply to or is associated with.
hostgroup_name: This directive is used to specify the short name(s) of the hostgroup(s) that the service escalation should apply to or is associated with. Multiple hostgroups should be separated by commas. The hostgroup_name may be used instead of, or in addition to, the host_name directive.
service_description: This directive is used to identify the description of the service the escalation should apply to.
first_notification: This directive is a number that identifies the first notification for which this escalation is effective. For instance, if you set this value to 3, this escalation will only be used if the service is in a non-OK state long enough for a third notification to go out.
last_notification: This directive is a number that identifies the last notification for which this escalation is effective. For instance, if you set this value to 5, this escalation will not be used if more than five notifications are sent out for the service. Setting this value to 0 means to keep using this escalation entry forever (no matter how many notifications go out).
contacts: This is a list of the short names of the contacts that should be notified whenever there are problems (or recoveries) with this service. Multiple contacts should be separated by commas. Useful if you want notifications to go to just a few people and don't want to configure contact groups. You must specify at least one contact or contact group in each service escalation definition.
contact_groups: This directive is used to identify the short name of the contact group that should be notified when the service notification is escalated. Multiple contact groups should be separated by commas. You must specify at least one contact or contact group in each service escalation definition.
notification_interval: This directive is used to determine the interval at which notifications should be made while this escalation is valid. If you specify a value of 0 for the interval, Nagios will send the first notification when this escalation definition is valid, but will then prevent any more problem notifications from being sent out for the host. Notifications are sent out again until the host recovers. This is useful if you want to stop having notifications sent out after a certain amount of time. Note: If multiple escalation entries for a host overlap for one or more notification ranges, the smallest notification interval from all escalation entries is used.
escalation_period: This directive is used to specify the short name of the time period during which this escalation is valid. If this directive is not specified, the escalation is considered to be valid during all times.
escalation_options: This directive is used to define the criteria that determine when this service escalation is used. The escalation is used only if the service is in one of the states specified in this directive. If this directive is not specified in a service escalation, the escalation is considered to be valid during all service states. Valid options are a combination of one or more of the following: r = escalate on an OK (recovery) state, w = escalate on a WARNING state, u = escalate on an UNKNOWN state, and c = escalate on a CRITICAL state. Example: If you specify w in this field, the escalation will only be used if the service is in a WARNING state.
描述:
Host dependencies are an advanced feature of Nagios that allow you to suppress notifications for hosts based on the status of one or more other hosts. Host dependencies are optional and are mainly targeted at advanced users who have complicated monitoring setups. More information on how host dependencies work (read this!) can be found here.
定义格式:
注意
标记了(*)的域是必备的而黑色是可选的。define hostdependency{ dependent_host_name host_name(*) dependent_hostgroup_name hostgroup_name host_name host_name(*) hostgroup_name hostgroup_name inherits_parent [0/1] execution_failure_criteria [o,d,u,p,n] notification_failure_criteria [o,d,u,p,n] dependency_period timeperiod_name ... }
定义样例:
define hostdependency{
		host_name			WWW1
		dependent_host_name		DBASE1
		notification_failure_criteria	d,u
		}
域描述:
dependent_host_name: This directive is used to identify the short name(s) of the dependenthost(s). Multiple hosts should be separated by commas.
dependent_hostgroup_name: This directive is used to identify the short name(s) of the dependenthostgroup(s). Multiple hostgroups should be separated by commas. The dependent_hostgroup_name may be used instead of, or in addition to, the dependent_host_name directive.
host_name: This directive is used to identify the short name(s) of the host(s)that is being depended upon (also referred to as the master host). Multiple hosts should be separated by commas.
hostgroup_name: This directive is used to identify the short name(s) of the hostgroup(s)that is being depended upon (also referred to as the master host). Multiple hostgroups should be separated by commas. The hostgroup_name may be used instead of, or in addition to, the host_name directive.
inherits_parent: This directive indicates whether or not the dependency inherits dependencies of the host that is being depended upon (also referred to as the master host). In other words, if the master host is dependent upon other hosts and any one of those dependencies fail, this dependency will also fail.
execution_failure_criteria: This directive is used to specify the criteria that determine when the dependent host should not be actively checked. If the master host is in one of the failure states we specify, the dependent host will not be actively checked. Valid options are a combination of one or more of the following (multiple options are separated with commas): o = fail on an UP state, d = fail on a DOWN state, u = fail on an UNREACHABLE state, and p = fail on a pending state (e.g. the host has not yet been checked). If you specify n (none) as an option, the execution dependency will never fail and the dependent host will always be actively checked (if other conditions allow for it to be). Example: If you specify u,d in this field, the dependent host will not be actively checked if the master host is in either an UNREACHABLE or DOWN state.
notification_failure_criteria: This directive is used to define the criteria that determine when notifications for the dependent host should not be sent out. If the master host is in one of the failure states we specify, notifications for the dependent host will not be sent to contacts. Valid options are a combination of one or more of the following: o = fail on an UP state, d = fail on a DOWN state, u = fail on an UNREACHABLE state, and p = fail on a pending state (e.g. the host has not yet been checked). If you specify n (none) as an option, the notification dependency will never fail and notifications for the dependent host will always be sent out. Example: If you specify d in this field, the notifications for the dependent host will not be sent out if the master host is in a DOWN state.
dependency_period: This directive is used to specify the short name of the time period during which this dependency is valid. If this directive is not specified, the dependency is considered to be valid during all times.
描述:
Host escalations are completely optional and are used to escalate notifications for a particular host. More information on how notification escalations work can be found here.
定义格式:
注意
标记了(*)的域是必备的而黑色是可选的。define hostescalation{ host_name host_name(*) hostgroup_name hostgroup_name contacts contacts(*) contact_groups contactgroup_name(*) first_notification #(*) last_notification #(*) notification_interval #(*) escalation_period timeperiod_name escalation_options [d,u,r] ... }
定义样例:
define hostescalation{
		host_name		router-34
		first_notification	5
		last_notification	8
		notification_interval	60
		contact_groups		all-router-admins
		}
域描述:
host_name: This directive is used to identify the short name of the host that the escalation should apply to.
hostgroup_name: This directive is used to identify the short name(s) of the hostgroup(s) that the escalation should apply to. Multiple hostgroups should be separated by commas. If this is used, the escalation will apply to all hosts that are members of the specified hostgroup(s).
first_notification: This directive is a number that identifies the first notification for which this escalation is effective. For instance, if you set this value to 3, this escalation will only be used if the host is down or unreachable long enough for a third notification to go out.
last_notification: This directive is a number that identifies the last notification for which this escalation is effective. For instance, if you set this value to 5, this escalation will not be used if more than five notifications are sent out for the host. Setting this value to 0 means to keep using this escalation entry forever (no matter how many notifications go out).
contacts: This is a list of the short names of the contacts that should be notified whenever there are problems (or recoveries) with this host. Multiple contacts should be separated by commas. Useful if you want notifications to go to just a few people and don't want to configure contact groups. You must specify at least one contact or contact group in each host escalation definition.
contact_groups: This directive is used to identify the short name of the contact group that should be notified when the host notification is escalated. Multiple contact groups should be separated by commas. You must specify at least one contact or contact group in each host escalation definition.
notification_interval: This directive is used to determine the interval at which notifications should be made while this escalation is valid. If you specify a value of 0 for the interval, Nagios will send the first notification when this escalation definition is valid, but will then prevent any more problem notifications from being sent out for the host. Notifications are sent out again until the host recovers. This is useful if you want to stop having notifications sent out after a certain amount of time. Note: If multiple escalation entries for a host overlap for one or more notification ranges, the smallest notification interval from all escalation entries is used.
escalation_period: This directive is used to specify the short name of the time period during which this escalation is valid. If this directive is not specified, the escalation is considered to be valid during all times.
escalation_options: This directive is used to define the criteria that determine when this host escalation is used. The escalation is used only if the host is in one of the states specified in this directive. If this directive is not specified in a host escalation, the escalation is considered to be valid during all host states. Valid options are a combination of one or more of the following: r = escalate on an UP (recovery) state, d = escalate on a DOWN state, and u = escalate on an UNREACHABLE state. Example: If you specify d in this field, the escalation will only be used if the host is in a DOWN state.
描述:
Extended host information entries are basically used to make the output from the status, statusmap, statuswrl, and extinfo CGIs look pretty. They have no effect on monitoring and are completely optional.

Tip: As of Nagios 3.x, all directives contained in extended host information definitions are also available in host definitions. Thus, you can choose to define the directives below in your host definitions if it makes your configuration simpler. Separate extended host information definitions will continue to be supported for backward compatability.
定义格式:
注意
标记了(*)的域是必备的而黑色是可选的。然而你在定义里至少要提供一种可选域以使其有用。define hostextinfo{ host_name host_name(*) notes note_string notes_url url action_url url icon_image image_file icon_image_alt alt_string vrml_image image_file statusmap_image image_file 2d_coords x_coord,y_coord 3d_coords x_coord,y_coord,z_coord ... }
定义样例:
define hostextinfo{
		host_name	netware1
		notes		This is the primary Netware file server
		notes_url	http://webserver.localhost.localdomain/hostinfo.pl?host=netware1
		icon_image	novell40.png
		icon_image_alt	IntranetWare 4.11
		vrml_image	novell40.png
		statusmap_image	novell40.gd2
		2d_coords	100,250
		3d_coords	100.0,50.0,75.0
		}
Variable Descriptions:
host_name: This variable is used to identify the short name of the host which the data is associated with.
notes: This directive is used to define an optional string of notes pertaining to the host. If you specify a note here, you will see the it in the extended information CGI (when you are viewing information about the specified host).
notes_url: This variable is used to define an optional URL that can be used to provide more information about the host. If you specify an URL, you will see a link that says "Extra Host Notes" in the extended information CGI (when you are viewing information about the specified host). Any valid URL can be used. If you plan on using relative paths, the base path will the the same as what is used to access the CGIs (i.e. /cgi-bin/nagios/). This can be very useful if you want to make detailed information on the host, emergency contact methods, etc. available to other support staff.
action_url: This directive is used to define an optional URL that can be used to provide more actions to be performed on the host. If you specify an URL, you will see a link that says "Extra Host Actions" in the extended information CGI (when you are viewing information about the specified host). Any valid URL can be used. If you plan on using relative paths, the base path will the the same as what is used to access the CGIs (i.e. /cgi-bin/nagios/).
icon_image: This variable is used to define the name of a GIF, PNG, or JPG image that should be associated with this host. This image will be displayed in the status and extended information CGIs. The image will look best if it is 40x40 pixels in size. Images for hosts are assumed to be in the logos/ subdirectory in your HTML images directory (i.e. /usr/local/nagios/share/images/logos).
icon_image_alt: This variable is used to define an optional string that is used in the ALT tag of the image specified by the <icon_image> argument. The ALT tag is used in the status, extended information and statusmap CGIs.
vrml_image: This variable is used to define the name of a GIF, PNG, or JPG image that should be associated with this host. This image will be used as the texture map for the specified host in the statuswrl CGI. Unlike the image you use for the <icon_image> variable, this one should probably not have any transparency. If it does, the host object will look a bit wierd. Images for hosts are assumed to be in the logos/ subdirectory in your HTML images directory (i.e. /usr/local/nagios/share/images/logos).
statusmap_image: This variable is used to define the name of an image that should be associated with this host in the statusmap CGI. You can specify a JPEG, PNG, and GIF image if you want, although I would strongly suggest using a GD2 format image, as other image formats will result in a lot of wasted CPU time when the statusmap image is generated. GD2 images can be created from PNG images by using the pngtogd2 utility supplied with Thomas Boutell's gd library. The GD2 images should be created in uncompressed format in order to minimize CPU load when the statusmap CGI is generating the network map image. The image will look best if it is 40x40 pixels in size. You can leave these option blank if you are not using the statusmap CGI. Images for hosts are assumed to be in the logos/ subdirectory in your HTML images directory (i.e. /usr/local/nagios/share/images/logos).
2d_coords: This variable is used to define coordinates to use when drawing the host in the statusmap CGI. Coordinates should be given in positive integers, as the correspond to physical pixels in the generated image. The origin for drawing (0,0) is in the upper left hand corner of the image and extends in the positive x direction (to the right) along the top of the image and in the positive y direction (down) along the left hand side of the image. For reference, the size of the icons drawn is usually about 40x40 pixels (text takes a little extra space). The coordinates you specify here are for the upper left hand corner of the host icon that is drawn. Note: Don't worry about what the maximum x and y coordinates that you can use are. The CGI will automatically calculate the maximum dimensions of the image it creates based on the largest x and y coordinates you specify.
3d_coords: This variable is used to define coordinates to use when drawing the host in the statuswrl CGI. Coordinates can be positive or negative real numbers. The origin for drawing is (0.0,0.0,0.0). For reference, the size of the host cubes drawn is 0.5 units on each side (text takes a little more space). The coordinates you specify here are used as the center of the host cube.
描述:
Extended service information entries are basically used to make the output from the status and extinfo CGIs look pretty. They have no effect on monitoring and are completely optional.
Tip: As of Nagios 3.x, all directives contained in extended service information definitions are also available in service definitions. Thus, you can choose to define the directives below in your service definitions if it makes your configuration simpler. Separate extended service information definitions will continue to be supported for backward compatability.
定义格式:
注意
标记了(*)的域是必备的而黑色是可选的。然而你在定义里至少要提供一个可选域以使其有用。define serviceextinfo{ host_name host_name(*) service_description service_description(*) notes note_string notes_url url action_url url icon_image image_file icon_image_alt alt_string ... }
定义样例:
define serviceextinfo{
		host_name		linux2
		service_description	Log Anomalies
		notes			Security-related log anomalies on secondary Linux server
		notes_url		http://webserver.localhost.localdomain/serviceinfo.pl?host=linux2&service=Log+Anomalies
		icon_image		security.png
		icon_image_alt		Security-Related Alerts
		}
Variable Descriptions:
host_name: This directive is used to identify the short name of the host that the service is associated with.
service_description: This directive is description of the service which the data is associated with.
notes: This directive is used to define an optional string of notes pertaining to the service. If you specify a note here, you will see the it in the extended information CGI (when you are viewing information about the specified service).
notes_url: This directive is used to define an optional URL that can be used to provide more information about the service. If you specify an URL, you will see a link that says "Extra Service Notes" in the extended information CGI (when you are viewing information about the specified service). Any valid URL can be used. If you plan on using relative paths, the base path will the the same as what is used to access the CGIs (i.e. /cgi-bin/nagios/). This can be very useful if you want to make detailed information on the service, emergency contact methods, etc. available to other support staff.
action_url: This directive is used to define an optional URL that can be used to provide more actions to be performed on the service. If you specify an URL, you will see a link that says "Extra Service Actions" in the extended information CGI (when you are viewing information about the specified service). Any valid URL can be used. If you plan on using relative paths, the base path will the the same as what is used to access the CGIs (i.e. /cgi-bin/nagios/).
icon_image: This variable is used to define the name of a GIF, PNG, or JPG image that should be associated with this host. This image will be displayed in the status and extended information CGIs. The image will look best if it is 40x40 pixels in size. Images for hosts are assumed to be in the logos/ subdirectory in your HTML images directory (i.e. /usr/local/nagios/share/images/logos).
icon_image_alt: This variable is used to define an optional string that is used in the ALT tag of the image specified by the <icon_image> argument. The ALT tag is used in the status, extended information and statusmap CGIs.
或者是...“如何来让你保持清醒”
本文试图向你解释如何让你利用那些隐藏于基于模板的对象定义之后的东西。那么你要问怎么来干?几各对象定义可以让你指定多个主机名和主机组名,允许你“复制”主机或服务的对象定义。我将逐个地说明支持这种方式的每种对象。如下的这些对象支持所要的省时特性:
没有列出的对象类型(象时间范围、命令等)不支持以上特性我将作出说明。
下例中我将使用“标准”的对象名匹配式。如果你愿意,可以打开use_regexp_matching配置选项里的使能开关。默认情况下只是对象名里包含*,?,+或\..的作为正则式进行处理,如果你想让全部都认为是正则式,你应使能use_true_regexp_matching配置选项。正则式可以被用于如下例子中的对象内的域(主机名称、主机组名、服务名称和服务组名)。
注意

使用正则时一定要小心-你可能需要修改配置文件,有时一些指令你并不想真正地被理解为正则式只是看起来角,任何问题都变成了你应验证你配置文件的证明。
多个主机:如果你想在多个主机上创建同一个服务,你可以在多个主机的host_name定义中实现。如下的定义中将服务名称叫SOMESERVICE的绑定在主机名字叫HOST1到HOSTN的多个主机上。所有的名字叫SOMESERVICE的服务将是同一个(例如有同一个检测命令、最大检测次数、告警周期等)。
define service{
		host_name		HOST1,HOST2,HOST3,...,HOSTN
		service_description	SOMESERVICE
		other service directives
		...
		}
在多个主机组里的全部主机:如果你想将一个或多个主机组里的全部主机标定同一个服务,该怎么办?在服务定义里的主机组域hostgroup_name里指定一个或多个玉机组。下面的服务名叫SOMESERVICE的服务被指定在一系列主机组HOSTGROUP1到HOSTGROUPN。全部的名叫SOMESERVICE的服务将是同一个(例如有同样的检测命令、最大检测次数、告警周期等)。
define service{
		hostgroup_name		HOSTGROUP1,HOSTGROUP2,...,HOSTGROUPN
		service_description	SOMESERVICE
		other service directives
		...
		}
全部主机:如果你想对你配置文件里的全部主机指定同一个服务,你要在host_name域里使用通配符。下面将在配置文件里指定一个服务名叫SOMESERVICE的服务。全部的名叫SOMESERVICE的服务将是同一个(例如相同的检测命令、最大检测次数、告警周期等)。
define service{
		host_name		*
		service_description	SOMESERVICE
		other service directives
		...
		}
不包含主机:如果你想定义一个服务在许多个主机或主机上但不包含某几个主机时,可以在不包含的主机或主机组前加上!符号。
define service{
		host_name             HOST1,HOST2,!HOST3,!HOST4,...,HOSTN
		hostgroup_name                HOSTGROUP1,HOSTGROUP2,!HOSTGROUP3,!HOSTGROUP4,...,HOSTGROUPN
		service_description   SOMESERVICE
		other service directives
		...
		}
多个主机:如果想对多个主机上的服务或服务描述创建同一个服务扩展对象,你可以在多个主机上指定host_name域。如下在主机系列从HOST1到HOSTN上指定一个服务扩展对象到服务名为SOMESERVICE的服务,这些服务扩展将有同一个内容定义(如相同的联系人组、通知间隔等)。
define serviceescalation{
		host_name		HOST1,HOST2,HOST3,...,HOSTN
		service_description	SOMESERVICE
		other escalation directives
		...
		}
多个主机里的全部主机:如果想对一个或多个主机组里的全部主机上的服务定义同一个服务扩展,你可以使用hostgroup_name域。下面将在主机组系列从HOSTGROUP1到HOSTGROUPN上全部主机上的服务名是SOMESERVICE有同一个服务扩展。所有的服务扩展是同一的(如有相同的联系人组、通知间隔)。
define serviceescalation{
		hostgroup_name		HOSTGROUP1,HOSTGROUP2,...,HOSTGROUPN
		service_description	SOMESERVICE
		other escalation directives
		...
		}
全部主机:如果你想在你的配置文件里的全部主机上相同名称或描述的服务上创建同一个服务扩展,你需要在host_name域里用通配符。下面在配置文件里的全部主机上定义一个名为SOMESERVICE的服务有相同的服务扩展。全部的服务扩展是同一个(如有相同的联系人组、通知间隔等)。
define serviceescalation{
		host_name		*
		service_description	SOMESERVICE
		other escalation directives
		...
		}
不包含主机:如果你想定义一个服务扩展在许多个主机或主机但不包含某几个主机上的服务时,可以在不包含>的主机或主机组前加上!符号。
define serviceescalation{
		host_name             HOST1,HOST2,!HOST3,!HOST4,...,HOSTN
		hostgroup_name                HOSTGROUP1,HOSTGROUP2,!HOSTGROUP3,!HOSTGROUP4,...,HOSTGROUPN
		service_description   SOMESERVICE
		other escalation directives
		...
		}
一个主机上的全部服务:如果想对某个特别的主机上全部的服务创建同一个服务扩展,你可以在service_description域里使用通配符。下面在主机名是HOST1上的全部服务创建同一个服务扩展。如下的服务扩展将是同一个(如有相同的联系人组、通知间隔等)。
如果你特别喜欢急功冒进的话,你可以在host_name和service_description两个域里同时使用通配符。这样做将会创建一个你配置文件里的全部主机上的全部服务中定义同一个服务扩展。
define serviceescalation{
		host_name		HOST1
		service_description	*
		other escalation directives
		...
		}
同一个主机上的多个服务:如果对某个主机上的一个或多个服务创建同一个服务扩展,你可以在service_description域里指定服务描述。如下例中,在一主机名为HOST1上的一系列多个服务从SERVICE1到SERVICEN上创建服务扩展。所有的服务扩展是同一个(如有相同的联系人组、通知间隔等)。
define serviceescalation{
		host_name		HOST1
		service_description	SERVICE1,SERVICE2,...,SERVICEN
		other escalation directives
		...
		}
多个服务组里的全部服务:如果你想在一个或多个服务组里的全部服务创建同一个服务扩展,你可以用servicegroup_name域。如下将在一系列服务组自SERVICEGROUP1到SERVICEGROUPN的全部服务创建同一个服务扩展。这些服务扩展是同一个(如有相同的联系人组、通知间隔等)。
define serviceescalation{
		servicegroup_name		SERVICEGROUP1,SERVICEGROUP2,...,SERVICEGROUPN
		other escalation directives
		...
		}
多个主机:如果想在多个主机上创建同名或相同描述的服务依赖,你可以在多个主机定义里指定host_name或dependent_host_name域或是两者之一。在下例中,在主机HOST3和HOST4上的服务SERVICE2依赖于在HOST1 and HOST2主机上的SERVICE1服务。所有的主机服务依赖定义是相同的,除了主机名称(如有相同的通知故障处理等)。
define servicedependency{
		host_name			HOST1,HOST2
		service_description		SERVICE1
		dependent_host_name		HOST3,HOST4
		dependent_service_description	SERVICE2
		other dependency directives
		...
		}
多个主机组里的全部主机:如果你想在一个或多个主机组里的全部主机上创建一个同名或同描述的服务依赖,你可以指定hostgroup_name和dependent_hostgroup_name域或是两者之一。在下例中,主机组HOSTGROUP3和HOSTGROUP4里的全部主机上的服务SERVICE2将依赖于主机组HOSTGROUP1和HOSTGROUP2上的SERVICE1服务。假定每个主机组里有5个主机,那么这个定义将相当于创建了100个服务依赖!所有的服务依赖是相同的除了那些主机名有所不同(如有相同的通知故障处理等)。
define servicedependency{
		hostgroup_name			HOSTGROUP1,HOSTGROUP2
		service_description		SERVICE1
		dependent_hostgroup_name	HOSTGROUP3,HOSTGROUP4
		dependent_service_description	SERVICE2
		other dependency directives
		...
		}
一个主机上的全部服务:如果你想创建针对某个主机的全部服务上的服务依赖,你可以在service_description和dependent_service_description域里使用通配符或是两者之一中使用。在下例中,全部在主机HOST2上的服务依赖于主机HOST1上的全部服务。全部的服务依赖将是相同的(如有相同的通知故障处理等)。
define servicedependency{
		host_name			HOST1
		service_description		*
		dependent_host_name		HOST2
		dependent_service_description	*
		other dependency directives
		...
		}
一个主机上的多个服务:如果你想创建对某个主机上的多个服务的服务依赖,你可以在service_description和dependent_service_description域里写一个或多个服务描述,象这样:
define servicedependency{
		host_name			HOST1
		service_description		SERVICE1,SERVICE2,...,SERVICEN
		dependent_host_name		HOST2
		dependent_service_description	SERVICE1,SERVICE2,...,SERVICEN
		other dependency directives
		...
		}
多个服务组里的全部服务:如果你想在一个或多个服务组里的全部服务上创建服务领事,你可以用servicegroup_name和dependent_servicegroup_name域,象这样:
define servicedependency{
		servicegroup_name		SERVICEGROUP1,SERVICEGROUP2,...,SERVICEGROUPN
		dependent_servicegroup_name	SERVICEGROUP3,SERVICEGROUP4,...SERVICEGROUPN
		other dependency directives
		...
		}
相同主机的服务依赖:如果想在相同主机的服务上创建服务依赖,空着dependent_host_name和dependent_hostgroup_name域。如下的例子中中,主机HOST1和HOST2至少有四个服务绑定其上:SERVICE1、SERVICE2、SERVICE3和SERVICE4,在这个例子中,主机HOST1的SERVICE3和SERVICE4依赖于自身的SERVICE1和SERVICE2服务,相似的,HOST2主机上SERVICE3和SERVICE4服务依赖于自身的SERVICE1和SERVICE2服务。
define servicedependency{
		host_name			HOST1,HOST2
		service_description		SERVICE1,SERVICE2
		dependent_service_description	SERVICE3,SERVICE4
		other dependency directives
		...
		}
多个主机:如果你想对多个主机创建同一个主机扩展,你需要使用host_name域。如下将在一系列自HOST1到HOSTN的主机上创建同一的主机扩展。如下的主机扩展是同一个(如相同的联系人组、通知间隔等)。
define hostescalation{
		host_name		HOST1,HOST2,HOST3,...,HOSTN
		other escalation directives
		...
		}
多个主机组里的全部主机:如果想在一个或多个主机组里的全部主机上创建同一个主机扩展,你可以用hostgroup_name域。如下将在一系列自HOSTGROUP1到HOSTGROUPN的主机组里的全部主机上创建同一个主机扩展。如下的主机扩展是同一个(如有相同的联系人组、通知间隔等)。
define hostescalation{
		hostgroup_name		HOSTGROUP1,HOSTGROUP2,...,HOSTGROUPN
		other escalation directives
		...
		}
全部主机:如果你想对你配置文件里的全部主机创建同一个主机扩展,你可以在host_name域里使用通配符。如下将对你配置文件里的全部主机定义同一个主机扩展。全部的主机扩展是同一个(如有相同的联系人组、通知间隔等)。
define hostescalation{
		host_name		*
		other escalation directives
		...
		}
不包含主机:如果在一系列的主机和主机组但不包含某些主机上创建同一个主机扩展,可以在主机或主机组定义前加上!符号。
define hostescalation{
		host_name             HOST1,HOST2,!HOST3,!HOST4,...,HOSTN
		hostgroup_name                HOSTGROUP1,HOSTGROUP2,!HOSTGROUP3,!HOSTGROUP4,...,HOSTGROUPN
		other escalation directives
		...
		}
多个主机:如果想在多个主机上创建同一主机依赖,你可以使用host_name或dependent_host_name域或同时使用。如下定义将生成六个分离的主机依赖,主机HOST3、HOST4和HOST5将依赖于HOST1和HOST2。以上的主机依赖是同一个(如有相同的通知失效处理等)。
define hostdependency{
		host_name		HOST1,HOST2
		dependent_host_name	HOST3,HOST4,HOST5
		other dependency directives
		...
		}
多个主机组里的全部主机:如果对一个或多个主机组里的全部主机创建同一个主机依赖,你可以用hostgroup_name或dependent_hostgroup_name域或两个都用。在如下例中,主机组HOSTGROUP3和HOSTGROUP4里的全部主机依赖于主机组HOSTGROUP1和HOSTGROUP2的主机。如下的主机依赖同一个只是主机名不同(如有相同的通知失效处理等)。
define hostdependency{
		hostgroup_name			HOSTGROUP1,HOSTGROUP2
		dependent_hostgroup_name	HOSTGROUP3,HOSTGROUP4
		other dependency directives
		...
		}
用户通常想在主机、服务或联系人的对象里加入自已定制的变量,这些变量象SNMP共同体名、MAC地址、AIM用户名、Skype帐号和街道名称等等,可能有各种各样的东西无法列完。这样会使Nagios不具备通用性并且无法保持一个特定的架构。Nagios试图更为柔性化,这就意味着需要处理这种情况,例如在Nagios的主机对象定义中,"address"是一个IP地址也可以是任何东西,只要对使用者而言是个可读可操作的,无论用户怎么设置都行。
但还是有必要在Nagios配置文件中提供一种可供管理和保存的处理方法而不是与现有变量域混用的方法。Nagios试图在对象的定义中引用用户自定制变量来解决这个问题。用户自定制变量的方法可以让用户在主机、服务和联系人对象定义里加入属性,在通知、事件处理和对主机与服务的检测中使用这些变量。
使用用户自定制变量需要注意如下几个要点:
这有一个如何在对象中定义不同类型的用户自定制变量的例子:
define host{
		host_name	linuxserver
		_mac_address	00:06:5B:A6:AD:AA	; <-- Custom MAC_ADDRESS variable
		_rack_number	R32			; <-- Custom RACK_NUMBER variable
		...
		}
define service{
		host_name	linuxserver
		description	Memory Usage
		_SNMP_community	public			; <-- Custom SNMP_COMMUNITY variable
		_TechContact	Jane Doe		; <-- Custom TECHCONTACT variable
		...
		}
define contact{
		contact_name	john
		_AIM_username	john16			; <-- Custom AIM_USERNAME variable
		_YahooID	john32			; <-- Custom YAHOOID variable
		...
		}
在Nagios的检测、通知等的脚本和执行程序里可以引用用户自定制变量,通过使用宏或是环境变量来实现。
为防止混淆不同对象类型中的用户定制变量,Nagios在宏和环境变量的名字里,对用户定义的主机、服务或是联系人的变量名之前分别加上了"_HOST"、"_SERVICE"或"_CONTACT"以示区分。下面的表格中给出前面例子中的用户自定制变量在宏和环境变量这中的可引用的命名。
表 6.1.
| 对象类型 | 变量名 | 宏名 | 环境变量 |
|---|---|---|---|
| 主机 | MAC_ADDRESS | $_HOSTMAC_ADDRESS$ | NAGIOS__HOSTMAC_ADDRESS |
| 主机 | RACK_NUMBER | $_HOSTRACK_NUMBER$ | NAGIOS__HOSTRACK_NUMBER |
| 服务 | SNMP_COMMUNITY | $_SERVICESNMP_COMMUNITY$ | NAGIOS__SERVICESNMP_COMMUNITY |
| 服务 | TECHCONTACT | $_SERVICETECHCONTACT$ | NAGIOS__SERVICETECHCONTACT |
| 联系人 | AIM_USERNAME | $_CONTACTAIM_USERNAME$ | NAGIOS__CONTACTAIM_USERNAME |
| 联系人 | YAHOOID | $_CONTACTYAHOOID$ | NAGIOS__CONTACTYAHOOID |
象标准的主机、服务或联系人对象里的变量一样,用户自定制变量同样可以继承。
本文件试图解释什么是对象继承和如何在对象定义里使用它。
如果你在前过之后被如何进行递归和继承搞迷糊了,你可以看一下Nagios发行包里的简单的对象配置文件。如果还没有帮助,扔个邮件写清楚详细情况描述你的问题到nagios-users邮件列表。
对于全部的对象定义说明,有三个变量影响着递归和继承关系,下面用(*)符号标记说明:
define someobjecttype{
		object-specific variables ...
		name		template_name(*)
		use		name_of_template_to_use(*)
		register	[0/1](*)
		}
第一个变量是name,只是一个可供其他对象定义时提供模板引用名字,以使其他对象可以继承属性和变量。模板名字必须是唯一的且继承者要有相同的类型定义,也就是说,不能给主机对象定义有两个或以上的模板含有同一个主机模板。
第二个变量是use,用来表示对象的属性和变量是继承于哪个指定模板。指定的这个继承来源必须是一个命名过的另一个对象模板(用变量name确切命名过的)。
第三个变量是register。这个变量用于告知这个对象定义是否需要Nagios“注册”。默认情况下,对象定义是需要Nagios注册。如果你想利用一个对象定义的部分内容作为一个模板,你可以让它不在Nagios里注册(后面将提供一个例子)。取值:0 = 不做注册;1 = 注册(默认值)。这个变量是不被继承的;每个对象模板都须明确地将这个register变量设置为0。防止register被设置为1的继承后覆盖需要注册的对象定义。
在理解继承关系时有一个很重要就是本地的对象变量总是优先于模板里的对象变量值,看一下下面的例子中两个主机的定义(没有提供全部的必备变量):
define host{
		host_name		bighost1
		check_command		check-host-alive
		notification_options	d,u,r
		max_check_attempts	5
		name			hosttemplate1
		}
define host{
		host_name		bighost2
		max_check_attempts	3
		use			hosttemplate1
		}
你注意到主机bighost1的定义中引用了模板hosttemplate1定义,主机bighost2的定义则使用了主机bighost1作为模板。一旦由Nagios来处理这些数据,那么主机bighost2相当于是这么定义的:
define host{
		host_name		bighost2
		check_command		check-host-alive
		notification_options	d,u,r
		max_check_attempts	3
		}
可以看到check_command和notification_options变量从模板(也就是主机bighost1的定义)继承而来,而host_name和max_check_attempts没有从模板对象中继承,而被限定于本地变量。这应该是一个相当容易理解的概念。
对象可以从多层次地使用模板对象的属性和变量(儿子可以引用老爸的老爸的东西,但更象老爸),如下例:
define host{
		host_name		bighost1
		check_command		check-host-alive
		notification_options	d,u,r
		max_check_attempts	5
		name			hosttemplate1
		}
define host{
		host_name		bighost2
		max_check_attempts	3
		use			hosttemplate1
		name			hosttemplate2
		}
define host{
		host_name		bighost3
		use			hosttemplate2
		}
注意主机bighost3变量来自主机bighost2中定义,而其后是继承主机bighost1的内容。采用如此方式来处理配置数据,其结果就象下面的主机定义一样:
define host{
		host_name		bighost1
		check_command		check-host-alive
		notification_options	d,u,r
		max_check_attempts	5
		}
define host{
		host_name		bighost2
		check_command		check-host-alive
		notification_options	d,u,r
		max_check_attempts	3
		}
define host{
		host_name		bighost3
		check_command		check-host-alive
		notification_options	d,u,r
		max_check_attempts	3
		}
对于对象继承层次的深度没有限度(老爸的老爸的老爸的...没有尽头的),但你为了保持清楚的定义以便于维护的话可能需要减少继承的层次(别把老祖宗也抬出来,家谱没办法画啦!:-D )。
用定义不完整的对象定义来做对象模板给其他对象做继承源是可以的,“不完整”的对象意思是定义了对象不含全部内容的对象。使用不完整的对象来做模板这可能看起很奇怪,但却推荐你这么做,为什么呢?因为它可以定义一堆默认的对象属性给其他的对象用于继承(这就象介绍父子俩:老爸长得的五宫很端正...,儿子象他爸)。看下面的例子:
define host{
		check_command		check-host-alive
		notification_options	d,u,r
		max_check_attempts	5
		name			generichosttemplate
		register		0
		}
define host{
		host_name		bighost1
		address			192.168.1.3
		use			generichosthosttemplate
		}
define host{
		host_name		bighost2
		address			192.168.1.4
		use			generichosthosttemplate
		}
注意到第一个主机对象的定义是不完整的,因为它缺少了必须的host_name变量。我们不想定义这个host_name,因为它是一个通用的对象模板。为了防止它被Nagios理解为一个一般的主机,我们把register变量设置为0。
主机bighost1和bighost2的定义来自于通用对象模板的继承。我们只是选择性地覆盖了address变量定义。也就是说,这两个主机将有相同的属性,除了host_name和address变量不一样。在Nagios处理这个样例中的配置数据时将等同于做如下对象的定义:
define host{
		host_name		bighost1
		address			192.168.1.3
		check_command		check-host-alive
		notification_options	d,u,r
		max_check_attempts	5
		}
define host{
		host_name		bighost2
		address			192.168.1.4
		check_command		check-host-alive
		notification_options	d,u,r
		max_check_attempts	5
		}
不完整的对象定义的优势最少最少的一点就是你可以在对象定义的时候少打很多字母,同样,它也可以在你改变大量的主机的变量定义时减少你的痛苦。(--原作者无非是想让用户尽量在对象定义的时候用这种理性的表达方式,而不是一团数据的粘贴来做)
任何你想在主机、服务或联系人等的带有用户定制变量的模板定义将象标准的对象变量一样做对象继承的传递(介绍一对特殊的父子:老爸长得高过姚明,儿了也很高),象下面的例子:
define host{
		_customvar1		somevalue  	; <-- Custom host variable
		_snmp_community		public		; <-- Custom host variable
		name			generichosttemplate
		register		0
		}
define host{
		host_name		bighost1
		address			192.168.1.3
		use			generichosthosttemplate
		}
主机bighost1将会继承来自于模板generichosttemplate的用户定义变量_customvar1和_snmp_community和各自的值。其结果是主机bighost1的定义就象这样:
define host{
		host_name		bighost1
		address			192.168.1.3
		_customvar1		somevalue
		_snmp_community		public
		}
有些情况下,你并不想让你的主机、服务或联系人对象定义继承从模板里定义的值,在是这种情况下,你可以指定为"null"(是不带双引号的)做为变量的值以防止继承模板的值(介绍父子俩:老爸个子高过姚明,但儿子很普通,儿子多高还是不知道吧?!),如下面的例子:
define host{
		event_handler		my-event-handler-command
		name			generichosttemplate
		register		0
		}
define host{
		host_name		bighost1
		address			192.168.1.3
		event_handler		null
		use			generichosthosttemplate
		}
在上例中,主机bighost1的对象定义将不再继承event_handler变量,而这个变量是定义在模板generichosttemplate之中。其结果就是主机bighost1的定义是下面这样子:
define host{
		host_name		bighost1
		address			192.168.1.3
		}
Nagios在处理时总是让本地变量高于从模板继承,但有些时候想让本地变量与继承模板的对象同时起效。
这种“附加继承”式的继承可以是在本地变量中用一个附加(也就一个"+"号)式来表示它。但这种特性只支持标准(非用户定制)变量中包含这种串定义(介绍父子俩:老爸个子是二米一,儿子个子比老爸高出两公分)。如下面的例子:
define host{
		hostgroups		all-servers
		name			generichosttemplate
		register		0
		}
define host{
		host_name		linuxserver1
		hostgroups		+linux-servers,web-servers
		use			generichosthosttemplate
		}
在上面例子中,主机linuxserver1的本地变量hostgroups将会附加在由模板generichosttemplate的变量之上,其主机linuxserver1的结果就是:
define host{
		host_name		linuxserver1
		hostgroups		all-servers,linux-servers,web-servers
		}
通常情况下,你必须清晰地指定哪些对象的变量是从模板继承的,有很少的情况并不遵守这个规则,也就是当Nagios认为你想利用其中的一个值而不是从相关对象引用时是这样的。例如,如果你不指明晰地指定有些服务的变量将是从主机与服务的结合中获得。
下表中列举了这些情况。当你没有特别清晰地指定对象变量值并且没有可从模板继承的值的时候,下面列出的情况就会从相关对象里面引用从而实现隐含继承。
表 6.2.
| Object Type | Object Variable | Implied Source |
|---|---|---|
| 服务 | contact_groups | 绑定的主机对象中的contact_groups域 |
| notification_interval | 绑定的主机对象中的notification_interval域 | |
| notification_period | 绑定的主机对象中的notification_period域 | |
| 主机扩展 | contact_groups | 绑定的主机对象中的contact_groups域 |
| notification_interval | 绑定的主机对象中的notification_interval域 | |
| escalation_period | 绑定的主机对象中的notification_period域 | |
| 服务扩展 | contact_groups | 绑定的服务对象中的contact_groups域 |
| notification_interval | 绑定的服务对象中的notification_interval域 | |
| escalation_period | 绑定的服务对象中的notification_period域 |
服务扩展与服务扩展的对象定义可以将隐含继承和附加继承结合起来使用。如果对象扩展里不继承其他扩展对象模板中contact_groups或是contacts域的值,而且它contact_groups或contacts域里以(+)号开头,那么,主机或服务定义里的contact_groups或contacts域将使用附加继承逻辑的规则来处理。
搞迷糊了吧?这有个例子:
define host{
		name 		linux-server
		contact_groups	linux-admins
		...
		}
define hostescalation{
		host_name	linux-server
		contact_groups	+management
		...
		}
上面的例子相当于这样:
define hostescalation{
		host_name	linux-server
		contact_groups	linux-admins,management
		...
		}
(--如果你觉得这是个怪里怪气的规则,还是老老实实地写明白的好)
迄今为止,所有的例子都是从单一的源上来做对象定义时继承对象的变量或域值。你可以在一个复杂的配置里使用多个源来完成对象的变量或域值的定义。象下面的例子:
# Generic host template
define host{
		name 			generic-host
		active_checks_enabled	1
		check_interval		10
		...
		register 		0
		}
# Development web server template
define host{
		name 			development-server
		check_interval		15
		notification_options	d,u,r
		...
		register 		0
		}
# Development web server
define host{
		use			generic-host,development-server
		host_name 		devweb1
		...
		}
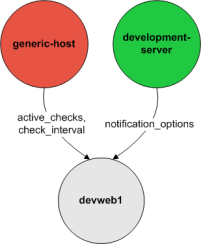
上例中,主机devweb1是从两个源模板generic-host和development-server中继承变量和域。要注意到check_interval域在两个源里都有定义。由于generic-host是第一个被主机devweb1的use域里说明的模板,那么它的check_interval域值将传给主机devweb1。那么这种继承规则下,主机devweb1将象如下的定义:
# Development web server
define host{
		host_name 		devweb1
		active_checks_enabled	1
		check_interval		10
		notification_options	d,u,r
		...
		}
当你使用多个源做继承时,告诉Nagios如何处理那些变量是很重要的事。一般是Nagios将会使用use域中指定的第一个对象模板(就是第一个源)。既然是可以从多个源里来继承变量或域值(--尤其是每个源都是多层次继承下来的时候),有必要清晰地处理这些变量和域的优先级别。
考虑如下的涉及到三个对象模板的主机定义:
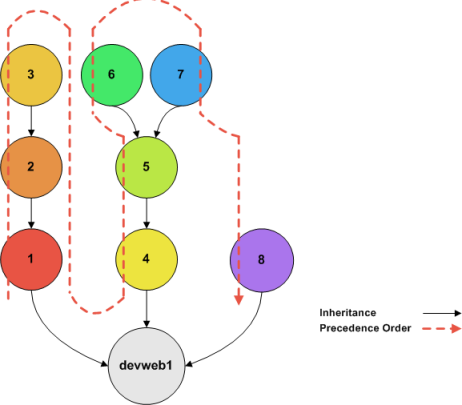
# Development web server
define host{
		use 			1, 4, 8
		host_name		devweb1
		...
		}
如果从一个或多个模板中要继承而涉及到多个对象的引用时,优先级的处理方式是以右侧优先(--就是use中指明的第一个直接对象源1、直接源的父对象节点2、对象节点2的父对象3、第二个直接对象源4、源4的父节点5...依次类推,注意看图中的示意)。测试、检验和排错将有助于你更准确地理解象这种复杂的继承关系。(--老婆,跟我一块儿出来看上帝...)

可以用扩展信息CGI模块来对某主机或服务指定计划停机时间(可以在查看主机或服务信息时来做)。点击一下"给此主机/服务设置计划停机时间"的链接来开始编制一个计划停机时间。
一旦给主机与服务编制了一个计划停机时间,Nagios将会给主机与服务加入一条注释以说明在这个期间该主机与服务是处于计划停机时间内。当计划停机时间过去了,Nagios将自动地删除那条添加的注释。很棒吧?
当通过Web来编制一个主机与服务的计划停机时间时,Nagios会询问停机时间是固定式还是可变式,这里来解释一下“固定式”与“可变式”有何不同:
"固定式"停机时间启动和停止在你所编制计划所设定的时间内开始与结束,这当然很简单啦...
"可变式"停机时间可以用在当知道主机与服务要停机X分钟(或X小时)但是并不知道什么时候开始停机时,当使用可变式停机时间,Nagios将在某个时间开始执行停机,到你指定的时间间隔达到后结束停机。它假定了主机与服务使用一个可变的停机时间段来做停机时的操作,而这个停机时间段开始于主机进入宕机(或不可达)状态或是服务处于非正常状态时,结束时间是经过了你指定的时间间隔之后的那个时间点,即便是在此之前主机与服务已经恢复也是认为是它还处于停机时间内。对于这样的情况你将很需要这种停机时间定义,你需要做一个故障修复,但需要重启动机器才能让它真正启效。很聪明,不是么?
当编制主机与服务的停机时间时需要给出可对它“触发”的停机时间。什么是触发停机时间?有触发的停机时间开始于编制时所指定的停机时间开始的时刻,这对于很多个主机与服务的停机时间开始于编制好的某个停机时间条目时是非常有用的。比如,当编制一个主机的停机时间(因需要做维护而做停机)时,需要在网络拓扑中针对这个主机的全部子节点主机定制触发停机时间。
当主机与服务处于停机时间内时,Nagios将不会送出针对这个主机与服务的一般意义的通知。但是,会送出一条停机时间开始"DOWNTIMESTART"的通知,这将给主机与服务的管理者一个提示,在此之后将不会收到主机与服务故障时的告警通知直到停机时间结束。
当主机与服务的停机时间结束时,Nagios将再次可以送出针对这个主机与服务的一般意义的通知,也会送出一条停机时间结束"DOWNTIMEEND"的通知,这将给主机与服务的管理者提醒,在此之后会再次收到各种该有的通知了。
如果预置的停机时间被提前取消(在期满之前),会送出一条停机时间取消"DOWNTIMECANCELLED"的通知给相关的管理员。
这就好象是“天啊,它又没动静了。”的并发症,你知道我在说什么。你编制了一个服务停机时间来做“例行”的硬件升级,只是在此之后才意识到操作系统的驱动不支持它!硬盘RAID搞掉了或是驱动映像失败或是原始盘已经彻底完蛋了。象这样的故事会发生在任何一个你认为只是“例行”的停机时间里,而且相似的故事会一幕一幕地重演着。
看下面这个场景:你是个做网管的倒霉蛋,而且
- 你给主机A定制了停机时间是每周一晚上19:30-21:30;
- 通常大约是在周一晚上19:45时会开始硬件升级;
- 在一个很不幸日子里,你在浪费了一个半小时来处置SCSI和驱动不兼容之后,机器终于开启了;
- 在到了晚上21:15时,你才发现一个分区无法挂接或是在盘上怎么也找不到它;
- 知道要搞很长时间了,你不得不返回重编制对主机A编制一个额外停机时间,从周一晚上21:20到周二凌晨1:30;
如果你给主机与服务编制了重叠的计划停机时间(在上例中,有19:40到21:30和21:20到1:30两个停机时间)时,Nagios将会等待,直至最后一个编制的停机时间结束时才会送出相关的通知。在上例中,直到周二早晨的1:30之前的这段时间里,主机A的各种通知一直会被压制着。
或许是..."正当其时?"
时间周期对象定义可用于控制何时各种不同的监控与报警的逻辑可以执行或操作。例如可以限定:
- 何时可以执行对主机与服务的计划任务检测;
- 何时可以送出通知;
- 何时应用通知扩展;
- 何时依赖关系是正确的;
时间周期的对象定义中有多个不同类型的域,包括周计划、月计划、日历型日期。不同类型的域有不同的优先级别而且会覆盖同一个时间周期定义里的其他域值。不同类型的域的优先级从高到低依次如下(--后面是译者加的例子):
- 日历型日期(2008-01-01)--指定奥运会开幕的那天是(2008-08-08)
- 指定月份的日期(January 1st)--国庆是每年的十月一日-(October 1st)
- 一般月份里的日期(Day 15)--每个月的5号发工资啊(Day 5)
- 指定月份里的星期几的次数(2nd Tuesday in December)--父亲节是每年六月的第三个星期天(3th Sunday in June)
- 指定星期几的次数(3rd Monday)--每隔四周的周六都要执班(4rd Saturday)
- 一般的周计划(Tuesday)--每周六和周日都可以休息(Saturday Sunday)
不同的时间周期域的样例可以查阅这篇文档。
主机与服务定义里的可选域check_period可用于控制限定特定的时间周期,它可以用于控制何时进行规格化的计划任务,何时做自主检测等。
如果没有在check_period域来指定一个时间周期,Nagios将在任何需要的时候执行计划性的自主检测,实际上相当于设置一个24x7的时间周期。
Specifying a timeperiod in the在check_period域里指定一个时间周期可以限定Nagios执行规格化计划检测的时间,主机与服务自主检测的时间。当Nagios尝试去对主机或服务进行一个规格化计划表检测时,它将确保下次检测是在指定的合法时间段内进行。如果不是,Nagios将调整下次检测时间以使下次检测处于指定的时间周期所限定的合法时间内,这意味着主机或服务的检测可能在下个小时、下一天或下一周等等的时间里不会检测直至到时间。
注意
强烈建议你对全部的主机与服务使用24x7这个时间周期,除非你有一个明确的理由可以不这样做。如果没有用24x7,可能在你指定时间周期的的非合法时间里(无监控的黑色时间段)将会有些麻烦:
- 主机与服务的状态将不再改变;
- 联系人将几乎不会收到主机与服务的重置报警;
- 如果主机与服务从故障中恢复,所属的联系人将不会立即收到恢复的通知。
通过使用主机与服务对象定义里的notification_period域可以指定一个特定的时间周期,它可以限定Nagios主机与服务在认定故障或故障恢复时送出通知。当主机的通知将要被送出时,Nagios将会确保当前时刻处于notification_period指定的时间周期里是合法的时间。如果是合法时间,Nagios将尝试对每一个联系人送出故障与恢复的通知。
也可以用多种时间周期来控制通知送向不同的联系人。指定联系人对象定义里的service_notification_period和host_notification_period域,可以对每个联系人指定一个“按应需求”的时间周期。每个联系人将只是在指定的时间周期里才会收到主机与服务的通知。
如何创建一个“按应需求”循环的例子可以查阅这篇文档。
使用服务与主机的通知扩展对象定义里的可选项escalation_period域可以指定一个特定时间周期,它将限定在哪个时间内是扩展项是合法的且可用的。如果没有使用在扩展对象里的escalation_period域,那么扩展对象将认定所有时间都是合法时间。如果使用了escalation_period域来指定时间周期,Nagios将只是在指定时间周期所限定的合法时间内使用扩展对象。
通过使用主机与服务的依赖关系对象里的可选项dependency_period域来指定一个时间周期,它可以限定依赖关系对象在哪个时间段内是合法的且可以使用。如果没有在依赖关系对象里使用dependency_period域,依赖关系对象在任意时间里都是合法可用的。如果在对象依赖关系里的dependency_period域指定了时间周期,Nagios将只是在指定时间周期所限定盺合法时间内使用该依赖对象。
送出通知的判定是由主机与服务的检测逻辑来完成的。主机与服务的通知发生于如下情形:
- 当一个硬态状态变化时;更多有关状态类型与硬态变化的内容请查阅这篇文档。
- 当主机或服务仍旧处于一个硬态的非正常状态而且最后一次通知送出的时间超过了主机与服务对象定义里的<notification_interval>域所指定的时间时。
每个主机与服务对象定义里都有<contact_groups>域来指定接收此主机与服务通知内容的联系人组。联系人组可以包括一个或几个相互独立的联系人。
当Nagios送出主机与服务的通知,将会通知每个联系人组里的联系人成员,联系人组是由对象定义里的<contactgroups>域来设定。Nagios实现了联系人可以属于多个联系人组,所以会在做通知之前将联系人组里重复出现的联系人去掉保证每个联系人收到有且只有一次通知。
因为并非每一个接收送出通知的联系人都需要收到通知所以需要过滤器来处理它。通知送出前有好几个经过的过滤器,正因如此,指定有联系人就可能收不到信息因为过滤器可能把它要收到的信息组过滤掉了。下面稍详细点地介绍一下通知在送出前要通过的过滤器...
首先必须通过的过滤器是在程序里面内嵌是否发送通知的过滤器。它由主配置程序里的enable_notifications变量值初始化,但可在运行时通过Web接口改变它。如果通知在程序层面里是不使能的,那么在这期间里,不会送出任何主机与服务的通知。如果使能了它,仍旧有其他的过滤器要通过...
主机与服务通知要通过的第一个过滤器是检查主机与服务是否处于计划停机时间定义的时间段内。如果在停机时间段内,联系人不会收到通知。如果不是在停机时间段内,通知会通过这个过滤器而到下一个过滤。额外的提醒是,如果是在主机的停机时间段内,给主机上的服务通知将会被压制。
要通过的第二个过滤器是在检查主机与服务是否处于抖动(如果你使能了感知抖动检测项的话)。如果服务或主机当前处于抖动,联系人不会收到通知,其他情况下,这个过滤会通过进入到下个过滤器。
要通过的第三个过滤器是给主机的与服务的通知选项。每个服务对象定义含有一个选项过滤以决定是否在报警、紧急和恢复等状态时送出通知。相似的,主机对象定义里含有选项以决定是否在宕机、不可达和恢复等状态时送出通知。如果主机与服务的通知没有通过这些过滤选项,那么联系人不会收到通知,如果通过了,则会进入下一个过滤...注意,主机与服务的恢复通知仅仅是当诱发它的原始故障通知也送出时才会送出,这样就不会收到一条不知道原因的故障恢复通知的。
要通过的第四个过滤器是给时间周期的检查。每个主机与服务对象定义里都有一个<notification_period>通知时间周期选项来指定何时送出通知是合法的时间。如果送出通知的时间没有落在指定的时间周期所划定的范围内的话,没有人会收到通知。如果时间是处于指定的时间周期之内的话,该过滤会通过,则会进入一下个过滤...注意:如果时间周期的过滤器没有通过的,Nagios将会重新编制该主机与服务(如果它处于非正常状态的话)的通知送出时间,使送出时间处于合法的时间周期规定。这将有助于保证联系人在下一个时间周期到来时尽可能早地收到故障通知。
最后一个主机与服务的过滤器是由两个要素条件控制:(1)针对该主机与服务的已经送出的最后一条通知所发出的时间;(2)主机与服务在最后一条通知发出后仍旧处于相同的非正常状态所处的时间长度。如果遇到这两个限定条件,Nagios将会用最后一次通知送出时间到当前时间的时间段来比对主机与服务对象定义里的<notification_interval>通知间隔域,看看是否到达或超出。如果还没有到通知间隔所设置的时间段,不会送出通知给任何人。如果这个时间段已经超出了间隔设置而且第二个条件不成立的话(就是说因为状态不一样而送出通知),通知就会被送出!是否真正地送出通知,还必须要通过每个联系人的过滤器控制...
在这个点上,通知过程已经通过了程序过滤和全部的主机与服务对象里所设置的过滤,开始通知每一个它该通知到的联系人。这是否就意味着要每个联系人都会收到通知呢?并不是这样!每个联系人都有各自的联系人过滤器,通知要经过这些过滤后才能收到通知。注意:联系人过滤器指定给每一个联系人但不会影响到其他联系人是否收到通知。
第一个联系人过滤器是联系人对象定义里的有关主机的或服务的过滤通知选项。每个联系人可以指定出对于服务,是否要收到告警状态、紧急状态和恢复状态的通知,同样地,也可以指定针对主机是否要收到主机宕机、变为不达可或是恢复的通知。如果这些在联系人里的主机和服务的过滤没有通过的话就不会收到通知,如果设置了要送出通知,那么会进入下一个过滤器...注意:只是那些针对于主机与服务的原始故障而产生的通知才会送出,不会有人收到一个没有故障原因通知却有状态恢复的通知...
最后一个过滤是联系人里的时间周期设置的检查。每个联系人对象定义里的<notification_period>通知接收时间周期域指定了联系人可以接收通知的时间周期。如果通知的时间没有落入指定的时间周期的时间段内,联系人不会收到通知。如果在合法的时间段区间里,联系人会收到通知!
(译者注:数一数,一共有七个过滤器!第1个是总阀门,第2到第5个是针对服务与主机状态的,后面2个是针对每个联系人的,很复杂,但是提供了很大的控制度)
对于故障与恢复的通知方式,Nagios提供了多种供选择:BP机、蜂窝电话、电子邮件、即时信息、警报声音、电击(这是个什么东西?)等等。如何送出通知将依赖于你的对象定义文件里的通知命令。
注意
特定的通知方式(象BP机等)并没有直接融合在Nagios代码中因为这没有必要。Nagios的核心设计思想并不是把Nagios搞成一个集成完整统一的一个应用程序(all-in-one)。如果这种服务嵌入到Nagios的核心之中将会使得用户很难加入自己的检测方法,而且修改检测等等也不方便。通知的处理也是如此。有成百上千种方式来实现检测与通知,因而为何要舍近求远呢?最好的方式是提供一个外部调用的入口(如一个执行脚本或一个成熟的消息系统)来做这种杂事。有一些消息处理包或是蜂窝电话挂件的资源可以处理通知,在下面一节里给出了列表。
当编写通知命令时,需要理解是什么通知类型产生的。那个$NOTIFICATIONTYPE$宏将用一个字符串来指出是哪个类型。下表列出这个宏可能的值以及相关的描述信息:
表 6.3. 通知类型的宏
| 值 | 描述 |
|---|---|
| PROBLEM | 服务与主机刚刚(或是仍旧)处于故障状态。如果收到服务通知,可能服务是处于告警、未知或是紧急状态之中,如果收到是主机通知,主机可能是处于宕机或不可达状态之中 |
| RECOVERY | 服务与主机已经恢复。如果是一个服务通知,说明服务刚回到正常状态,如果是主机通知,说明主机刚刚回到运行状态 |
| ACKNOWLEDGEMENT | 这是一个主机与服务故障的确认通知。由联系人给特定的主机与服务通过Web来初始化一个确认通知 |
| FLAPPINGSTART | 主机与服务刚开始处于抖动 |
| FLAPPINGSTOP | 主机与服务刚结束抖动 |
| FLAPPINGDISABLED | 主机与服务刚因为检测抖动被关闭而停止抖动... |
| DOWNTIMESTART | 主机与服务刚进入到一个计划停机时间周期,在此后通知会被抑制 |
| DOWNTIMESTOP | 主机与服务刚结束了计划停机时间。有关故障的通知将恢复 |
| DOWNTIMECANCELLED | 给主机与服务所指定的计划停机时间刚刚取消。有关故障的通知将恢复 |
在Nagios中可以配置多种送出通知的方式。这取决于你所想用的方式方法。一旦安装好必须的支持软件并在配置文件里给定了通知命令就可以运用它们了。可行的方式这里只给出几种:
- 电子邮件(Email)
- BP机(Pager)
- 蜂窝电话短信息(CellPhone SMS)
- Windows弹出消息(WinPopup message)
- 各种即时信息(Yahoo, ICQ, or MSN instant message)
- 声音警报(Audio alerts)
- 等等...
所有这些全是基于你用通知命令格式来编写了一个命令行。
如果想找一个替代电子邮件送出通知的方法,如用BP机或蜂窝电话,查看一下如下软件包。这些可以与Nagios结合当故障产生时用一个Modem送出通知,这在EMail无法送出通知时起作用(注意,电子邮件在网络出现故障时可能不会送出电子邮件)我没有真正测试过这些包,但其他人报告说是可以用的...
- Gnokii一个手机短信的软件包(SMS software for contacting Nokia phones via GSM network)
- QuickPage数字BP机的软件(alphanumeric pager software)
- SendpageBP机软件(paging software)
- SMS Client给BP机或手机发短信的命令行工具(command line utility for sending messages to pagers and mobile phones)
如果想试验非传统的通知方式,比如说想费时费力地使用声音警报,在你的监控主机上使用合成声音来演绎出你的故障通知,可以迁出Festival项目,如果想用一个独立的声音报警盒子,可以迁出Network Audio System (NAS)和rplay项目。

事件处理是一些可选的系统命令(脚本或执行程序),一旦主机与服务的状态发生变化时就会运行它们。
一个明显的例子是使用事件处理来在任何人收到通知之前由Nagios来做一些前期故障修复。如下的情况也可能会用到:
- 重启动一个失效的服务;
- 往协助处置系统里敲入一个故障票;
- 把事件信息记录到数据库中;
- 循环操作主机电源*
- 等等
*循环操作主机电源是个故障处理经验,它是个不容易实现的自动化脚本。在用自动化脚本实现之前要考虑到它的后果。 :-)
有几种不同的事件处理类型可以用于主机与服务的状态变换的事件处理中:
- 全局主机事件处理
- 全局服务事件处理
- 特定主机事件处理
- 特定服务事件处理
全局主机和服务事件处理将于每一个主机和服务状态变更发生时候运行,且稍稍早于特定主机与服务的事件处理。可以用主配置文件里的global_host_event_handler和global_service_event_handler域来设置全局的主机与服务事件处理命令。
不同的主机与服务可以有各自不同事件处理来处置状态变化,是用主机和服务对象定义里的event_handler域来指定事件处理命令。这些设置的特定主机与服务的事件处理命令将会在全局主机与服务事件处理运行之后运行。
事件处理在程序层面上可通过主配置文件里的enable_event_handlers来控制打开或关闭。
特定主机的和服务的事件处理可用主机和服务对象里的event_handler_enabled域来开关。如果全局的enable_event_handlers域是关闭的,那么特定主机的和服务的事件处理也不会运行。
事件处理命令可以是SHELL或是Perl程序,同样可以是任意类型语言编写的在命令行下可执行的程序。至少脚本要处理在参数行里处理如下宏:
对服务的:$SERVICESTATE$、$SERVICESTATETYPE$和$SERVICEATTEMPT$;对主机的:$HOSTSTATE$、$HOSTSTATETYPE$和$HOSTATTEMPT$。
脚本须检测这些作为命令参数传入的值并采取任何必要动作来处理这些值。最好的理解事件处理如何工作的途径是看例子,幸运的是下面就提供个例子。
事件处理命令通常是与运行于本机上的Nagios程序的权限是相同的。这可能会有问题,如果你想写成一个用于系统服务重启的命令,它需要有root权限以执行一系列命令与任务。
较理想的是让事件处理拥有它将要执行的系统命令所需权限相同的权限。你或许尝试用sudo命令来实现它。
下面例子给出了监控本机上的HTTP服务且在HTTP服务对象里指定了restart-httpd来做为事件处理命令。同样地,假定已经设置了服务对象的max_check_attempts值为4或是大于4的值(服务将检测4次之后才认定它真的出问题)。该样例服务对象的定义片段象下面这样子:
define service{
	host_name			somehost
	service_description	HTTP
	max_check_attempts		4
	event_handler		restart-httpd
	...
	}
一旦对服务对象定义了事件处理,必须要保证命令可执行。一个restart-httpd命令的样例见下。注意在命令行里给命令脚本传递了几个宏-这个很重要!
define command{
	command_name	restart-httpd
	command_line	/usr/local/nagios/libexec/eventhandlers/restart-httpd  $SERVICESTATE$ $SERVICESTATETYPE$ $SERVICEATTEMPT$
	}
现在,写一个实现的事件处理脚本(它是/usr/local/nagios/libexec/eventhandlers/restart-httpd脚本文件的内容)。
#!/bin/sh
#
# Event handler script for restarting the web server on the local machine
#
# Note: This script will only restart the web server if the service is
#       retried 3 times (in a "soft" state) or if the web service somehow
#       manages to fall into a "hard" error state.
#
#
# What state is the HTTP service in?
case "$1" in
OK)
	# The service just came back up, so don't do anything...
	;;
WARNING)
	# We don't really care about warning states, since the service is probably still running...
	;;
UNKNOWN)
	# We don't know what might be causing an unknown error, so don't do anything...
	;;
CRITICAL)
	# Aha!  The HTTP service appears to have a problem - perhaps we should restart the server...
	# Is this a "soft" or a "hard" state?
	case "$2" in

	# We're in a "soft" state, meaning that Nagios is in the middle of retrying the
	# check before it turns into a "hard" state and contacts get notified...
	SOFT)

		# What check attempt are we on?  We don't want to restart the web server on the first
		# check, because it may just be a fluke!
		case "$3" in

		# Wait until the check has been tried 3 times before restarting the web server.
		# If the check fails on the 4th time (after we restart the web server), the state
		# type will turn to "hard" and contacts will be notified of the problem.
		# Hopefully this will restart the web server successfully, so the 4th check will
		# result in a "soft" recovery.  If that happens no one gets notified because we
		# fixed the problem!
		3)
			echo -n "Restarting HTTP service (3rd soft critical state)..."
			# Call the init script to restart the HTTPD server
			/etc/rc.d/init.d/httpd restart
			;;
			esac
		;;

	# The HTTP service somehow managed to turn into a hard error without getting fixed.
	# It should have been restarted by the code above, but for some reason it didn't.
	# Let's give it one last try, shall we?
	# Note: Contacts have already been notified of a problem with the service at this
	# point (unless you disabled notifications for this service)
	HARD)
		echo -n "Restarting HTTP service..."
		# Call the init script to restart the HTTPD server
		/etc/rc.d/init.d/httpd restart
		;;
	esac
	;;
esac
exit 0
样例脚本将尝试用两个时刻来重启本地Web服务:
- 在服务检测出三次并且是处于软态紧急状态之后;
- 在服务首次进入硬态紧急状态之后;
这个脚本理论上在服务转入硬态故障之前可以重启HTTP服务并可以修复故障,这里包含了首次重启没有成功的情况。须注意的是事件处理将只是第一次进入硬态紧急状态时才会执行事件处理,这将阻止Nagios在服务一直处于硬态故障的状态时会反复不停地重启动Web服务。你不需要反复地重启,对吧? :-)
这就是事件处理。事件处理很容易理解、编写和实现,所以要尽量尝试来使用并看看它能给你带来什么。
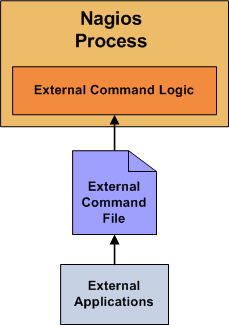
为使Nagios可以处理外部命令,必须按如下步骤来做:
- 使能了外部检测命令check_external_commands选项。
- 用command_check_interval选项设置了命令检测的频度。
- 在command_file选项中指定了命令文件的位置。
- 对包含有外部命令文件的目录给出了恰当的目录操作权限,象在快速指南说明的那样。
- 由command_check_interval选项指定了一个规格化的频度,该选项在主配置文件中给出。
- 在事件处理句柄之后被立即执行。在规格化定制周期执行的命令检测之后增加了如果需要Nagios来做事件处理之后立即执行的要求。
外部命令可以写入到命令文件之中,用如下格式:
[time] command_id;command_arguments
这里的time是指用time_t格式的时间戳,标记外部命令或应用执行时间。而command_id的值和command_arguments命令参数取决于Nagios将执行的命令。
一个完整的外部命令列表包括如何使用这些的样例可以在线查阅URL:
被监控的主机和服务的当前状态由如下两个要素决定:
- 主机与服务的状况(如正常、警告、运行和宕机等)
- 服务与主机将要从属的状态类型
Nagios有两种状态类型 - 软态和硬态。这两种状态取决于监控逻辑,当执行过事件处理或是当通知被初始送出时将会给出决定。
本文试图描述软态和硬太的状态区别,它们是如何发生及在发生时将做些什么。
为防止因瞬态故障而引发错误报警,Nagio需要定义主机与服务经过多少次的重试检测后再认为故障是“真正”发生。这个次数是由主机与服务中的max_check_attempts选项决定。理解如果真正故障发生时主机与服务进行检测重试的做法在理解状态类型机制很重要。
软态在如下情况时会发生:
- 当服务与主机检测返回一个非正常或非运行状态,同时,服务与主机的重试检测还没有达到设置max_check_attempts所设定的次数时。这个被称为软故障。
- 当服务与主机自软故障转变时。这个被称为软恢复。
软态变化时将有如下情形发生:
- 软态被记录;
- 事件处理将会执行以捕获分析软态;
只是在使能了主配置文件里的log_service_retries选项或是log_host_retries选项时软态才会被记录。
真正重要的是在软态发生时去执行事件处理。在它转入硬态之前应用事件处理将特别有效,如果你试图预处理修复故障时。当事件处理运行时,宏$HOSTSTATETYPE$或$SERVICESTATETYPE$将会赋值"软态",这样将使事件处理脚本得知什么时候正确动作。更多有关事件处理的信息可以查阅这篇文档。
主机与服务的硬态将会在如下情况发生:
- 当服务与主机检测返回一个非正常或非运行状态,同时,服务与主机的重试检测已经达到设置max_check_attempts所设定的次数时;这个被称为硬故障。
- 当主机与服务从一个硬故障转变为另一个时(如告警到紧急);
- 当服务检测处理非正常状态时对应的主机处于宕机或不可达时;
- 当主机或服务自一个硬态恢复时;这个被称为硬恢复。
- 当收到一个强制主机检测结果时。强制主机检测结果将被认定是硬态除非设置使能了passive_host_checks_are_soft选项;
当主机或服务经过硬态变迁时如下情形将会发生:
- 硬态被记录;
- 事件处理将会执行以处置硬态;
- 在主机与服务故障和恢复时对应的联系人将收到通知;
当执行事件处理时宏$HOSTSTATETYPE$或$SERVICESTATETYPE$将会赋值为"硬态",这样将使事件处理脚本得知什么时候正确动作。更多有关事件处理的信息可以查阅这篇文档。
这里有一个在当状态转换发生时和当事件处理与通知被送出时如何给定状态类型的例子。服务的最大重试次数max_check_attempts值设置为3。
表 6.4.
| 时刻 | 检测次数 | 状态 | 状态类型 | 是否状态变换 | 注释 |
|---|---|---|---|---|---|
| 0 | 1 | 正常 | 硬态 | 否 | 初始的服务状态 |
| 1 | 1 | 紧急 | 软态 | 是 | 首次发现非正常状态。执行事件处理。 |
| 2 | 2 | 告警 | 软态 | 是 | 服务仍处于非正常状态。执行事件处理。 |
| 3 | 3 | 紧急 | 硬态 | 是 | 达到最大重试次数,服务状态类型进入硬态。事件处理执行且送出故障通知。检测数在当时被重置为1。 |
| 4 | 1 | 告警 | 硬态 | 是 | 服务状态变换为硬态告警。事件处理执行且送出故障通知。 |
| 5 | 1 | 告警 | 硬态 | 否 | 服务仍停在硬态故障,为个取决于服务的通知间隔是多少,也可能会有另一个故障通知被送出。 |
| 6 | 1 | 正常 | 硬态 | 是 | 服务经历了一个硬态恢复。事件处理执行且一个恢复通知被送出。 |
| 7 | 1 | 正常 | 硬态 | 否 | 服务仍处于正常。 |
| 8 | 1 | 未知 | 软态 | 是 | 服务被检查出从一个软态非正常态变换了。事件处理执行。 |
| 9 | 2 | 正常 | 软态 | 是 | 服务经历了一个软恢复。事件处理执行,但通知不会送出,因为这不是个“真正”故障。当这发生时状态类型设置为硬态而且检测次数被立即重置为1。 |
| 10 | 1 | 正常 | 硬态 | 否 | 服务停在了一个正常状态。 |
由Nagios守护进程来做主机检测,一般是:
- 在规格化的间隔内,这个由主机对象定义里的check_interval和retry_interval选项确定;
- 当主机状态变换后对应的服务做按需检测;
- 在主机可达性逻辑中需要做按需检测;
- 在主机依赖检测的前处理中需要做按需检测;
规格化定期主机检测是可选的,如果你将主机对象定义里的check_interval值设置为0,Nagios将不会定期做检测。然而它仍旧会在按需检测时做主机检测,如果由监控逻辑中的其他部分需要进行检测时。
按需检测被用于当绑定于某台主机上的服务状态变换时对主机检测,因为Nagios需要知道主机是否也有状态变换情况发生。服务状态的变化通常表征着主机状态也发生变化。例如,如果Nagios发现某台主机上的HTTP服务从“紧急”到“正常”时,它有也表示主机刚刚从重启中恢复它重新恢复运行。
按需检测同样被用于主机可达性逻辑之中对主机检测。Nagios被设计为尽快地得到网络概况,且尽快分辨出主机的宕机与不可达状态。这些完全不同的状态将协助管理员尽快在网络中定位出问题源点。
按需检测同样在主机依赖性检测的前处理逻辑中进行主机检测。这将协助确保得到尽可能正确的依赖逻辑关系。
可用缓存检测来显著地改善按需检测的性能,缓存检测机制可使Nagios放弃一个主机的检测执行而使用相关的最近检测来替代,更多有关缓存检测的信息可查阅这篇文档。
计划式主机检测是并发运行的。当Nagios要运行一个计划的主机检测时,初始会对它进行主机检测返回后再然后做其他工作(运行服务检测等)。一个主机检测程序是由主Nagios守护进程fork派生出来的一个子进程。当主机检测完成,子进程将通告主进程检测的结果。Nagios主进程将处理检测结果并采取合适的动作(执行事件处理、发送通知等)。
如果需要按需主机检测同样可以并发。在前面所提及的,Nagios如果可以利用从缓存的相关的最近主机检测的结果而放弃一次按需检测。
当Nagios处理计划的和按需的主机检测结果时,它可能初始化之后的其他主机检测。初始化这些检测可能是由于两个原因:依赖性检测的前处理和使用网络可达性逻辑来判定主机状态。初始化的之后检测一般是并发的。然而,一个很大问题必须要把握,这将降低运行效率...
注意
在主机对象定义里将max_check_attempts值设定为1会导致一系列性能问题。原因就是,如果Nagios需要使用网络可达性逻辑来判定一个主机的真正状态(它们是宕机或不可达)时,Nagios将不得不对该主机的直接父节点执行一连续地检测。需要重申,这些检测是一个个地连续运行,而不是并发,这将导致性能降低。基于此,建议总是将主机对象定义里的max_check_attempts域值设置大于1。主机检测由插件来做,插件会返回结果,结果是运行、告警、未知和紧急四个状态之一。那么Nagios将如何把插件的返回值转换成主机的运行、宕机或不可达呢?下面会讲到。
下表给出了插件返回结果与预置主机状态,之后会做某些后续处理(后面会讲到),后续处理可能会改变最终的主机状态。
如果预置主机状态是宕机,Nagios将尝试它是否真的宕机还是它是不可达。宕机与不可达分开很重要,这使得管理员更快地查找到网络故障的源头。下面给出了基于该主机的父节点得出主机最终状态的表格。主机的父节点是在对象定义里的parents域来设定的。
表 6.6.
| 预置主机状态 | 父节点状态 | 最终的主机状态 |
|---|---|---|
| 宕机(DOWN) | 至少一台运行(UP) | 宕机(DOWN) |
| 宕机(DOWN) | 全部父节点不是宕机(DOWN)就是不可达(UNREACHABLE) | 不可达(UNREACHABLE) |
有关如何分辨宕机(DOWN)与不可达(UNREACHABLE)状态的更多信息可查阅这篇文档。
你可能注意到了主机并不总是留在一种状态,事件中断、打上补丁和服务器需要重启动等都会让它状态变换。当Nagios检测出主机状态时,它总是要感知到主机从四种状态之间做了变换并要采取对应的行动。这些在不同的状态类型(硬态或软态)下的状态变换将会触发事件处理的运行和发送出通知。发现与处置这些状态变换是Nagios该做的全部。
当主机状态过度频繁地变换状态时可以考虑状态处于“抖动”(flapping)。一个明显的例子就是一台主机由于加载操作系统而不断地重启动,这种状态就是处于抖动。不得不应对它是个有趣的方案,Nagios能感知主机开始抖动,并且可以压制通知直到抖动停下来达到一种稳定状态。更多的有关感知抖动逻辑的内容可以查阅这篇文档。
由Nagios守护进行的服务检测执行于
- 在规划的间隔到了时;间隔由服务对象定义里的check_interval和retry_interval选项确定。
- 因服务依赖检测的前处理需要而发出的按需检测;
因服务依赖检测的前处理逻辑而做的按需检测可以保证得到的依赖逻辑关系尽可能准确。如果不使用使用依赖,Nagios将不做任何按需服务检测。
通过应用缓存服务检测可以显著地改善按需服务检测的性能,缓存服务检测可令Nagios放弃一个服务检测而用一个相关的最近一个检测来替代。如果给出了服务依赖,缓存检测将只是提高性能。更多的有关缓存检测可查阅这篇文档。
计划的服务检测是并发运行。当Nagios需要运行一个计划服务检测时,它将初始化一个服务检测并返回来做其他工作(运行主机检测等)。服务检测在一个由Nagios守护主进程中派生出的子进程中运行,子进程将把检测结果通告给主进程。Nagios主程序会处理检测结果并采取合适的行动(执行一个事件处理、发出通知等)。
如果需要,按需服务检测同样可以并发。如前所述,Nagios可以放弃一个按需检测如果可以利用缓存的相关的最近的检测结果来替代的话。
由插件来做的服务检测将返回一个状态,是正常(OK)、告警(WARNING)、未知(UNKNOWN)或紧急(CRITICAL)四种之一。插件直接将转换为服务状态,如插件返回一个告警状态将使一个服务处于告警态。
Nagios用两种模式来对主机和服务进行检测:自主检测和强制检测。强制检测将在其他地方说明,这里只涉及自主检测。自主检测是最通用的监控主机与服务的方式。自主检测的主要特点是:
- 由Nagios进程进行起始的自主检测
- 自主检测是在一个规格化预定义周期之上进行
自主检测由Nagios守护进程的检测逻辑进程初始化。当Nagios需要进行对主机和服务进行状态检测时,它将需要检测的信息传给一个插件,由插件来检测主机或服务并给出一个可供进一步运作的状态,将结果返给Nagios守护进程。Nagios按照主机或服务的结果来做适当地动作(如发出告警、执行事件处理句柄等)
有关插件是如何工作的更多信息可以在这里找到。
自主检测将在如下情况执行:
- 当规格化时间到达时;规格化时间由主机和服务定义的check_interval和retry_interval选项决定。
- 进程必须处于守护状态;
规格化计划检测发生的间隔要么是check_interval要么是retry_interval,这取决于主机与服务当前处于什么状态类型。如果主机与服务是处于硬态,实际检测间隔将等于check_interval值,如果它处于软态,检测间隔将等于retry_interval值。
每当Nagios需要取得某特定主机或服务的最新状态时,将会去做按需检测。例如当Nagios要判断主机的可达性时,它通常会去做针对主机父节点及子节点的按需检测以决定该网段的状态。按需检测同样发生于依赖性检测的前处理逻辑之中,以确保Nagios得到最为准确的状态信息。
通常情况下Nagios监控主机与服务使用规格化计划表来做自主检测。自主检测使用“轮询”机制来对设备或服务的状态信息进行收集,这是常见方式。Nagios同样支持用另一种方式,即强制方式来替代自主方式来检测,强制检测的关键特性是:
- 强制检测被外部应用或进程初始化和执行;
- 强制检测的结果交给Nagios来处理;
自主检测与强制检测的最主要不同是自主检测是由Nagios来做初始化和执行而强制检测是由外部应用程序来做。
强制检测在如下监控中很有用:
- 本身是异步的并且无法有效地基于一个规格化计划表来轮询的监控;
- 被监控主机位于防火墙后面无法从监控服务器送出自主检测;
异步式服务的例子是自身提供包括SNMP陷井或安全警告等强制监控方式的服务。从来不会知道在一个指定时间片段里将会收到多少SNMP陷井或安全警告,所以这些不适合用每几分钟来判定一下被监控的状态。
更详细的强制检测的工作机制是...
- 一个外部应用对主机或服务的状态进行检查;
- 外部程序将检测结果写入外部命令文件之中;
- 每次Nagios读入外部命令文件并将全部强制检测结果写入一个将要处理的队列中,该队列同样会保存自主检测结果;
- Nagios将定期执行检测结果接收的事件处理并扫描结果队列。在队列里可找到的每个服务检测结果都会同样处理 - 不管这个检测结果是自主检测的还是强制检测的结果 - Nagios将按照检测结果送出通知、记录警告等。
对自主检测与强制检测的处理本质上是一致的,这使得Nagios与其他的外部应用无缝集成。
在Nagios里使能强制检测需要做如下设置:
- 将accept_passive_service_checks域设置为1;
- 在主机与服务对象定义里将passive_checks_enabled域设定为1;
如果想全局地关闭强制检测,将accept_passive_service_checks域设置为0;
如果只想对几个主机与服务关闭强制检测,在对象与服务对象定义里用passive_checks_enabled域来控制。
外部应用通过写入一个PROCESS_SERVICE_CHECK_RESULT外部命令到外部命令文件中来告诉Nagios提交了一个强制检测结果。
命令的格式是:
[<timestamp>] PROCESS_SERVICE_CHECK_RESULT;<host_name>;<svc_description>;<return_code>;<plugin_output>
参数说明:
- timestamp是一个time_t格式的时间戳来表征检测动作的时间,注意有在方括号的右侧有一个空格;
- host_name是主机与服务对象定义里的短名称;
- svc_description是指定服务对象定义里的服务描述;
- return_code是返回的检测结果(0=正常(OK), 1=报警(WARNING), 2=紧急(CRITICAL), 3=未知(UNKNOWN));
- plugin_output是服务检测的文本输出(如同插件输出)。
注意
外部应用通过写一个PROCESS_HOST_CHECK_RESULT外部命令到外部命令文件中来告诉Nagios提交了一个强制检测结果。
命令格式是:
[<timestamp>].PROCESS_HOST_CHECK_RESULT;<host_name>;<host_status>;<plugin_output>
参数说明:
- timestamp是一个time_t格式的时间戳来表征检测动作的时间,注意有在方括号 的右侧有一个空格;
- host_name是主机对象定义里的短名称;
- host_status是主机的状态(0=运行(UP), 1=宕机(DOWN), 2=不可达(UNREACHABLE));
- plugin_output是服务检测的文本输出(如同插件输出)。
必须在Nagios提交主机对象定义后才可以提交检测结果;Nagios将会忽略没有最后一次启动后读入的配置文件里所做对象定义的全部检测结果。
与自主检测不同,Nagios(默认)不会在强制检测时尝试判定主机是宕机(DOWN)或不可达(UNREACHABLE)。Nagios把强制检测结果当做真实的主机状态,并且不会使用网络可达性检测逻辑来判定主机的真正状态。如果是想对远程主机的强制检测进行判定时将会导致问题,同样,在一个分布式监控环境下因父/子节点的关系不一样时也会有问题。
可以设置令Nagios在强制检测的状态是宕机(DOWN)/不可达(UNREACHABLE)时变换到一个“合理”的状态,通过设置translate_passive_host_checks变量来做变换即可,更详细地关于如何设置它的信息可以查阅这篇文档。