蜜罐背后的影子系统探秘
作者:糖果
一般场景下我们会在内部部署蜜罐系统,当外部有渗透时,碰到蜜罐就会报警,蜜罐会去检索攻击源的位置,确定别攻击机器的IP端口,取得payload数据,配合IDS我们可以捕获事件的过程,然后采取对应防御措施。
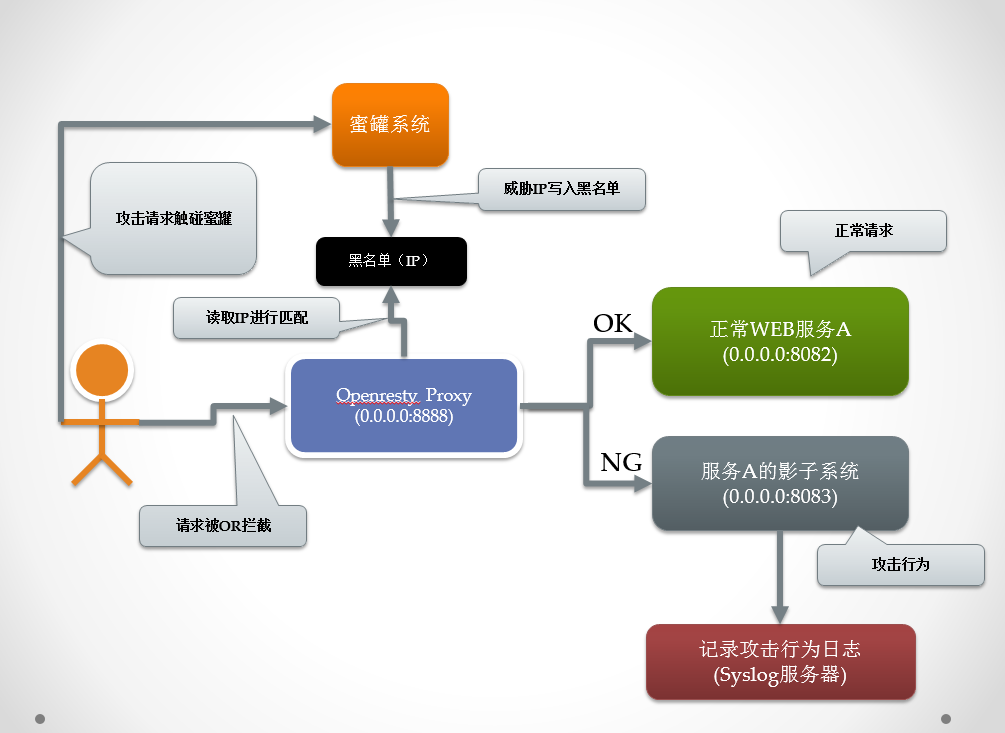
还有一种办法,我们可以在蜜罐被触碰的时候,把流量引入到一台具体的机器上,伪装成一个正常的服务,像侦查机一样,收集攻击服务。我们以WEB服务为例,有一个接近真实的HTTP服务器,主动或是被动的配合蜜罐收集更多的数据,当蜜罐发现威胁IP时,运用动态迁移技术,将威胁服务引到到一个提新预备好的WEB服务,记录攻击行业,还原威胁事件。
负载均衡和灰度测试的WEB服务就是根据特定的用户和被访问机器的负载情况,决定将用户的请求切入到那台服务上。我们也用这种技术, 对有可以行为的攻击请求,进行环境切换。
我们用Openresty的上流反向代理来实现这种模式。
1.基础环境安装
系统最主要依赖的软件就是Openresty,Openresty的安装如下:
1.1 安装依赖软件
sudo apt-get install libreadline-dev
sudo apt-get install libncurses5-dev
sudo apt-get install perl
sudo apt-get install make
sudo apt-get install build-essential
sudo apt-get install luasec
sudo apt-get install openssl
sudo apt-get install libssl-dev
1.2 下载Openresty
wget https://openresty.org/download/openresty-1.11.2.2.tar.gz
tar xzvf ngx_openresty-1.11.2.2.tar.gz
1.3 安装Openresty
cd xzvf ngx_openresty-1.11.2.2
./configure
make
make install
1.4 配置Openresty
export PATH=/usr/local/openresty/nginx/sbin:$PATH
nginx -v
2. 首先我们用Openresty、Lua快速构建一个WEB服务
2.1 安装一个演示用的Lua Web框架,名叫blues
git clone https://github.com/shengnoah/blues.git
cd blues
sudo sh install.sh
2.2 创建一个openresty web项目
hi new ghost
2.3 配置web服务
#generated by `web framework blues`
# user www www;
pid tmp/dev-nginx.pid;
# This number should be at maxium the number of CPU on the server
worker_processes 4;
events {
    # Number of connections per worker
    worker_connections 4096;
}

http {
    # use sendfile
    #sendfile on;
    # include #NGX_PATH/conf/mime.types;
    # framework initialization
    lua_package_path "./app/?.lua;/usr/local/hi/fw/?.lua;/usr/local/hi/libs/moon/?.lua;./?.lua;/usr/local/hi/?.lua;/usr/local/hi/?/init.lua;;";
    lua_package_cpath "./app/library/?.so;/usr/local/hi/fw/?.so;/usr/local/hi/libs/moon/?.so;/usr/local/hi/?.so;;";
    lua_code_cache off;
    #LUA_SHARED_DICT
    lua_shared_dict g_waf 10m;

    upstream backend {
        server 0.0.0.0;
        balancer_by_lua_block {
            require "balancer"
        }
    }


    server {
        listen 8082;
        location /{
            content_by_lua '
                ngx.say("candylab.net 8082")
            ';
        }
    }

    server {
        listen 8083;
            location /{
                content_by_lua '
                    ngx.say("candylab.net 8083")
            ';
        }
    }

    server {
        # List port
        listen 8888;
        #set $template_root '';
        location / {
            proxy_pass http://backend;
        }

        access_by_lua '
            local blues = require "app"
            blues:run()
        ';

        location /static {
            alias ./app/static; #app/static;
        }


        # Error log
        error_log logs/dev-error.log;
    }
}
3. 实现影子系统切换逻辑
我们创建了3个监听服务,端口分别是8888、8082、8083,8888是主代理服务,当请求过来时,判断当前的请求IP是否被识别出蜜罐、IDS发现的威胁IP。
我们主要通过在by_balancer阶段对访问者的IP与蜜罐的威胁情报进行碰撞,发现当前访问的IP在封禁列表里,就直接将这个用户请求切换到影子系统。
然后我们在影子系统里手机这个用户的情报。
3.1 服务切换逻辑
local balancer = require "ngx.balancer"
local buffer = require "buffer"
local iplist = buffer.gett("blockip_list")
local c_ip = ngx.var.remote_addr
local flg = 1

for k,v in pairs(iplist) do
    ngx.log(ngx.ERR, "block_ip=", v)
    if v == c_ip then
        flg =2
        break
    end
end

local port = {8082, 8083}
local backend = ""
ngx.log(ngx.ERR, "flg=", flg)
backend = port[flg]
ngx.log(ngx.ERR, "backend=", backend)
local ok, err = balancer.set_current_peer("127.0.0.1", backend)

if not ok then
    ngx.log(ngx.ERR, "failed to set the current peer: ", err)
    return ngx.exit(500)
end

ngx.log(ngx.DEBUG, "current peer ", backend)
3.2 黑名单维护逻辑 一般创建一个nginx项目,需要手动创建目录和配置文件,我们通过blues框架简单的就创建一个APP,blues实现了比较基础的库,比主说路由,JSON处理等库。这样一来,实现一个的封禁IP的存储逻辑就很简单了。
local bjson = require "utils.bjson"

local app = require "blues"

app:get("/blues", function(self)
    return "blues"
end)

app:get("/json", function(self)
    local t = bjson.decode(self.req.body)
    return t
end)

app:get("/setlist", function(self)
    local buffer = require "buffer"
    local t = bjson.decode(self.req.body)
    buffer.sett("blockip_list", t)
    return "done !"
end)

app:get("/getlist", function(self)
    local buffer = require "buffer"
    local iplist = buffer.gett("blockip_list")
    for k,v in pairs(iplist) do
        ngx.say(v)
    end
end)

return app
4. 模拟攻击访问
4.1 原理流程图

我们测试通过一个REST接口,在共享的字典里加入一个封禁的IP,这个IP的主要来源就是蜜罐报警给出的,我们通过一个人为的REST设定时你要测试的IP,最直接的测试,就是从日志里选出一个IP,比如“10.236.66.29”,当发现有这个来了,就直接把请求引入到8083这个服务,而如果正常的用户IP是不会加上封禁列表里。
我们直接给8888服务发送一个REST请求,通过Blues框架提供的的功能,记入到封禁列表里。
为了简单演示,我们的upstream使用的是同一台机器,但真的影子系统,需要把影子系统直接变为别的机器会是docker,或是docker套docker,docker里用openresty放影子系统。
4.2 封禁IP
4.2.1 我们通过setlist接口添加模拟封禁IP
curl -X GET http://0.0.0.0:8888/setlist -d '{"1":"xx.xxx.69.84"}'
4.2.2 显示封禁列表
通过getlist,显示当前系统内的封禁IP列表。

4.2.3 验证是否切换到影子系统
国为xx.xxx.69.84是客户端IP,当再次访问时,请求就被引导到影子系统 8083端口服务上了。
4.3 解禁IP
4.3.1 通过setlist接口重置封禁IP
curl -X GET http://0.0.0.0:8888/setlist -d '{"1":"xx.xxx.69.85"}'
4.3.2 显示封禁列表

4.3.3 验证是否切换到影子系统
我们可以看到,当封禁列表里IP与当前测试客户端的IP不匹配时,用户会引导到正常的服务端口上,不会再被引入的影子系统。

4.4 存储攻击行为日志到syslog服务器 用户的请求数据在Openrsety的日志中都可以看到,可以在Openresty里,直接配置把日志发送到远端的syslog服务器上,只要在配置文件里加入下面的代就可以:
log_by_lua '
                local logger = require "resty.logger.socket"
                ngx.log(ngx.ERR, "Test Syslog: ", "call")

                if not logger.initted() then
                    local ok, err = logger.init {
                        host="127.0.0.1",
                        port=810,
                        sock_type="udp",
                        flush_limit = 1,
                    }

                    if not ok then
                        ngx.log(ngx.ERR, "failed to initialize the logger: ", err)
                        return
                    end

                end

                -- construct the custom access log message in
                -- the Lua variable "msg"
                local bytes, err = logger.log("test")

                if err then
                    ngx.log(ngx.ERR, "failed to log message: ", err)
                    return
                end

            ';
而具体要传入什么数据到syslog服务器都是可以定制的,下面具几个常字段的例子:
 -- construct the custom access log message
                local url = ngx.var.uri
                local method = ngx.req.get_method()
                local headers = ngx.req.raw_header(true)
                local params_var = ngx.req.get_uri_args()
                local client_ip = ngx.var.remote_addr
                local body_var = ngx.req.get_post_args()
                local user_agent = ngx.req.get_headers()["User-Agent"]
                local referer = ngx.req.get_headers()["Referer"]
                local cookies = ngx.req.get_headers()["Cookie"]
4.5 把Openresty代理部署到Docker上
4.5.1 拉取较新版本的docker
docker pull openresty/openresty:1.9.15.1-trusty
4.5.2 本地端口映射
#!/usr/bin/env bash
docker run -d --name="nginx" -p 8080:80 -v $PWD/config/nginx.conf:/usr/local/openresty/nginx/conf/nginx.conf:ro -v $PWD/logs:/usr/local/openresty/nginx/logs openresty/openresty:1.9.15.1-trusty
4.5.3 极简化配置
worker_processes  1;
error_log logs/error.log;

events {
    worker_connections 1024;
}

http {
    server {
        listen 80;
        location / {
            default_type text/html;
            content_by_lua '
                ngx.say("<p>candylab.net</p>")
            ';
        }
    }
}
4.5.4 停止docker服务
#!/usr/bin/env bash
docker kill nginx && docker rm nginx
4.5.5 提交docker
docker commit xxxxxxx  candylab/openrestytest
docker push candylab/openrestytest
之后可以实践将各种影子系统放到docker里。
5. 总结
这个影子系统只是做了web方式的系统,如果用户的请求不是http请求,我们也可以做出相应的影子系统,限于篇幅就介绍7层的影子,之后还会介绍tcp协议的影子系统的思路,本文代码只是说明逻辑思路流程,具体功能丰富,还要后续自己润色,关于用Openresty搭建web服务的更细节的内容,请参考资料中的连接。
6.资料
Openresty以及Blues框架的下载的位置是:
https://www.openresty.org
https://github.com/shengnoah/blues.git
http://openresty-reference.readthedocs.io/en/latest/
https://www.openresty.com.cn